Jump to content

Storyboard Artwork Project/Using 2D software

From Wikiversity


These lessons are ready for a test drive.


How to create 2D stamp artwork for the Storyboard Artwork Project

Creating Stamps with 2D software

You can create 2D drawings with pen and ink or any of a wide variety of 2D drawing programs.

Inkscape
Inkscape is professional quality vector graphics software which runs on Windows, Mac OS X and Linux. It is used by design professionals and hobbyists worldwide, for creating a wide variety of graphics such as illustrations, icons, logos, diagrams, maps and web graphics. Inkscape uses the W3C open standard SVG (Scalable Vector Graphics) as its native format, and is free and open-source software.
ArtRage
ArtRage 2 and ArtRage FREE are easy-to-use programs for creating 2D still artwork of human figures which look realistic. ArtRage has paid and free versions which run on Windows and Mac.
ToonBoom
ToonBoom has a free trial disk which can create 2D vectored artwork. The program is fully working for 30 days. It runs on Windows and Mac.
Flash
Flash has a demo version. It runs on Windows and Mac.
Illustrator
Adobe Illustrator has a demo version. Illustrator runs on Windows and Mac.
Draw the model

Three Views

For a simple set of stamps, create three views of the figure (or more). All you do is draw the figure on an empty background. Position the figure in a natural pose with the mouth slightly open. That way, it can be used in shots where the person is both not talking and talking.

The pictures should be at least 600 pixels tall.

For the storyboards of the short motion picture "Seduced by the Dark Side!" which talks about the meaning of life and the movie "Star Wars", Wikiversity Film School needs stamps of a young person and an old person. We need both a set of stamps full height (as shown here) and a set of stamps for a medium shot (the upper half of the body.)

The angles
The minimum positions
  • Front (45 degrees)
  • Side (90 degrees)
  • Back angle (135 degrees)

Optional: Straight on front Optional: Straight on back


Cartoon Solutions
A sample of a 2D figures can be found at Cartoon Solutions.
Crop the stamps with Photoshop

Crop and mask the images

In a program such as Photoshop, crop the images and add a mask (alpha channel) to create the stamp. Save the images as PNG files and upload to Wikiversity.
You can test your stamps by downloading the FREE Tux Paint program and putting your stamps in the stamp folder.
If you have trouble with any of this, I will help you. Simply email me and we will figure something out.
Stamps for use in Tux Paint

The completed stamps

Here are the completed stamps after cropping and masking. Click on the picture to go to the original which will be full size. (The images shown here are are only miniatures.)

When you are done

Send me your drawings

Upload the drawings or send them to me.
Once you have created a set of 2D stamps, please tell us how you did it. Write here or email me.
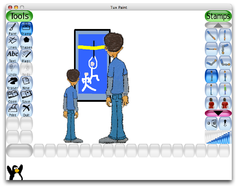
Two people look at the movie poster

This storyboard was created with stamps in just a few clicks of the mouse. The figure on the left is drawn smaller than the figure on the right so it looks like a young boy. (Time to draw this picture was about 2 minutes. This makes storyboarding very fast.)

Created in Tux Paint


A very simple drawing using 2D stamps


Don't do this!

The limitations of Tux Paint

Draw only whole figures

Tux Paint has limitations so you must take care. Only create whole images, not parts to be assembled.
Other programs work differently, Artwork for ToonBoom is always drawn in pieces. The program can handle this.
Not so in Tux Paint. Tux Paint cannot assemble pieces of art. (It is a scaling problem.)
Mismatched pieces

The arms do not match

Tux Paint cannot magnify or shrink different stamps equally. If you create arms and you create a figure without arms, the two will not match in size in Tux Paint.

In the scene above, the arms do not match the body even though they started out at the correct size.

Index

The lessons in the Storyboard Artwork Project

The introduction

1. The artwork needed for storyboarding
2. How to create stamps for Tux Paint
3. How to create artwork for storyboarding in Tux Paint using 2D software ← You are here!
4. How to create artwork for storyboarding in Tux Paint using 3D software
A. How to create blank storyboard frames for Tux Paint ← This page is optional.
B. How to create background scenery for Tux Paint Storyboards ← This page is optional.

The completed rubber stamps for Tux Paint

Storyboard Artwork Project/Stamps ← See the completed stamps here!

Contact the project co-ordinator