Web Science/Part1: Foundations of the web/Ethernet/Summary, further reading, homework
Summary, further reading, homework
Learning goals
In general you can use the edit button in the upper right corner of a section to edit its content.
Video

Script
Exercises Part 1: Foundations of the Web
[edit | edit source]In the exercises to the first (technical) part of our lesson, we will do various experiments on a simulated network. Therefore, we need a couple of tools.
- VirtualBox: The network simulations is backed by VM running in virtual box.
- GNS 3: The network simulation tool we use.
- Wireshark: As packet analyser.
- Various linux commandline tools
Setup of the experiment environment
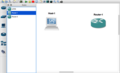
[edit | edit source]In order to setup the experiment environment you first have to install VirtualBox, GNS 3 and Wireshark. All tools are free and available for Windows/Linux and OSX. You can decide to set the experiment environment (namely the network) from the scratch, some information about how to do that can be found [#Detailed Documentation here] or you download and import the setup we provide for you. Therefore download the .zip file and unpack it. Inside you'll find a file called Appliance.ova and a folder called ItWS_exercise_full. The Appliance.ova file is an open visualization format file containing all VMs needed for the simulation, it can be imported directly into VirtualBox. The folder contains the GNS3 project, you can open it from within GNS3. The only thing you'll have to do is to alter the general settings of GNS3 to match your system paths to VirtualBox and Wireshark if any problems occure. After you have setup and configured everything the main window in GNS3 should look something like that.

Tools used in the Experiments
[edit | edit source]If you decided to use your experimental setup, we already installed the required tools to the VMs. If you build the environment from the scratch, do not forget to install them. Usually for most of these tools and as long as our operation system has man install a man-page is provided for this tools, that helps you with the usage and command line options. Most man pages can also be found online and many of the tools also provide help if you call them with '-h' or '--help' as parameter.
ping
[edit | edit source]With ping you can test reachability of a known server (ip address) and measure the round trip time.
arp / arping
[edit | edit source]Arp and arping are tools build around the (A)ddress (R)esolution (P)rotocol. Arp allows you to inspect and manipulate the local ARP cache and arping to manually probe and discover hosts.
nmap
[edit | edit source]NMap (Network Mapper) is a network security scanner. Zenmap provides a gui for nmap.
traceroute
[edit | edit source]With traceroute you can trace the route to a given host.
whois
[edit | edit source]Whois is a client for the whois directory service. That helps you to find out about server on the internet.
netcat
[edit | edit source]With netcat or nc you can easily read from or write to networking conncetions (tcp and udp). You can manliy use it to analyse and debug network connections.
tcpdump
[edit | edit source]Tcpdump is a packet analyzer. It allows to capture the network traffic of an specific interface an provides various filter facilities. Wireshark provides a gui for tcpdump.
host / nslookup / dig
[edit | edit source]Host, nslookup and dig are tools that allow to manually do DNS queries.
Documentation
[edit | edit source]Tiny Core Linux
[edit | edit source]All virtual machines (VMs), we provide to use in our exercise to run routers, servers and clients base on Tiny Core Linux (TCL) a minimalistic Linux distribution.
Building TCE VirtualBox Image
[edit | edit source]If you like to build your own TCL images to run other machines than the provided in your simulated network, here is a short intro how to setup a plain TCL image for virtual box.
- Download a TCL image, i recommend to go for some version 4.x, because for later versions not all packages are provided.
- Just create a new VM in VirtualBox.
- Select 'Linux' as type and 'Other Linux (64Bit)' as version.
- TCL needs at least 48 MB of ram, if you like to run more like a gui or a service such as a webserver, go for more ram, 512 MB are more than sufficient for most jobs.
- Create a virtual harddrive, VDI as format is sufficient and i prefer dynamically allocated. Choose a maximum size.
- Run the machine and select the downloaded image as virtual optical disk file
First you'll see a prompt for the boot options. Just press 'enter'. Next the basic system will boot. In order to install the basic system to the just created harddisk, we have to perform several steps:
- Download a disk partitioning (cfdisk) tool and a bootloader (grub) using tce-load.
tc@box:~$tce-load -wi cfdisk
tc@box:~$tce-load -wi grub-0.97-splash
- You can also use the tce app browser, if you like to search for packages or does not know the package name.
tc@box:~$tce-ab
- Now we are ready to partition and format the disk. therfore we fist change to superuser
tc@box:~$sudo su
- Lets have a look at all available disks.
root@box:~#fdisk -l
- We can see that there is only one disk, namley '/dev/sda', which is not partitioned yet. Lets partition it.
root@box:~#cfdisk /dev/sda
- Go for 'New' -> 'Primary' -> 'Whole Disk (size as presented)'. Once created make it 'Bootable', you can see it under flags and finally 'Write' all changes to the disk.
- Running 'fdsik -l' again, now shows us that disk '/dev/sda' now has a partition '/dev/sda1'.
- Now, we have to format the disk, therefore we use 'mkfs.ext4' in order to format the partition to the ext4 filesystem. You can go for any other filesytem by using other 'mkfs.' commands.
root@box:~#mkfs.ext4 /dev/sda1
- Now lets mount the partition. First we have to generate an entry in '/etc/fstab'. Then we can mount both, the newly created partition and the cd, we booted from.
root@box:~#rebuildfstab
root@box:~#mount /mnt/sda1
root@box:~#mount /mnt/sr0
- Now, we have to create some directories on the newly mounted disk. We need 'boot/grub' and 'tce/optional' as directory structures on the disk. We use the -p parameter, to be able to create the whole directory structures at once.
root@box:~#mkdir -p /mnt/sda1/boot/grub
root@box:~#mkdir -p /mnt/sda1/tce/optional
- Lets copy all necessary files from the mounted cd to our new disk. We use the -p parameter to preserve permissions, if possible.
root@box:~#cp -p /mnt/sr0/boot/core.gz /mnt/sda1/boot/
root@box:~#cp -p /mnt/sr0/boot/vmlinuz /mnt/sda1/boot/
root@box:~#cp -p /usr/lib/grub/i386-pc/* /mnt/sda1/boot/grub/
- Create a grub menu
root@box:~#vi /mnt/sda1/boot/grub/menu.lst
- Add the following lines to the file
default 0
timeout 0
title TCE
kernel /boot/vmlinuz
initrd /boot/core.gz
- create a file for persitence data
root@box:~#touch /mnt/sda1/tce/mydata.tgz
- Now, we can write the bootloader to the master boot record (MBR) on the disk.
root@box:~#grub
- In the grub prompt
grub> root (hd0,0)
grub> setup (hd0)
grub> quit
- Setup finished, now we can reboot the machine, first remove the disk from virtual drive.
Persistence
[edit | edit source]IMPORTANT
The current installation is not persistent, all changes you make on a running system will not persist a reboot/shutdown of the machine. In order to make changes persistent, you have to make a backup of the current changes. Backups are made with the script 'filetool.sh'
tc@box:~$sudo filetool.sh -b
Not all changes are under backup by default. In the file '/opt/.filetool.lst' you can add directories or files that should be backed up. In '/opt/.xfiletool.lst' you can explicitly exclude directories or files from backup.
Keymaps
[edit | edit source]By default, TCE uses a US keymap in order to change this you can download the kmaps package and load an alternative keymap
tc@box:~$tce-load -wi kmaps
tc@box:~$sudo loadkmap < /usr/share/kmaps/qwertz/de-latin1.kmap
In order to load a keymap or any other thing at boot, you can add this line to '/opt/bootlocal.sh' a script that will be run at boot. For the keymap from our example just add:
loadkmap < /usr/share/kmaps/qwertz/de-latin1.kmap
Required Software
[edit | edit source]Not all the tools required for our experiments is already installed on a fresh TCE system, so don't forget to install the required tools using the tce packet manager.
tc@box:~tce-ab
Network Simulation Environment
[edit | edit source]In our exercise, we will use a software stack based on GNS3, as network simulator, with VirtualBox, as virtualization backend, and Wireshark as packet analyzer. All programs are available for Linux as well as Windows and OSX. We will use GNS3/VirtualBox to simulate different network setups and Wireshark to inspect traffic in the simulated Networks. All components used in our simulations (Hosts, Router), will run on Tiny Core Linux. As router software, we will use Quagga, a routing software suite for Unix platforms.
VirtualBox Setup
[edit | edit source]These are just the basic steps to setup our exercise environment. You should always follow the installation instructions specific to your operating system. Here, you can find detailed installation instruction for an environment similar to the one we are using for Xubuntu Linux. Download and install required software:
- Download GNS3 here. You have to create an account or you can login via Facebook. The software itself is completely free and under GPL v3 license.
- Download VirtualBox here. The Software is completely free and under GPL v2 license.
- Download Wireshark here. The Software is completely free and under GPL license.
Download host and router images:
Setup Host and Router virtual machines (VM):
- Open VirtualBox Application
- Create a new VM. Click on 'New'.
- In the 'Name and operating system' tab, name your machine with a meaningful name, e.g. Host-1, Router-1. Go for 'Linux' and 'Other Linux (64-Bit)'.
- Next tab, for hosts we recommend 64MB Ram and for routers 128 MB Ram.
- In the 'Hard drive' tab choose 'Use an existing virtual hard drive file' and choose the router- or host-image as file.
- Once a machine is created, select it and click on settings. Select 'Network -> Adapter1' and select 'Not attached' under attached to.
- Once one host/router is created, you can create additional hosts/routers by cloning.
- 'Right-click -> Clone...' Name it and select 'Reinitialize the Mac address of all network cards'.
- Select 'Full clone'.
-
 Main view of VirtualBox, all VMs.
 -
 Step one of the VM creation process.
 -
 Step two of VM creation, Ram.
 -
 Step three of VM creation, Hard drive.
 -
 VB Network Settings
 -
 Cloning, first step, name and select.
 -
 Cloning, second step, full clone.


GNS3 Setup
[edit | edit source]Setup GNS3 VirtualBox integration:
- Open GNS3 Application
- Go to Preferences -> VirtualBox -> VirtualBox VMs and create your VMs.
- Click 'New' and select VM from the VM list. The following can also be edited post-creation.
- General Settings: Select 'Enable remote console', 'Start VM in headless mode'
- Select Adapters and Type, e.g. 1 adapter and '82540EM' for hosts or 8 adapters, '82543GC' for routers.
- You can customize Machine symbols, e.g. for routers, by right-click the machine.
-
 GNS3 the main window.
 -
 Setup a VirtualBox VM in GNS3.
 -
 General settings of VirtualBox VM in GNS3.
 -
 Customize router symbol


First Experimental Setup
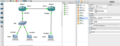
[edit | edit source]The example contains 3 Networks. The first network (10.0.100.0/24) consists of two hosts (Host-1 (10.0.100.2) and Host-2(10.0.100.3)) and a router (Router1(10.0.100.1)), all components are connected via a switch. The second network consists of one host (Host-2(10.0.200.2)) and one router (Router-2(10.0.200.1)). The third network connects both routers (Router-1(10.0.1.1) and Router-2(10.0.1.2)).

Setup Network in GNS3
[edit | edit source]Create all required VMs in VirtualBox, as described above. Then integrate those VMs in GNS3. Change the symbol for the routers. These are the basic steps to create devices in your network and connect the 'physically' in the simulation. Lets Start with two basic VMs, we have learned to setup above. A host VM called 'Host-1' and a router VM called 'Router-1'
- Creating host and router.
- Click on the computer symbol on the left, select a host (Host-1,Host-2, or Host-3)and drag it into the main window.
- Click on the router symbol on the left select a router (Router-1 or Router-2) and drag it to the main window.
- Connect host and router
- Select the connection symbol on the left, then click on the host (order is irrelevant) and select a NIC (in this case only e0 is available).
- Drag a line to the router and select a NIC (we go for e0 again).
Now that we know how to create and connect network components, we can create our example network. Then, we can start our fist simulation. Click on the start button in the topbar of GNS3. The green lights next to the devices indicate that everything is running.
-
 Net setup host
 -
 Net setup router
 -
 Net setup, connect host NIC
 -
 Net setup, connect router NIC
 -
 Example setup all machines running.


Host and Router configuration
[edit | edit source]All components are wired and up and running. Now we can configure our network.
- Open a terminal for all VMs. Click the terminal symbol in the top bar.
- Login to the VM. User: 'tc', no pwd
Make changes persistent
[edit | edit source]All changes made via commandline in the VM are not persistent. In oder to make any changes persistent, you have to backup these changes. Under '/opt/.filetool.lst' you'll find a list of all directories and files that are under backup currently. To make the previous changes (IP and routes) persistent, you'll have to add the commands the file '/opt/bootlocal.sh', so that they are performed on every bootup. And then perform a backup with:
tc@box:~$ filetool.sh -b
After every change in configuration don't forget to make a backup otherwise your changes are lost after a restart.
Host configuration
[edit | edit source]On the hosts, we have to setup an IP address and define a route. The following command executed on Host-1, assigns the ip address '10.0.100.2' to the interface 'eth0' which connects Host-1 to Router-1.
tc@box:~$ sudo ip addr add 10.0.100.2/24 broadcast 10.0.100.255 dev eth0
This line sets the default route via gateway 10.0.100.1 (Router-1) connected on eth0.
tc@box:~$ sudo ip route add default via 10.0.100.1
Router configuration
[edit | edit source]The routers are also running Tiny Core Linux and additionally Quagga as router software suit for Unix based systems. Quagga is an Open Source providing implementations for several routing algorithms as, e.g. OSPFv2 or BGP-4. Quagga provides us with an integrated shell 'vtysh'. In the official Quagga wiki and this blog post are good staring point if you want to know more about Quagga and Vtysh in particular. You can also refer to the Cisco IOS (Internetwork Operation System) command reference, because vtysh commands are based on the Cisco IOS ones
Configure a OSPF Router
[edit | edit source]On the router all IP related configurations are made via the vtysh console. The only thing, we have to do in the '/opt/bootlocal.sh' file, is to disable the dhcp client on startup. Therefore add the following line to the end of this file.
sudo pkill udhcpc
In our first example, both routers are running the OSPF routing algorithm. In order to configure the router software suit open the vtysh console.
tc@box:~$ vtysh
Hello, this is Quagga (version 0.99.22.4).
Copyright 1996-2005 Kunihiro Ishiguro, et al.

box#
Now, we have to enter configuration mode with 'configuration terminal' (or 'conf t'). The vtysh shell support 'tab' autocompletion, using the '?' in any situation provides you with information about all possible or the actual command.
box# conf t
With the 'exit' command, we can exit from the actual mode and finally quit the shell.
box(config)# exit
In order to configure the two interfaces, eth0 (10.0.100.1) and eth7 (10.0.1.1) on our router (Router-1). We first have to select an interface with 'interface eth0' (or 'int e0'):
box(config)# interface eth0                                               ! select interface eth0
box(config-if)# ip address 10.0.100.1/24                                  ! assign ip address and subnet-mask to selected interface
box(config-if)# exit
box(config)# interface eth7
box(config-if)# ip address 10.0.1.1/24
box(config-if)# exit
Configure OSPF routing
box(config)# router ospf
box(config-router)# network 10.0.1.0/24 area 0                           ! define the network ant authentication area
box(config-router)# redistribute connected                               ! advertise all connected routes (= directly attached interfaces)
box(config-router)# exit
box(config)# exit
Save configutaion:
box# write
Don't forget to backup your configuration now, otherwise it will be lost after restart.
Check the setup
[edit | edit source]Now that both host and router are configured, we can check basic connectivity. Login to your host and try to ping the interface of the router. If needed, you can kill running programs by pressing 'ctrl-c'.
tc@box:~$ ping -c 1 10.0.100.1     ! ping the IP address 10.0.100.1 (using flag '-c 1' will tell ping to send only one packet)
tc@box:~$ ping  1 10.0.1.1         ! ping 10.0.1.1 until interrupted
Capture and Analyse Network Traffic
[edit | edit source]Python
[edit | edit source]The anaconda installation, we are using throughout this tutorial is using Python 3.4 as basis. Due to version conflicts between the different versions of python, we highly recommend to use a python version above 3, preferably 3.4 or higher. Python can be downloaded and installed directly from the python project website or using our packet manager if your OS supports it (e.g. for the different linux distributions various .deb /.rpm packages exist). If you plan to install anaconda, you do not have to install python separately, anaconda ships with the right python version included.
Anaconda / Conda
[edit | edit source]PyCharm
[edit | edit source]Old Stuff
[edit | edit source]- Search for a MAC Address OUI.
- Compare Ethernet and Token Ring frame formats. Which fields are included in both formats? Which fields are unique to one format or the other?
- Compare Ethernet and Point-to-Point Protocol frame formats. Which fields are included in both formats? Which fields are unique to one format or the other?
- Review Wireshark: Ethernet.
- Use Wireshark to capture and analyze Ethernet traffic.
- Review Wireshark: WLAN Capture Setup.
Quiz
Further reading
- Bruce Hartpence video lectures:
[http://www.youtube.com/watch v=UDxBEo9G5Hw ethernet part1] and [http://www.youtube.com/watch v=1oeC6PFHp2o ethernet part2]
- Link Layer in Wikipedia
- Link Layer section in Internet Protocol Analysis course
- Communication over a shared medium