
MakerBot/Hardware
What to Worry About
[edit | edit source]The single biggest problem is the wire (PLA) stops moving. The print head starts printing nothing ... but continues to move around without knowing that nothing is coming out. There are three things that can cause this:
- Build plate is not level and then nozzle has clogged (serious)
- PLA was broken off inside the print head in an attempt to change the filament.
- PLA wire has tired itself in a knot. The stepper motor can not pull it any more.
The last one is easy. Untie the knot and load the PLA (see changing filament below). The first two are going to surface when filament can not be inserted into the print head (see changing filament below). Stop when this happens and find a lab aid/instructor for guidance.
Theory of Operation
[edit | edit source]PLA is melted at the last moment and then cooled as quickly as possible. Stopping the PLA is where most of the problems occur. PLA burns when sitting still at the printing temperature (230°C). When it burns it turns into a hard clay that further heating to 230°C does not melt. But stopping and starting the flow of PLA out of the nozzle is a big part of printing. So the PLA is melted at the last moment and instantly cooled. This is why there are fans directing cold air on the nozzle tip.
Hardware
[edit | edit source]Congratulations! you're half way done! Now that you have your file on an SD card, you just have to print it.
Write in the print queue
[edit | edit source]It is rare that the makerbot is not printing something. In order to get your object printed, you must describe your object so that others will print it.
The print queue looks a spread sheet with these columns:
| owner name | sd card number | File name | Estimated print time | Actual print time |
|---|
The purpose of the print queue is to discourage people from hogging the 3D printer.
The general idea is that an instructor, lab aid or certified makerbot user will notice the printer is finished. They will look look through the print queue, look at the current time of the day, and then print something to keep the printer running. If it is 3pm and there is a job that is going to take 20 minutes, another job that is going to take 8 hours, and another that is going to take 3 hours, they make a decision that minimizes down time.
Choosing your build surface
[edit | edit source]Printing on different build platforms can be tricky, but aid greatly in your object's ability to stick to the build plate, and or make it easier to remove when you are done.
Your choices are:
1. Double sided sticky tape: ADVANCED USERS ONLY. Very difficult to level the build plate. Very hard to remove, and can leave residue on your finished part. Does hold the object fairly well. Using a raft is preferable to double sided sticky tape...
2. Blue painter's tape: Sticks better than bare, removes easier than bare. Need to replace roughly every other build.
3. Bare (plexiglass): Harder to remove than masking tape, does not stick as well as masking tape. Use Blue painter's tape.
-
 Double sided sticky- mid print
 -
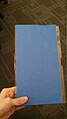 Blue painters tape
 -
 Bare
Bare


Level the build plate!
[edit | edit source]Leveling the build plate has nothing to do with bubbles moving around in a liquid. It has nothing to do with gravity. The XY plane the print head travels on must be parallel to the plane of the build plate.

It's difficult to explain the process, but this is the most crucial part to keeping the printer working. It is best to error with the nozzle to far above the build plate. A nozzle too close to the build plate will cause the nozzle to clog.
If the nozzle is too far above the build plate, then the raft/object will have trouble sticking to the build plate. This is why watching the first few layers is very important. If it doesn't stick lower the build plate a little.
Words can not describe how to do this. Brass shims are being purchased so that this process becomes more precise.
Leveling the build plate doesn't take that long. The screws compress springs underneath the build plate to lower it, or release spring to raise it. This makes the screw directions opposite of most people's intuition.
The time it takes to level the build plate is not that long. It will get faster with practice.
What can cause the build plate to not be level anymore? Removing the build plate to get something off of it. Pushing on it while removing an object. Physically pushing the build plate around instead of jogging with the front control panel.
Leveling Steps
[edit | edit source]From the makerbot's home display, select "Utilities" then "Level build plate" It gives you a step by step instructional.
Use a piece of paper as the spacing gauge, a yellow post it note works great, Printer paper also works, and Bugs hacker-space recommends a crisp dollar bill.
Adjust the knobs such that there is NO resistance in sliding the paper between the build plate and the nozzle, but is as close as possible. Printing too far will make it such that the print does not stick to the build plate, but printing too close will clog the print head
For first time users, I recommend calibrating further away by adding a quarter turn to each knob, and printing with a raft. The raft ensures a good stick to the build platform, and ensures there are no discrepancies in how level the build plate is.
Extrude for 30 seconds
[edit | edit source]The biggest problem is the nozzle becoming clogged. The fancy $15K 3D printers have a timer that automatically starts to extrude after a period of time. If the makerbot has been sitting used, cooled down, it is best to warm it up by extruding for 30 seconds. This is cleans out any PLA that is starting to bake into a hard brick that clogs the nozzle. The PLA bakes when cooling down.
The easiest way to do this is by going to "Utilities" -> "Change filament" -> "Load" Doing this also turns on pre-heat, so you will be ready to print.
Plug-n-play
[edit | edit source]Put in your SD card if you have not already, hit "Build from SD" -> select the file you wish to print
Watch the first layer
[edit | edit source]The most important layer is the first layer. It is the foundation upon which everything is built. If the first layer comes out properly, the build will likely go as well as it can. If there are any problems with the first layer, the print will fail. Allowing the makerbot to continue printing on a failed first layer will potentially result in the formation of a stringy mass waste of pla, and or a solid glob of pla stuck to the print head that can damage the makerbot.
WATCH THE FIRST LAYER you don't want to be potentially responsible for the pictures below...
-
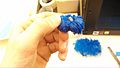 Blob of PLA
 -
 Makerbot printing problems


Aborting Print Job
[edit | edit source]When to abort:
- Abort print job if nothing is coming out of the nozzle.
- Abort print job if dragging blob, hair, or parts around.
How to abort:
- Press arrow to the left of the Makerbot logo on the front panel.
- Printing will pause and a question will be displayed
- Choose the continue or abort/stop/quit option and press M
Moving Platform Manually
[edit | edit source]It is not wise to grab the print head or the platform and force them to move manually. Every motor has electronics that is trying to figure out what the current position is. Moving the motor confuses the electronics. Moving the motor generates spike or surge of energy that the MakerBot has to dissipate. Moving the platform manually requires re-leveling. Re-leveling can require waiting for the print head to cool down.
Use the jog options on the utility menu.
Changing filament
[edit | edit source]There are two danger spots when changing filament:
- Leaving the heater on with nothing moving through then nozzle for an extended period of time
- Breaking filament off in the guide tube when removing it
Leaving the heater on with PLA in the nozzle can bake the filament into flakes that cause clogs.
Sometimes the filament breaks off in a way that enables the new filament to push the break out the nozzle. But in most classes the print head will have to be removed and cleaned by a lab manager/instructor.
This video shows someone pushing down on a lever when changing the filament. This works, but the goal is to change the filament without pushing down on the lever. LOAD and UNLOAD cause a stepper motor to change from pulling to pushing on the PLA wire. Let the stepper motor do it's job when LOADing and UNLOADing filament (PLA).
Lastly, please keep the area clean
[edit | edit source]It's much nicer to work when the space is not cluttered.
 |