User:Kristy.chahil/ENES-100/project 2
Week1 Narrative[edit | edit source]
Build the line following lego mindstorm robot.
software describes how to program the mindstorm to follow line
picture of the line following robot with program
First, I built the line following robot using the website http://www.nxtprograms.com/line_follower/steps.html. While creating the line following robot I documented my progress on my iPhone. The video that I recorded was about 51 minutes. It took me a lot longer than I expected because some of the pieces weren't properly fitting the way they were supposed.
-
 Side view of an assembled line following robot
 -
 Front view of an assembled line following robot


Then, I tried to upload my video to youtube, but that didn't quite work out as well as I had hoped. I went to my gmail account and then clicked on the share option for youtube.com. When I tried to upload my file it said there was an error and it wasn't in the correct format. So then I went back to the upload page and at the bottom I clicked "Have videos longer than 15 minutes" and set up my youtube account so that I could upload videos longer than 15 minutes. Where I started getting frustrated was when I tried to upload it for the second time and it said I need to convert the file as one of the ones below.
-
 Correct video file format

I looked up what file an iPhone creates videos in which is mpeg4. I was confused because my video was already in the proper format yet it didn't upload. I even tried to import my video on my laptop so that I could access it to upload on youtube.com. Next, I tried to download the LEGO MINDSTORMS NXT software so that I could program it to have my robot move in a line. I was able to install the software, but then when I tried to open it an error message popped up saying "you can't open the install application because powerpc applications are no longer supported. I messed around with the software a bit longer. I then downloaded the software two more times and the program was installed, though there was still an issue with trying to open the program so that I could calibrate my robot and have it function. There was a similar error message as previously.
Week2 Narrative[edit | edit source]
I took apart the head of the tribot. Here are before and after pictures of the removal of the face plate.
-
 The Head Of A Tribot
 -
 Disassembled Tribot Head


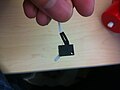
I then tried to figure out how to get the power to the head of the tribot. I followed the ribbon cable consisting of an orange and black wire to the head to see where it was connected to. I realized that it was connected to the a little purple square that is attached to the circuit board in its head.
- 2 ribbon cables, and another black/orange wire travel to the tri-bot head and connect to a small circuit board inside its head
- Ribbon #1 Brown, Red, Orange, Yellow, Green, Blue
- Ribbon #2 Brown, Red, Orange, Yellow, Green, Blue, Purple
- These are marked on the control board with things light R eye, L eye, R ear, etc.
While reassembling the Tribot, I observed the mechanism behind triggering a switch. The spring allows the head to move up & down (bounce) and the switch is turned on and off whenever the head is pushed
-
 Switch
 -
 Spring


I created a page on what the head of a tribot is composed up of.
The Head Of A Tribot Disassembled
|
|---|
|
The head can be taken off and put back on easily. There is a tiny controller circuit board that manages the LED's and eyebrow movement. The face itself is taken off to see the possibilities of LEDs being turned on by the Arduino. There are LEDs for eyes, there is an LED that pops out of the top of it's head, and there are LEDs down around the mouth. The black plastic piece inside the head mates with the back of the face to cause the eye brow movement.
The top of the tribot head can be pushed down to trip a switch. The switch is the white piece of plastic that is either at a 45 degree angle when the head is up, or is vertical when the head is pushed down. There are two white wires attached to this switch. These could be run to the Arduino to add a mechanism to turn off the robot, reset the software, or pause the software instead of pushing the power switch.
The head controller is held on by four screws. The vertical distance between the screws almost matches two mounting holes in the Arduino. Two of the screws can be used to mount the Arduino on the tribot's back.
|


There were a few places where I was frustrated.One of those moments was when I had taken of the four screws surrounding the face plate, but couldn't detach it because it felt like something was still attached to the face plate on the inside. So to fix this problem I tugged on the face plate for about 5 minutes trying to get it move a bit. I tried to take a look inside when I got part of bottom detached to see if anything was still connected though nothing was connected to the face plate. Finally I was able to remove the face plate with some pressure.
Next Step
To check the wire connections in the rest of the tribots.
- Head switch documentation is in the design section "connecting cables to the arduino" ... add your information (picture of spring, etc.) there ... listing the colors of the cables is not useful ... there are already pictures of these cables coming out of the head in design section "connecting the head" ... from your pictures it looks like you have taken the head apart ... I don't see any information about that .. I am concerned it is in pieces and someone else is going to have to put it back together ... lots more difficult ... please post taken apart and putting together pictures ... you mention a circuit board with art work (lettering) on it ... please take close up pictures of it ... you have not linked the colors of the cables to the art work (lettering) on the circuit board ... you have not described mechanically how the ears pop out, how the LED pops up and how they retreat back into the head ... please do this .. 10/10/5 --1sfoerster (discuss • contribs) 22:11, 25 March 2014 (UTC)
Week3 Narrative[edit | edit source]
Over the weekend I tried to get the Lego Mindstorms NXT software to work. I came up with two different options to accomplish this task.
Wine install on Mac
|
|---|
|
I installed the program WineBottler by using the website http://darwine-winebottler.en.softonic.com/mac/download as a starting point. I inserted the Lego Mindstorms NXT cd into the computer's cd-rom to see if the WineBottler program was compatible with the Lego Mindstorms NXT software. I opened up the WineBottler program to see if it would recognize the Lego Mindstorms NXT software and it didn't. There may have been a glitch somewhere or the Lego Mindstorms NXT software may just have been too old to run on the WineBottler program. |
Windows XP Mode Install
|
|---|
|
Since option 1 didn't work out as I had hoped I installed the software Windows XP Mode onto one of the computers in the engineering classroom. To do this I first unfroze the computer. I then downloaded Windows Virtual PC onto the computer using the website http://windows.microsoft.com/en-us/windows7/install-and-use-windows-xp-mode-in-windows-7. The purpose of downloading Windows Virtual PC is that it provides you with Microsoft's visualization environment to run multiple operating systems at the same time on your PC. Windows Virtual PC is a software that lets you run Windows XP Mode on Windows 7. After successfully downloading the Windows Virtual PC I rebooted the computer. I then downloaded Windows XP Mode to the PC using the same website that I used to download Windows Virtual PC since it has separate links to download each of them from that website. Before I could finish downloading Windows XP Mode I had to choose from 2 options regarding which Windows XP Mode I wanted to download and I chose the first one as you can see from the second picture below. Once Windows XP Mode was properly installed on the PC the next step was the setup for Windows XP Mode. I had to go through a process where I had to agree to the Windows XP Mode License Agreement before I continued. After the setup was completed I noticed a screen on the PC computer that displayed a message "What is Windows XP Mode?". This screen just gave me the overall information of what Windows XP Mode is, what it's purpose is, and what it's used for. |
installing old Lego Mindstorm NXT software
|
|---|
|
I then inserted the Lego Mindstorms NXT version 8527 cd into the cd-rom in the PC computer and then under "My Computer" I clicked on the icon for the Lego Mindstorms NXT cd. Once I clicked that the first picture below appeared. This picture shows a picture of the installer initializing the Lego Mindstorms NXT software. The next picture just shows the overall progress of installing the Lego Mindstorms NXT software onto the PC. After Windows Virtual PC and Windows XP Mode was installed on the PC I connected my USB cable to the PC and the line following robot I created using Legos. I then opened up Windows XP Mode by going to the the programs tab, clicked on Windows Virtual PC and then clicked on Windows XP Mode to open it. Then once that was open I went to "My Computer" and clicked the icon for the Lego Mindstorms NXT software. Following that on the home page of the Lego Mindstorms NXT software I clicked on the tab that said "Calibrate". I calibrated the light sensor that is located on the line following robot. |
Next Step For next weekend I plan on installing Windows Virtual PC and Windows XP Mode onto my Mac at home so that I also have access to the program so that I don't have to go back and forth to and from school. I will then use the Lego Mindstorms NXT software to create a path so that the line following robot can follow.
- Wow! Good job ... great documentation 10/10/50 --1sfoerster (discuss • contribs) 13:37, 1 April 2014 (UTC)
Week4 Narrative[edit | edit source]
Over the weekend I tried to install the Lego Mindstorms NXT software onto my Mac by installing Windows Virtual PC and Windows XP Mode.
Windows Virtual PC install
|
|---|
|
Over the weekend I tried to install Windows Virtual PC and Windows XP Mode onto my Mac that I have at home. My overall goal was to use those two programs to be able to open up the Lego Mindstorms NXT software on my Mac using the virtual PC to create a path for the line following robot to follow. I downloaded Windows Virtual PC onto the computer using the website http://www.win-install.com/windows-virtual-pc?utm_source=google&utm_medium=cpc&utm_campaign=WIN_US_en_LongTail&utm_content=Windows-Virtual-PC&utm_term=windows%20virtual%20pc. The purpose of downloading Windows Virtual PC is that it provides you with Microsoft's visualization environment to run multiple operating systems at the same time on your PC. Windows Virtual PC is a software that lets you run Windows XP Mode on Windows 7. The first picture below just shows a screenshot of where I downloaded Windows Virtual PC from. The second picture is showing an error message that popped up stating that Windows Virtual PC can't be oped up because Microsoft Windows Applications aren't supported on OS X. Since downloading Windows Virtual PC from the website http://www.win-install.com/windows-virtual-pc?utm_source=google&utm_medium=cpc&utm_campaign=WIN_US_en_LongTail&utm_content=Windows-Virtual-PC&utm_term=windows%20virtual%20pc didn't work I downloaded Windows Virtual PC using another website. For my second attempt I downloaded Windows Virtual PC using the website http://www.parallels.com/landingpage/dskd77-1/?source=g_us . To download the software using this website I had to download Parallels Desktop 9 for Mac. The first few pictures below are the showing the whole downloading process. Then while the installation process for Windows Virtual PC was taking place I had to type in the administrator password so that the software could be installed. After I typed in administrator password a screen popped up displaying that files were being copied onto the Windows Virtual PC software. After the files had been copied I had to look over the software license agreement and make sure that I agreed to all of its terms. Once Windows Virtual PC was installed onto my Mac I had to create an account before I could gain access into the Windows Virtual PC program. The first two pictures below show me creating an account for Parallels Desktop 9 so that I can use Windows Virtual PC on it. The picture following that shows that once I created an account I came to a screen where I had to request a trial key. The reason for this was because when I downloaded the software Parallels Desktop 9 I used the trial version which is for 14 days. Therefore, since I didn't have an activation code to open up the software I had to request a temporary one that would last me 14 days. |
installation of LEgo Mindstorms NXT CD
|
|---|
|
Next, after I had successfully installed Parallels Desktop 9 onto my Mac which acts as a virtual software system I inserted the Lego Mindstorms NXT cd into my laptop's cd-rod and tried to see whither or not I could use the program and create a path for my line following robot to follow instead of having to download Windows XP Mode. The reason that I tried this is because the website from where I downloaded Windows Virtual PC said that the program Parallels Desktop 9 that I needed to download has Windows Virtual PC and Windows XP Mode inside it so you don't have to install them separately onto the laptop. The pictures below represent trying to install the Lego Mindstorms NXT software onto the Mac. Once I opened up Parallels Desktop 9 so I could use Windows Virtual PC I clicked on the DVD icon and selected the operating system that I was using which was Mac OS. A few steps came after I had selected the operating system. The name and location of where my Windows Virtual PC software is located was one of them as well as a picture showing that Parallels Desktop was activating. When I thought everything was going smoothly an error message appeared on my Mac that stated that there was no operating system installed. |
Since I wasn't able to install Windows XP Mode successfully onto my Mac that then caused me not being able to create a path for my line following robot to follow.
- 10/10/40 .. great failure documentation ... need to put this in the team page ... include that today (4/8/14 XP support from Microsoft ends ... and solving this problem (running old xp software on a variety of machines) is going to become more important ... look up stories of microsoft giving permission to their programmers to improve open source versions of XP support --1sfoerster (discuss • contribs) 15:19, 8 April 2014 (UTC)
Next Steps[edit | edit source]
For next weekend I plan on figuring out what went wrong with the installation of Windows XP Mode on my Mac. If I still can't install Windows XP Mode I will get in contact with Apple and see why I am not able to install Windows XP Mode onto my Mac. If none of those options work out in my favor then I will use the computer in the engineering classroom where I installed Windows Virtual PC and Windows XP Mode to create a path that my line following robot can follow.