
Uploading media files to a Wikibase with OpenRefine
This is a step-by-step how-to guide, showing the basic procedure to batch upload media files (for instance images, video files, PDFs...) to a Wikibase using the data cleaning tool OpenRefine.
What you need to get started
[edit | edit source]For Wikibase administrators: MediaWiki configuration, reconciliation services, Wikibase manifest
[edit | edit source]Before media files can be uploaded to a Wikibase with OpenRefine, your Wikibase administrator (usually a developer or sysadmin) will need to make sure that various settings are in place.
Enable file uploads in general in your Wikibase / MediaWiki. See https://www.mediawiki.org/wiki/Manual:Configuring_file_uploads for instructions.
Enable batch data and media importing in your Wikibase with OpenRefine by installing / creating:
- A data reconciliation service (Python wrapper)
- A media file reconciliation service (Python wrapper)
- A Wikibase manifest that points to both.
For uploaders: prepare files to upload, and collect some basic information about each file
[edit | edit source]Usually, you will upload files to a Wikibase from a folder (or multiple folders) on your local harddrive. Make sure you have these files ready before you start uploading them.
In addition, you will need a bit of basic information about each file. In most Wikibases, this information can be very minimal. It is often the following:
- The absolute file path to the file on your local harddrive
- The name that the file will have in your Wikibase. This can be the same name as the file has on your harddrive, but often it's smart to give your files more descriptive names. File names must have an extension (e.g.
.jpg,.png,.ogg,.pdf) - Some very basic metadata, formatted as Wikitext (see below). In many Wikibases, this is optional. This may consist of:
- A bit of text-based information about the file
- The license or copyright status of the file.
Check one or more existing uploads in your Wikibase to verify what information is usually uploaded with a file.
Files on your harddrive may be named |
Files uploaded to Wikibases (in fact MediaWiki installations) are described with Wikitext markup upon upload. A few examples (the Wikitext becomes visible when 'Edit source' is clicked on a file page):
For batch upload of files with OpenRefine, it is handy to construct such Wikitext beforehand. The following template can be used (but check with your Wikibase's conventions to verify what to add as usual headers, license options, and more): == Summary ==
Short text description of the file here.
== Licensing ==
{{CC-BY-SA-4.0}}
where the code under |
You can prepare your upload in various ways:
- You can collect your list of files and the additional data in a simple spreadsheet (e.g. Microsoft Excel, or LibreOffice Calc), with a line for each file and columns with the additional information / Wikitext.
- But you can also start an OpenRefine project from a simple list of file paths, and add the necessary data later.
In the how-to guide below, the second scenario will be described.
If your Wikibase also supports uploading media files from URL (ask your Wikibase administrator if that is the case, pointing them to these configuration instructions), then it's possible that OpenRefine also allows you to upload with a list of URLs pointing to files on the web (instead of a list of local absolute file paths as described above). This feature has not been tested in OpenRefine yet! Feel free to update this how-to guide with your findings if you have tried this (either successfully or unsuccessfully.) |
Add your Wikibase's manifest to OpenRefine
[edit | edit source]If you edit your Wikibase for the first time with OpenRefine, you will need to add your Wikibase's manifest to OpenRefine. A Wikibase manifest is a type of configuration file that helps OpenRefine to understand how it needs to 'talk with' and edit your Wikibase. Ask your Wikibase administrator to give you your Wikibase's manifest URL or JSON file.
By default, OpenRefine ships with the Wikidata and (as of OpenRefine 3.7) Wikimedia Commons manifests. Other Wikibase manifests need to be added manually. To check your current manifests in OpenRefine, and to add one or more new Wikibase manifest(s) if needed, select Manage Wikibase instances... in OpenRefine's Wikibase extension menu (available in the top right of the screen when you are working on a project). You will then see a dialog window:
- By default, OpenRefine is shipped with only Wikidata and Wikimedia Commons support:

- Click
Add Wikibaseto start adding an additional manifest:
- Next, you can either paste the manifest's URL (provided by your Wikibase administrator; preferred):

- Or you can also paste the JSON code of your Wikibase's manifest:

- Click OK. If the URL or JSON have been successfully recognized, your Wikibase will now be added to the list of supported Wikibases in OpenRefine. For the next few screenshots we are using Rhizome's ArtBase Wikibase as an example:

- In order to start batch editing (or batch uploading to) your own Wikibase, make sure to select it and click
OK:
- Your Wikibase's reconciliation service will also be enabled. You can see this in the dialog window below which you can access by selecting
Reconcile... Start reconcilingin a column's menu:


.png)


Uploading media files to a Wikibase, step by step
[edit | edit source]The example below shows a workflow where the user starts with only a list of local file paths. It is also entirely possible to start with a more extensive spreadsheet or other dataset with some basic metadata about the files. See above for some information on which data to include there.
You will need to locate the files in the Finder / File explorer on your local computer, and copy their absolute file paths.
|
- Create an OpenRefine project with your file paths. For instance, you can copy the file paths from your harddrive, and then create an OpenRefine project by pasting this list of file paths in Clipboard mode:

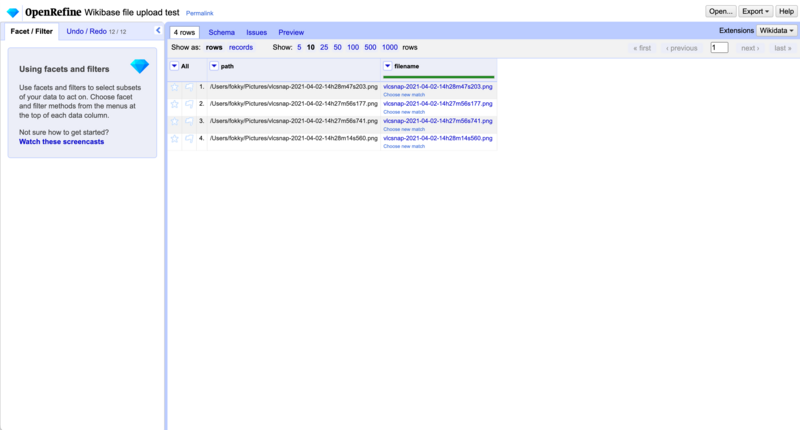
- At first, you will only have one column in your OpenRefine project (the column with file paths):

- Next, add a column (see these instructions if you need help with column editing) with the desired file names as they will appear in your Wikibase (see above for some tips around file naming):

- You can also add a column with Wikitext, following the guidelines mentioned above:

- Now, you need to make it clear to OpenRefine that you want to upload new files to your Wikibase. To start doing so, select
Reconcile→Actions→Create a new item for each cell...in the menu of the (newly created) column with file names. You will see a small dialog window:
- Here, select the media file reconciliation service of your Wikibase. Click
OK:
- This action tells OpenRefine that you want to create new items for each file name (= you will want to upload files). Each cell with a file name will have a light grey "new" indicator, and the column header will be underlined in bright green:

- You can now start preparing your file upload by creating a schema in OpenRefine. In OpenRefine's Wikibase extension menu (located in the top right corner of the application window, right below the Help button), select
Edit Wikibase schema. You will now arrive in the schema editor. - Click
Add media. The resulting schema for uploading file names will contain fields for theFile path,File name, andWikitext.
- Drag the file path, file name and Wikitext column titles to the respective fields. Note that 'file name' has to be dragged twice - both in the "type entity..." area directly above
File pathand then once more in the field directly belowFile path. If each file's Wikitext is the same, you can also directly type Wikitext (or just a generic short description) in theWikitextfield:
- In the Preview tab, you can check what the data of a first set of files will look like:

- The Issues tab will warn you that you are about to upload new files. This is correct, of course, this is exactly what you want to do!

- To start the upload process, select
Upload edits to Wikibase...in the Wikibase extension menu. - In the next dialog window, log in to your Wikibase with your usual username and password.

- In the next dialog window, you can enter a (short, optional) edit summary. Click
Upload edits. - After successful upload, the file names in your project will have turned blue, and will be clickable, linking to the file in your Wikibase:
- Success! Here's an image uploaded to a local Wikibase. Note that the image has also been added to a data item using the local "media file" statement (in this case P1):


.png)
.png)


.png)

Often, you will want to combine various batch upload and editing operations in your Wikibase. Various scenarios are possible:
|