Jump to content

Filmmaking Basics/3D Storyboard/Corrections for Mok

From Wikiversity


This school is:
Narrative film production - Wikiversity Film School
This course is:
The basics of narrative filmmaking
This lesson is:
Lesson: 3D Storyboarding
Pages of this Lesson:
Storyboarding using 3D software
Introduction to FrameForge 3D Studio free demo version
Getting started with FrameForge 3D Studio
Page 1 - Getting started storyboarding "Seduced by the Dark Side!"
Page 2 - A simple example
Page 3 - Building a movie set inside FrameForge
Page 4 - Creating depth of field inside FrameForge free demo version
Before and After: corrections by instructor
The corrections for Sir Mok
All the completed storyboards by students
The amazing storyboard from Gare Cline


Optional


Rough Draft by Sir Mok


Corrections


Suggestion #1 - Use only Prime lenses
Prime lenses vs. telephoto lens
There are important differences between a zoom lens and prime lenses.
When you received FrameForge 3D Studio free demo version, it is set up with a zoom lens. I want you to set up FrameForge 3D Studio free demo version for prime lenses.
Zoom lens
  • A zoom lens will do the work of many prime lenses... but not as well.
  • With a zoom lens, you can change the focal length just by turning the focal length ring around the lens.
  • But a zoom lens has less glass (smaller diameter glass) therefore you have less control over depth of field and a zoom lens captures much less light.
Prime lens
  • With Prime lenses, the focal length is fixed. Each lens has only one focal length.
  • To change focal lengths with a prime lens, you must stop filming and switch lenses.
  • A prime lens for wide angle has lots of glass. It is huge!
For this assignment, please use only prime lenses.
Using only prime lenses is good practice and it forces you to select exactly the right lens.
Please select "Panovision Zeiss 35mm" option in the lower left corner of the Edit Set/Location Parameters. I like to add a 10mm lens to my set of prime lenses. Do you see how to add a lens to your set of prime lenses?


Initially, please use only the
14mm, 24mm, 50mm, 85mm, & 135mm prime lenses.


Suggestion #2 - The actors must be in a line.


  • The actors need to face each other when they talk to each other. They cannot be offset. They must be in a straight line.


Original floorplan

Do not offset the actors. This looks good but the actors have trouble. The actors need to look directly at the other actor.


In line

Keep the actors in line. For a wide angle lens, you can move the actors together more than this.


In line and far away

For a telephoto lens, move the actors farther apart.


Suggestions for this shot


  • Lower the camera to be at the boy's height and tilt the camera up.
  • Use a wide angle or a telephoto lens.


Original storyboard frame

For this frame, you used a 40mm lens which is a neutral lens. It is not telephoto and it is not wide angle. Therefore, the lens does not have any distortion. This makes the scene uninteresting.

Also, the story is about the boy but you put the camera at the height of the man.

Cold and separate


Wide angle

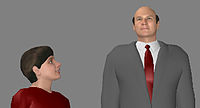
A wide angle lens makes people seem distant from each other; not warm or friendly. At the beginning of the scene, the man and the boy are distant from each other emotionally. To show this, I use a wide angle lens.

Here I lowered the camera to just below the boy's head and I tilted the camera up. Now the man seems very tall and very distant.


Warm, friendly, and together


Telephoto

A telephoto lens makes people look warm and close together. At the end of the movie, the man and the boy are close together emotionally. So for the shots at the end of the scene, you can use a telephoto lens.

In this shot, I lowered the camera and I tilted the camera up. Therefore, to get this shot, I must lower the camera almost on the ground to get this shot. The lens of the camera is only a half a meter off the ground.


Suggestions for this shot


  • Use the view point (the height) of the boy when photographing the man.


Original storyboard frame

The actors must not look into the camera unless they are taking directly to the audience.


Move camera down; Tilt camera up

Normally, the eyes of the actor will point to either the right or the left.

But in this case, you can lower the camera to the height of the boy so the eyes of the man go over the camera.


Suggestion for this shot


  • Move the actors away from the background.


Original storyboard frame

The actors are very near the wall and the poster in the background. Therefore, you cannot easily separate the actors from the background.


The original floor plan

This is the floor plan for the shot. This is correct but if you move the actors away from the poster, you will get a better shot.


The actors moved toward the camera

For a telephoto shot, you can move the actors away from the back wall.


Also move camera down; Tilt camera up

By lowering the camera and by moving the actors away from the back wall, you can use depth of field to make the background slightly fuzzy.
Suggestion for this shot


  • Try to get a better composition for the shot. Put the boy on one side of the picture and the man on the other side of the picture.


Original storyboard frame

The boy is centered on the screen. This is OK but I think it looks better if the boy is on the side and not the center.
Move the boy to the side of the picture


The boy on the side

By moving the boy to the side, you get a better picture.
Also needs correction


Also needs correction


The boy is centered in these shots

Here are two more shot where the boy should be placed to the side, not the center.


Suggestion for this shot


  • The boy must look at the man and not the camera.


Originally the boy looks at the camera

The boy is looking at the camera. If the boy is taking to the audience, this is OK.


The boy looking to the the other actor

The boy's eyes must be left or right of the center.

But in this case, you can lower the camera to the height of the boy so the eyes of the man go over the camera.


Here are the final shots