How to build a wall which has four posters using FrameForge 3D Studio.
- First load FrameForge 3D Studio
- Once you have loaded FrameForge 3D Studio 2 (or the demo version of FrameForge 3D Studio 2), you need to create a wall with four posters using Room Builder.
- To do this, we will actually create two walls, one of which has four windows in it.
Create the first wall

Control click to see full size
- Use the Single Wall tool
- In the upper left hand corner is the wall tool. Select this tool.
- Draw the Wall
- Start by creating a wall which is 40 feet long and 10 feet high using the wall tool.
- Adjust the dimensions using the dialog boxes
- If you draw it too long or two short, you can always change the size using the dialog boxes at the bottom of the screen.
Create a second wall

- Select the "Single Wall" tool
- The "Single Wall" tool will still be selected.
- Create a new wall
- Create a new wall which is the same size (or slightly smaller) behind the first wall.
- Adjust using the dialog boxes
- If you wish, you can adjust the length of this second wall using the dialog boxes at the bottom of the screen.

- Select the "Window" tool
- Select the "Window" tool at the top of the screen.
- What? No bars?
- The window tool looks like a real window with a complete window frame but actually this tool simply creates a rectangular hole in a wall. Nothing more! (This is all we need.)
Create the first window
 · Control click to see full size · Control click to see full size
- Create a window
- In the first wall, draw a window.
- Adjust the window
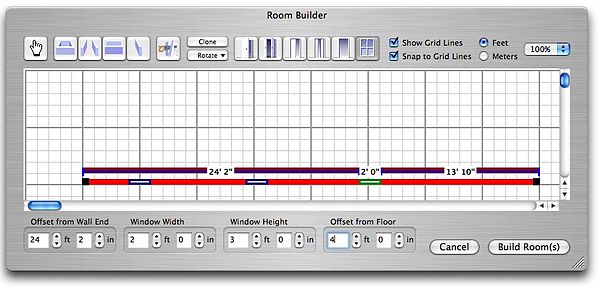
The easiest way to adjust the window is to use the dialog boxes at the bottom of the screen. Adjust the window so the dimensions of the window are:
- This window starts 4 feet from the end of the first wall. (Notice in the example above, I typed a 5 instead of a 4. Later I found my mistake so I simply clicked on the window with the selection tool (upper left in the window) and change the dialog box at the bottom of the screen.)
- This window is 2 feet wide
- This window is 3 feet high
- This window is 4 feet off the ground.
- Note
- The widows that we create will become the space where the posters will appear.
Create the second window

- Create a window
- In the first wall, draw a window.
- Adjust the window
The easiest way to adjust the window is to use the dialog boxes at the bottom of the screen. Adjust the window so the dimensions of the window are:
In the first wall, draw a second window. Then adjust the window so the dimensions of the window are:
- The second window starts 14 feet from the end of the first wall.
- The second window is 2 feet wide
- The second window is 3 feet high
- The second window is 4 feet off the ground.
When you draw the window, the dimensions and location will not be exactly what you want. It is easier to use the up and down arrows in the dialog box for the dimensions to adjust the window to the correct size. (There seems to be a bug in tying the first number. It you type one number and a different number appears, simply use the up and down arrows instead.)
Create the third window

- Create a window
- In the first wall, draw the third window.
- Adjust the window
The easiest way to adjust the window is to use the dialog boxes at the bottom of the screen. Adjust the window so the dimensions of the window are:
- The second window starts 24 feet from the end of the first wall.
- The second window is 2 feet wide
- The second window is 3 feet high
- The second window is 4 feet off the ground.
- Note
- When you draw the window, the dimensions and location will not be exactly what you want. It is easier to use the up and down arrows in the dialog box for the dimensions to adjust the window to the correct size. (There seems to be a bug in tying the first number. It you type one number and a different number appears, simply use the up and down arrows instead.)
Create the fourth window

- Create a window
- In the first wall, draw the fourth window.
- Adjust the window
The easiest way to adjust the window is to use the dialog boxes at the bottom of the screen. Adjust the window so the dimensions of the window are:
- The second window starts 34 feet from the end of the first wall.
- The second window is 2 feet wide
- The second window is 3 feet high
- The second window is 4 feet off the ground.
- Note
- When you draw the window, the dimensions and location will not be exactly what you want. It is easier to use the up and down arrows in the dialog box for the dimensions to adjust the window to the correct size. (There seems to be a bug in tying the first number. It you type one number and a different number appears, simply use the up and down arrows instead.)
- Build the movie set
- Build the room by clicking on the "Build Room" button on the lower right hand corner of the screen.
Select the Second Wall
- Look at the windows
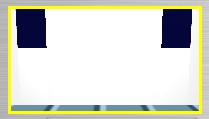
- When you look at the windows at the top of the page, you see just a faint outline. That is because both walls are the same color. They need to be different colors.
- Blue posters
- We are going to paint the second wall blue so it looks like posters.
- Select the second wall
To paint the second wall, we first need to select it.
Color all of the second wall blue

- The Green Room
- In the Green Room, you can change many things including the color of the selected object. To do this, you must select "Colors, Textures & State".
- Select ALL of the second wall
- Rather than trying to figure out which face of the second wall needs color, we will simply paint all of the second wall. Therefore, you first need to go under "Part Name:" and select "--For all Parts--" rather than just "front wall" or "back wall".
- Select a color
- By clicking on the color chip marked "Color:", you can change the color of the selected item (which is the all of the wall). Change the color to some strong color. I like dark blue.
- Click "OK"
- Click on the button at the bottom right of the screen to accept the changes to the scene.
Move the second wall

- Move the wall
The posters will look better if the two walls are almost in the same position. So drag the second wall forward until the two walls overlap by all but one or two inches.

- The posters will appear
- Now you can clearly see the windows which look like blue posters (well, sort of…). You are seeing the blue wall though the holes in the plain wall. This is good enough!

- Find the page with the set controls.
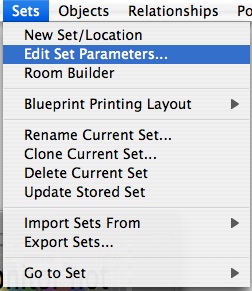
- The set controls are on a page called "Green Room". You access this page by using the menu item of "Edit Set Preferences" in the "Sets" menu.
Set all the parameters for the movie set

- The set name
- A good name for the movie set is "Theater Movie Set".
- The time of day
- Since the time of day is night, set the background sky to "Night".
Add the actors

- Old Person and Young Person
- You need to add the actors to the movie set and then rotate the actors to whatever position you like.
- Adding an actor
- To add the actors, simply look through the pictorial list of the available figures and select one. Then drag its picture to the movie set. (If the movie set is not visible in the main window in the center of the screen, double click on the picture of the movie set in the upper left corner of the screen.)
- Rotate the actors
- Select an actor and use the "Spin" control to rotate the actor to face where you want the actor to face.
- Magnify
- Move the camera nearer to the actors. Then magnify the blueprint view so that you can easily see the camera, the actors, and the wall. This way you can easily grab the actors and grab the camera and move them where you want.
- Adjust the actor
- If you want to adjust the actor, double click on the actor to see many of the controls for the actor.
- Begin
- Now you are ready to begin storyboarding.
|


