Helicopter/Howard Community College/Fall2011/502 Helicopter 2
===
===
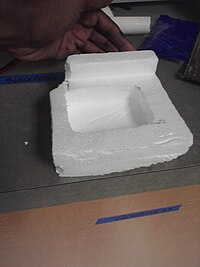
- Construct a remote operated helicopter from scratch, such as styrofoam, pencils and a PS2 disk tray.
- Write a sketch from which the helicopter can tilt in any direction using Gyro-5DOF with Arduino.
- Design a balance system (see-saw) to test the propellers of the helicopter.
- The previous design has not been returned yet, so we planned to start from the beginning by using new ideas.
Team Members
[edit | edit source]===
===
We tried our best to accomplish our goal and to solve the problem. Here are the main activities we planned to do:
Week0
- Brainstorm idea for helicopter. Understand the objective and assign jobs.
Week1
- Bring in supplies and try to build base on the design and the program made.
Week2
- Start construction based on design and research how to test the helicopter.
Week3
- Finish construction of the the see-saw gimble. The see-saw gimble is what we will test the helicopter on before we build it.
Week4
- Understand where we at and how to finish the project. try to finish building the see-saw gimble.
- Each individual planned to do different tasks during the weekend and stayed after class for building the see-saw gimble.
===
===
Story
[edit | edit source]Week1 Activities involved the followings:
- Writing down a code that makes it easier to setup the accelerometer.
- Testing the accelerometer by using LEDs (just like the one in Video).
- Determining what happens when I tilt the system over the x,y, and z axis.
- Expanding the written sketch to accelerate and decelerate each motor also shown in the Video.
- Using LEDs with each motor that will provide me the direction in which the system is tilted.
- uploading all pictures and files from older group to the Wikiversity.
- Repeat the work done from previous projects and update the information to simplest and detailed form.
Week2 Activities involved the followings:
- Combining two different sketches, 4-motors running at once and accelerometer sensing LEDs, into a sketch that functions both at once.
- Upload more pictures while explaining the activities performed.
- Testing the LED sketch and updating information.
- Writing down new ideas of creating See-saw gimble to balance propellers.
- Presenting the accelerometer sensing the LEDs and Motors to the class and get new ideas.
Week3 Activities involved the followings:
- Continue working with accelerometer while getting information about Gyro 5DOF sensor.
- Staying after class to build the See-Saw gimble and also making the design of the base of helicopter.
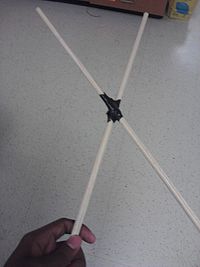
- Using new ideas, such as light material- pencils that defines the base, light propellers attached to each end of pencils.
- Continue uploading pictures from previous projects and explaining the work done.
Week4 Activities involved the followings:
- Writing about Gyro-5DOF and rationalize the differences between Gyro and Accelerometer-ADXL335
- Finish working with the See-Saw gimble and present it to the class.
- Complete the base of the helicopter.
- Continue to upload pictures from previous projects and giving ideas about new materials.
- Presenting everything we accomplished so far and getting ideas about how to continue working as next part of the project.
Part of the project is completed in that we all were engaged in doing something new or changing the materials from previous designs. The previous design of balancing the propellers of helicopter was missing, so everyone had to start from the beginning and think about the possible ways of making it again. We though of using wood materials since they were available in the class. We built the seesaw gimble within two-three weeks, yet we still have some problems with it which will be covered as a next part of the project. We also made the design similar to Drone; however we used really light materials, such as pencils and light propellers. We also have completed writing the accelerometer sketch to run motors and have lights turned on at once. Then, followed by using Gyro-5DOF (5 Degree of Freedom) which measures the acceleration of all dimensions up to 5. The measurements were done using a new software called "Serial Chart." It is similar to Serial Monitor from arduino software but it also plots graph according to your Serial.INPUTS/OUTPUTS in arduino sketch/library.
Decision List
[edit | edit source]Previous Projects of helicopter involved really heavy materials when building the base of the helicopter and we thought that might not be useful since the propellers couldn't support really heavy objects. Then, We decided to use light materials, such as pencils and even light propellers to decrease the weight as much as possible. We also decided to use Styrofoam to put the arduino system, including the batteries.
Material List
[edit | edit source]2x4 Blocks of Wood 8x8 Styrofoam Electric Tape 2 Wood Rods. 1 foot long (each). 2 cm diameter (at most) Nails or Screws Drill Electric Saw Clamp Electric Sander PBC Pibe. 3 feet Arduino Computer Printer (extra pieces from) Markers
Software List
[edit | edit source]Computer- OS=Windows XP Arduino Software Serial Chart Programming Processing Software Serial Monitor from arduino
Time
[edit | edit source]2 hours Brainstorming 4 hours construction of see -saw gimble 7 hours (at least) for writing arduino sketch 2 hours helicopter construction(without Arduino) = 15 hours (at least)
Tutorials
[edit | edit source]A lot of the material we found was conviently located in the room. but the 2x4 block we used for the see-saw gimble could be found at home depo. Along with the nails and the tools.
- Accelerometer vs. Gyro(5DOF)
- Gyro Video
- Sketch for Gyro
- A Guide to Learn Gyro
- Discussion page
- Project Details
Next Steps
[edit | edit source]The whole team is going to continue with this project for our project 3. we should be able to finish the whole project.
The next part of the project will include the following:
- Completing the Gyro-5DOF sketch to fly helicopter in all dimensions while using the GPS signals sent via remote controller.
- We still have some problems with see-saw, since the wooden stripe we used to balance propellers is really light and bends when you place the propellers on top of it.
- We have not made four similar types of propellers/motors - that are almost equal in weight, make less noise, and spin really fast.


