Digital Media Concepts/Physically Based Rendering

Physically-based rendering is a shading method in computer graphics that aims to simulate how light interacts with certain materials.
Light
[edit | edit source]Light is one of the most important aspects of a 3D render and can elevate it to the next level of realism[1]. Many different models and algorithms attempt to simulate the complexities of light, each with its own purpose[2]. Real-time lighting models’ goal is to simulate light in the quickest, most efficient way possible while still looking as realistic as it can. This is mainly used when images are needed to be rendered multiple times a second[3]. Most 3D video games use this method, as they usually need to render a frame at least sixty times a second (to achieve a frame rate of 60 FPS). On the flip side, offline/pre-rendering lighting models’ goal is to simulate light as realistically as possible, regardless of how long it takes[4]. This is used when the image, or sequence of images, never changes, so the amount of time it takes to render it does not matter. This method is utilized in 3D animated movies/videos, CGI for live-action movies/videos, and 3D rendered still images. These two methods have many different models, but this article will only go over the basics.
Real-time vs. pre-rendered lighting
[edit | edit source]Real-time lighting brings the physics of light down to its most basic form. Light travels from its source out into the environment, illuminating any objects in its path and adding shadows behind them[5]. The problem with this method is that light is much more complex than this and rarely ever travels in only one direction. Light constantly bounces and scatters off of everything, changing its color and direction with every bounce[6].
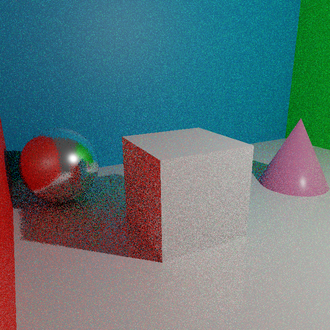
Notice how the shadow is completely black in the real-time lighting example below, which looks very artificial. This is because, in real life, the light hitting the walls and floor around the object would bounce around the room, bringing the colors of those objects with them[6]. These light bounces would end up hitting the shadowed area of this object, changing its color. Looking at the pre-rendered image, we see that the shadow is not black and has some color. Pre-rendered images often use a lighting method called path-tracing, which accurately bounces the rays of light coming from the light source.
With thousands of light rays bouncing off of every object, path-tracing cannot be done in real-time. Each frame takes time to render, as the computer has to calculate each ray of light. Because of this, if you don’t give the computer time to render, the resulting image will often look very grainy, with some pixels not being fully calculated yet. This is why this lighting method can only be used for movies, videos, or still images, and not in ways where the 3D environment could be manipulated[7].

Despite the limitations of real-time 3D graphics, there are many ways that rendering engines are able to fake the indirect lighting that path-tracing is able to achieve. Tools like screen space global illumination (SSGI), baked lighting, and ray-tracing are used in many video games or intractable 3D environments in order to add indirect lighting to them. Screen space global illumination (SSGI) looks at the depth and color of each object visible on the screen and uses this information to add artificial bounce light, disregarding anything outside of the screen[8]. This is great for dynamic global illumination because as long as an object is on screen, its indirect lighting is calculated for every frame. Baked lighting is a bit closer to path-tracing. After creating a 3D environment, many artists will bake the lighting into the scene. This means that similar to path-tracing, many light rays bounce off of the objects in the scene, but all of this light calculation is only done once. Once it's finished bouncing all of the rays, it bakes, or paints, the colors that the rays created onto each object in the scene. After this is done, it no longer needs to calculate anything, as the light is pasted onto the objects[9]. The downside to this method is that because the lighting data is baked onto each object, the objects can not move without having to calculate the light again. Ray-tracing is a fairly new method of real-time rendering that utilized the power of Ray Tracing Texel eXtreme (RTX) graphics cards to calculate each ray of light in real-time. Although this will usually yield better results, it is very heavy on performance, and the high end RTX graphics cards are needed for it to work[10].

|
Cyberpunk 2077 | Released: December 10, 2020 |
| Minecraft (Windows 10) | Released: July 29, 2015 | |

|
Battlefield 2042 | Released: November 12, 2021 |

|
Dying Light 2: Stay Human | Released: February 4, 2022 |

|
Call of Duty: Warzone | Released: March 10, 2020 |

|
RED DEAD REDEMPTION 2 | Released: October 26, 2018 |
Color/Albedo
[edit | edit source]What we preserve as color is simply a material absorbing more light from a certain wavelength than others, so the colors that aren't absorbed are reflected back into our eyes[12]. In a physically based rendering material, the color of an object is usually represented as either an RGB value, or an image texture.
| Input Type | Info |
|---|---|
 |
This input type covers the entire object in a single color. The color can usually be |
 |
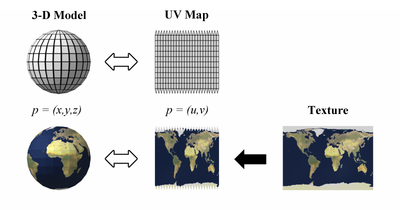
This input takes the color of each pixel on an image and plots it onto the 3D object,
wrapping the texture around it according to the object's UV map.[13] |
These are not the only two options, as using shaders allows one to add, mix, combine, and manipulate these types of values to fully customize the color of an object[14].
Roughness
[edit | edit source]Roughness relates to the irregularity of the surface of an object. As mentioned previously, light does not simply stop traveling once it hits an object but rather bounces off of them. However, many objects' surfaces are not completely flat and are irregular. Because of this, the direction light bounces in will be much more random on a rough surface, which ends up scattering the rays, making the reflected light less sharp. In simpler terms, the less rough an object is, the shiner it looks, and vice versa[12].
| 0% Roughness | 50% Roughness | 100% Roughness |
|---|---|---|
 |
 |
 |
Similar to color/albedo, there are different ways the roughness of a material can be manipulated. It can either be connected to a value that ranges from 0 - 1, or it can use a roughness map. A roughness map is a black and white image texture that tells the material which parts of the object are shiny, and which are rough.[15]
 |
 |
Once again, these are not the only two options, as using shaders allows one to add, mix, combine, and manipulate these types of values to fully customize the roughness of an object[14].
Metallic
[edit | edit source]The metallic value of a material tells the shader how metallic the object is. Because metals are good conductors of electricity, electric and magnetic fields (like light waves) are reflected when hitting a metallic object while refracted light is absorbed[12]. Normally, a material's metallic value is never between 0 -1, because objects in the real world are either metal, or not metal. However, the reason why shaders allow one to change the metallic value of a material is because some objects have parts on them that are not metal (like rust).[12]
| Metallic Object | Non-metallic object |
|---|---|
 |
 |
Like the others, these are not the only two options, as using shaders allows one to add, mix, combine, and manipulate these types of values to fully customize how metallic an object is.[14]
Summary
[edit | edit source]There are many more options to change when creating a PBR material, but these options are usually made for more specific purposes. Options like subsurface scattering, specular, IOR, emission, and more are often used when creating very specific materials like skin, car paint, glass, etc. The options mentioned above are the basics that are needed to make most materials, and when combined with the right illumination model, can easily create photorealistic imagery.
References
[edit | edit source]- ↑ Schechter, Sonia (2021-07-05). "Essential Guide to 3D Rendering". Marxent. Retrieved 2022-03-04.
- ↑ "Illumination Model in Computer Graphics". Retrieved 2022-03-04.
- ↑ "Unity - Manual: Real-time lighting". docs.unity3d.com. Retrieved 2022-03-07.
- ↑ http://optrix.com.au/threed/prerender.php
- ↑ "Introduction to Lighting and Rendering". Unity Learn. Retrieved 2022-03-08.
- ↑ 6.0 6.1 "Bounce Light Tips & Techniques for Photo and Video". StudioBinder. 2021-04-18. Retrieved 2022-03-08.
- ↑ J, Dr (2020-07-30). "This is Why 3D Rendering Takes So Long". 3DBiology.com. Retrieved 2022-03-08.
- ↑ "Screen Space Global Illumination | High Definition RP | 11.0.0". docs.unity3d.com. Retrieved 2022-03-08.
- ↑ "Light Baking". docs.worldviz.com. Retrieved 2022-03-08.
- ↑ "Introducing the NVIDIA RTX Ray Tracing Platform". NVIDIA Developer. 2018-03-06. Retrieved 2022-03-08.
- ↑ "Stream Like a Boss With NVIDIA RTX Graphics Card". NVIDIA. Retrieved 2022-03-08.
- ↑ 12.0 12.1 12.2 12.3 "The PBR Guide - Part 1 on Substance 3D Tutorials". substance3d.adobe.com. Retrieved 2022-03-08.
- ↑ "How 3D Game Rendering Works: Texturing". TechSpot. Retrieved 2022-03-08.
- ↑ 14.0 14.1 14.2 "Shader". Wikipedia. 2022-02-10. https://en.wikipedia.org/w/index.php?title=Shader&oldid=1071044835.
- ↑ "The PBR Guide - Part 2 on Substance 3D Tutorials". substance3d.adobe.com. Retrieved 2022-03-08.

