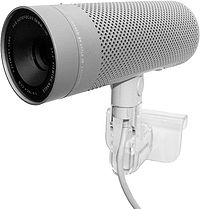
Creating a video lecture
Appearance

How to use a web cam to create a video recorded lecture, publish it to Youtube, and embed that Youtube video on another website - such as a Learning Management System.
Considerations
[edit | edit source]- As a rule of thumb, keep your lectures short. 5-10 minutes short. If you must take the full hour, break it up into 6 or 12 chapters
- Video recorded lectures made available online are a very different format compared to a live lecture given in a theatre. Your audience online is more easily distracted, can stop, pause and replay, and is usually not in a social setting. Many advise that short videos delivering concise information, presented close up, personally, and with an authentic voice will help to maintain interest and engagement.
- Video data is relatively expensive to download, therefore keep your videos short, concise and on message. Consider the option of offering audio recording only, and offering your slides to download as well. Audio only is less expensive to download, and gives the added flexibility of listening while doing other things.
Recording a video
[edit | edit source]
You have 3 options:
- Record with a webcam and computer, using software on a website (fastest option)
- Record with a webcam and computer, using software on the computer (Requires software installation, but affords better vision quality)
- Record with a video camera and computer (Requires more expensive camera, and software installation, but gives best quality in both vision and sound)
Webcam and website software
[edit | edit source]- Many popular video sharing websites, such as Youtube, offer the feature of recording video through a webcam using software on their website. This method is certainly the fastest way to get a video online, but the quality is low, and the reliability of the recording is determined by the reliability of your interent connection at during the time of recording.
- Step by step instructions: Using webcam to record video on Youtube
- Video demonstration: Adoptafeature: Quick Capture
Webcam and computer software
[edit | edit source]- Most webcams come with software you can use to record with. If you are recording with such software, make a test recording and find out where the video is being saved. It will be either on your desktop, in your system folder called "videos", or in a folder with a similar name to the software you're using.
- Find the software for your webcam. Look for an icon for the webcam software on your desktop or task bar. If you can't find it, try unplugging your webcam and plugging it back in. The option to open the software should appear - depending on your computer. Otherwise, look through the software that is available on the computer.
- Record a 10 minute video. The video will save either on your computer's desktop, "Videos" folder, or in a folder with a similar name to the webcam software.
- Preview the video.
- Upload to You Tube.
- Step by step instructions: How to Make Movies on Your Windows XP Computer
- Video demonstration: How To Record From Your Webcam
Video camera and computer software
[edit | edit source]Publish the video
[edit | edit source]You should aim to upload your video to at least 3 locations. Think of this as a backup. One location should be a popular site where your video is most likely to be found and seen, like Youtube. You're next location should be somewhere it is most likely going to remain available in a public archive, like Archive.org. Finally, you might like your video to be available on a very popular and non commercial education service, like Wikimedia Commons.
Upload to Youtube
[edit | edit source]
- Go http://youtube.com (type this in your web browser address bar)
- Check that you are logged in (see top tight of Youtube. If you see your name you are logged in)
- Click “Upload” then click the yellow button “upload video”
- Find the file you recorded previously on your computer
- Start filling in the details on the form. Name and describe the video to a wide audience. Be sure to use key word tags that link your video to subjects, projects and groups
- When video has finished uploading, you will see a message in a green box at the top, with a link the video page. Click that to see the video's page on Youtube.
Embeding Youtube videos on your own website
[edit | edit source]In this step, we display a Youtube video on our own website.
- On the video's Youtube page, find the "embed" code button and copy that text.
- Go to your website, in this case we are using Moodle.
- Turn editing on and click HTML view.
- Paste the embed code, then save.
Upload to Archive.org
[edit | edit source]Upload to Wikimedia Commons
[edit | edit source]
