Arduino/Junk pile stepper motor survey

From Wikiversity
Jump to navigation Jump to search

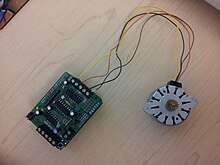
The purpose of this page is to record the wiring of junked stepper motors to arduino motor shields. Some stepper motors from a junk pile

Stepper motors have 4 or more wires going into them. Not all motors with 4 or more wires are stepper motors. Typically these motors do not settle down and display a constant ohm value. Instead the resistance reading go to zero or infinity. Switching the polarity of the probes measuring resistance causes different resistance values.

Arduino Code

There are two adafruit motor shield versions, with different libraries:

The sparkfun monster motor shield only comes with an example, not a library.

Example Code for sparkfun monster motor shield customized for stepper motor
/*  MonsterMoto Shield Example Sketch
  To work with 6 wire stepper motor
  by John Stapko 10/29/14
 */
#define BRAKEVCC 0
#define CW   1
#define CCW  2
#define BRAKEGND 3
#define CS_THRESHOLD 100

/*  VNH2SP30 pin definitions
 xxx[0] controls '1' outputs
 xxx[1] controls '2' outputs */
int inApin[2] = {7, 4};  // INA: Clockwise input
int inBpin[2] = {8, 9}; // INB: Counter-clockwise input
int pwmpin[2] = {5, 6}; // PWM input
int cspin[2] = {2, 3}; // CS: Current sense ANALOG input
int enpin[2] = {0, 1}; // EN: Status of switches output (Analog pin)

int statpin = 13;

void setup()
{
  Serial.begin(9600);
  
  pinMode(statpin, OUTPUT);

  // Initialize digital pins as outputs
  for (int i=0; i<2; i++)
  {
    pinMode(inApin[i], OUTPUT);
    pinMode(inBpin[i], OUTPUT);
    pinMode(pwmpin[i], OUTPUT);
  }
  // Initialize braked
  for (int i=0; i<2; i++)
  {
    digitalWrite(inApin[i], LOW);
    digitalWrite(inBpin[i], LOW);
  }
  // motorGo(0, CW, 1023);
  // motorGo(1, CCW, 1023);
}

void loop()
{
  motorGo(0, CW, 1023);
      delay(10);
  motorGo(0, CW, 0);
  delay(100);
  
   motorGo(1, CCW, 1023);
   delay(10);
  motorGo(1, CCW, 0);
  delay(10);
  
  motorGo(0, CCW, 1023);
  delay(10);
  motorGo(0, CCW, 0);
   delay(10);
   
  motorGo(1, CW, 1023);
  delay(10);
  motorGo(1, CW, 0);
  delay(10);
  
 motorGo(0, CW, 1023);
      delay(10);
  motorGo(0, CW, 0);
  delay(10);


  if ((analogRead(cspin[0]) < CS_THRESHOLD) && (analogRead(cspin[1]) < CS_THRESHOLD))
    digitalWrite(statpin, HIGH);
}

void motorOff(int motor)
{
  // Initialize braked
  for (int i=0; i<2; i++)
  {
    digitalWrite(inApin[i], LOW);
    digitalWrite(inBpin[i], LOW);
  }
  analogWrite(pwmpin[motor], 0);
}

/* motorGo() will set a motor going in a specific direction
 the motor will continue going in that direction, at that speed
 until told to do otherwise.
 
 motor: this should be either 0 or 1, will selet which of the two
 motors to be controlled
 
 direct: Should be between 0 and 3, with the following result
 0: Brake to VCC
 1: Clockwise
 2: CounterClockwise
 3: Brake to GND
 
 pwm: should be a value between ? and 1023, higher the number, the faster
 it'll go
 */
void motorGo(uint8_t motor, uint8_t direct, uint8_t pwm)
{
  if (motor <= 1)
  {
    if (direct <=4)
    {
      // Set inA[motor]
      if (direct <=1)
        digitalWrite(inApin[motor], HIGH);
      else
        digitalWrite(inApin[motor], LOW);

      // Set inB[motor]
      if ((direct==0)||(direct==2))
        digitalWrite(inBpin[motor], HIGH);
      else
        digitalWrite(inBpin[motor], LOW);

      analogWrite(pwmpin[motor], pwm);
    }
  }
}

Next Steps[edit | edit source]

  • Attach motor shield to larger power source .. 9-12volts .. perhaps up to 1.5amps. See how motor strength improves and how chips on motor shield heat up.
  • Get spark fun motor shields working .. suppose to handle more power
  • Count teeth on the gears to see if there are standards that can be leveraged
  • Research PC power supply specifications to see if they are going to be useful
  • Figure out how fast the motors can rotate .. some seem pretty slow .. this may be due to the stepper motor program or sketch.

Individual Motor Details[edit | edit source]

Pairs Motor Description Motor Thumb
orange/blue, purple/red

4 wire

10 ohm
Colored solid wires were attached
Mitsumi M355SP-9T C6747-60005 B2703
orange/yellow, brown/black

4 wire

12 ohm
Mitsumi M42SP-5 24 Volt 7.5 degree step
RH7-1197 TC5X07
brown/red, blue/yellow
white ground
5 wire
4,5 ohm
Mitsumi 55SPM25D4NA 24 Volt 7.5 degree step
brown/red, white/green
black ground
5 wire
75 ohm
ASTROSYN Minebea Tandon
17PS-C007-04 966000-001
yellow/orange, green/gray
brown ground
5 wire
15 ohm
NMB Minebea Electronics
PM55L-048-HP69 C2164-60045 TC1Z72C
blue/yellow, gray/purple
all red and black tied together for ground
8 wire
42 ohm
Colored solid wires were attached
990411206001 MB 11 0579
black/brown, yellow/orange
red wires both to ground
6 wire
40 ohm
ASTROSYN 17BB-H255-03 12V 0.3A
T8207 4 phase 07AA8003
black/blue, orange/yellow
white wires both to ground
6 wire
50 ohm
ASTROSYN 23BB-H028-12 24 volt 4 phase
54485376
orange/yellow, brown/black

4 wire

13 ohm
no markings on it
this might be Canon RH-1173 -01
orange/yellow, brown/black

4 wire

Mitsumi M49SP-3K LF
L6HAYYYK0025