
Engineering Projects/Corn Starch/Howard Community College/fall2012/p1-550-soc
Problem Statement
[edit | edit source]Use scientific experimentation to study the properties of Corn Starch and explore its applications.
Team Members
[edit | edit source]Summary
[edit | edit source]Corn starch is a non-Newtonian fluid with special properties. When mixed with water cornstarch has a flour-like consistency, but unlike flour, when acted upon at high speeds corn starch presents the characteristics of a solid, however, when moved at low speeds, it presents the characteristics of a liquid. During the first week we distributed the tasks of the project among group members. We worked on finding a computer program able to transmit different frequencies that could be use to test the properties of corn starch by emitting different frequencies through a mixture of corn starch and water. We also worked in setting up a sub woofer on the side of a speaker box so that when testing the corn starch, its mixture can be place on direct* contact with the speaker. As well, we worked on gathering the components to assemble a 50 Hz oscillator that would allow us to test a 50 Hz frequency without the help of a computer. During week 2, we assemble together an audio cable with a head phones end so that it can facilitate the connection from the computer to the speaker. Also, we were able to mount a speaker to the side of a speaker box and were able to assemble the parts of the 50 Hz oscillator for testing. During the 3rd week, we tested the properties of corn starch through a direct connection from the computer to the speaker using thetest sound site found, as it happened, we had to connect the computer to an amplifier and the amplifier to the speaker because of the low volume emitted. In the process, we tested the speakers and its set up and pointed down minor flaws in the setting that need to be fixed. While doing all this we also managed to test the oscillator using a power supply with and an adjusted output of 9 volts, an oscilloscope, and a multiplier, which showed some problems in the assembly of the oscillator. During the forth week, we came up with a ratio of corn starch to water, with was the result of an average calculation of ratios used during the days we have tested the corn starch. We also mounted a larger speaker by widening the hole so to fit the base of the speaker box, and started testing it. This week, though the connections of the cables from the amplifier to the speaker or the computer to the amplifier did not changed, the sound wasn't transmitted from the computer to the speaker, making us think that it might be a problem with either a miss set-up of the amplifier before used or a malfunction of the cable. We also re tested the oscillator and started looking for ways on how to connect the oscillator to the base of the speaker board. As well, we learned a little about frequency, different types of waves, and where each type of wave is emitted on the pins of a DIP timer and voltage dividers. Finally, we worked on the planning of an 8 feet long pool of corn starch where the effect of speed on the mixture of corn starch and water can be tested.
Poster
[edit | edit source]-
 Corn Starch Project Poster

Story
[edit | edit source]Our project was called "Corn Starch". Our challenge was to learn the properties of corn starch by testing it through scientific experimentation. At the start of the project we split three tasks between Lamin, Lisbet and Melissa. Lamin was to work on the speakers, taking them apart and mounting them to the side of the speaker box. Lisbet was to work on finding a software that would act as a frequency generator and hook it up to the sub woofer so that different frequencies could be tested. Melissa worked on building an 50 Hz oscillator powered by a 9 volt battery. Both the software and the oscillator would be able to power up the speaker.
Creating the computer cable was an easy process, it only required an audio cable, a wire stripper, a PC audio plug and a connector cable. When attached to the computer the sound obtained from the sound testing site was rather low so the computer was attached to an amplifier and then the amplifier was connected to the speaker. The testing of corn starch on the other hand was rather frustrating as, first, mixing the corn starch with water was not easy process, since the corn starch seemed to clump around the bottom of the glass used for the mixture preventing its mixture with the water. Also it was rather difficult to mix as the speed had to be kept low because other wise it the string object would get cot in the corn starch. When testing the mixture of corn starch and water there was not formation of corn starch monsters though there was a small movement at the edges of the corn starch mixture when the frequency was 60 Hz. From information looked upon the results of our experiment we learned that the best frequency to see the effects frequency to corn starch would be around the 20 Hz 1 2.
On the other hand, we did have some issues with the oscillator. We had some difficulty finding the right parts to include in the circuit. We did not have some of the resistors that we needed. There was one 2.2 ohms resistor,and one 5ohms resistor; however there was not a resistor that totaled at a 142 ohms resistance. After learning a little bit more about resistors, we tried different combinations: the first time there were three in the combination, 27ohms+110ohms+5ohms=142ohms, and the other one (the one we used) there were only 2, they were 120ohms+22ohms=142ohms. We ended up sending someone to Radio Shack to locate our capacitor; it was .001 mF (microfarads). Unfortunately they did not carry it. After some more looking around, though, we did eventually find what we needed. Next were the chips. We needed a NE555 (timer), and two 7490 divide-by-ten counter chips. Luckily we had those lying around. We also were able to locate our 7805 voltage regulator. So we hooked everything up on our breadboard. The first time around, the resistors were hooked up in parallel which set us back a little bit. When the resistors are in a parallel circuit their values changed; they become reciprocals and are added up as that; needless to say, the resistance that they produced was not what was required for the circuit. Another set back was that we found out that the 5ohms resistor was not supposed to be a resistor at all; in fact it was supposed to be a potentiometer. (Note: on the link to the "50 Hz oscillator" R3 is not a resistor, it is a potentiometer). After we got all the necessary materials to assemble the oscillator we wiped out the oscilloscope to test it. In the beginning we were not getting any current. We fiddled around with the settings on the oscilloscope for some time. We did eventually got some results. We found that if you put one of the rods in different parts of the board you get different types of waves. That day when we got the oscillator working and ready to go, it went missing. This was a major set back because we had to remake it. It was very inconvenient because there were no more 7490 divide-by-ten counter chips, so we had to order them. The worst part was that almost nobody had them in stock. We eventually found some on Ebay and ordered them. It took about 5-6 days for them to come in. Once we got them, we reassembled the circuit, but after much testing we could not get it to work properly.
Here is a 50 Hz oscillator we may have the parts for.
Decision List
[edit | edit source]1. Look up existing information on corn starch
2. Select experiments to test the corn starch properties
3. Analyze the components needed to test corn starch on a speaker system
4. Test corn starch properties by observing its reaction to multiple wave frequencies
5. Find a computer program that forms different frequencies to test the corn starch at
6. Use an audio cable to connect an amplifier to a computer
7. Adapt an audio cable to be connected from an amplifier, directly, to a speaker
8. Fix a speaker to the side of a speaker box so the corn starch can be directly placed on the sub woofer
9. Determine an adequate ratio of corn starch and water so that it is not too thick or too liquefied
10. Test the properties of corn starch using a direct connection from a computer to a speaker
11. Record and analyzed the data obtained
12. Build a 50 Hz oscillatory to be connected to a speaker system
13. Get a 9 Volt battery to be connected to the 50 Hz oscillator
14. Test the 50 Hz oscillator for competence of the system
15. Connect the oscillator to the speaker system and re-test the properties of corn starch
16. Record and analyze the results
17. Test corn starch properties by applying pressure to a mixture of corn starch and water at different speeds
18. Record and analyze the results obtained
Material List
[edit | edit source]-
 Amplifier/Speaker Cable Materials
 -
 Speaker Attached to side of Speaker Box
 -
 Wire Stripper
 -
 50 Hz Oscillator
 -
 50 Hz Oscillator
 -
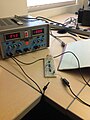 Power supply
 -
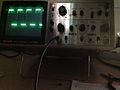 Oscilliscope
 -
 Speaker Board
 -
 Audio-Video Cable for HD Cable Box
 -
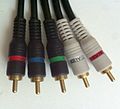 Audio-Video Cable
 -
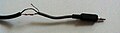
 Audio Cable
 -
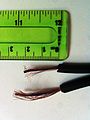
 Cutting Audio Cable
 -
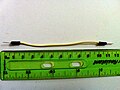
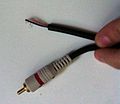 Audio Cable Cut
 -
 Audio Cable Cut
 -
 Add caption here
 -
 Add caption here
 -
 Add caption here
 -
 Audio Cable - PC Audio Cable Connection
 -
 Connector Cable


1. One speaker box with one sub woofer
2. Power Tool
3. One drill
4. Water
5. Corn Starch
6. Nails
7. Bread board
9. Resistors
10. One 9V battery
11. Wires
12. Oscilloscope
13. Power supply
14. Cables with rods
15. Regulator
16. Timer/Divider chips
17. Multimeter
18. Potentiometer
19. Wire Stripper
20. Multimeter
Software List
[edit | edit source]Test Sound Site was used to emit various frequencies through a computer into an amplifier and then into a speaker. These various frequencies were used to test the reaction of corn starch and water mixture from different sound waves.
Time
[edit | edit source]Hours Per Week:
Team Work: ~ 2 hr/week (In Class), ~ 2.5 hr/week (Out Side Class)
Individual Work: ~ 5 hr/week (Out Side Class)
After 4 Weeks:
Total Team Work Hours: ~18 hr/4 week
Individual Hours: ~ 20 hr/4 week
3 Individuals Hours: 60 hr/4 week
Accumulated Project Hours: ~78 hr/ 4 week
Tutorials
[edit | edit source]How to Mount the Sub Woofer on the Speaker Box
For this tutorial you will need one speaker box, one sub woofer, one jigsaw, four screws, one drill with a drill bit the same size as the screws, a screwdriver, a level and a pencil..
1. Unscrew the back cover of the speaker box and disconnect any wires and set it aside. You will not need it for this project.
2. Unscrew the sub woofer from the box using your screwdriver and remove it from the box. Keep the screws, you will need them later.
3. You should make your hole in the speaker box just big enough to supplant the base of the sub woofer into so take your sub woofer and place it on the spot on the speaker box where you want to make your hole. Now take your pencil and make an outline of the base of the sub woofer on that spot. Now set your sub woofer aside for now.
4. Take your jigsaw and make an incision in the middle of the outline you traced. Now from there begin to saw your way out carefully and slowly while remembering to stay within the boundaries of the circle.
5. Once you have cut your hole place the base od your sub woofer into the hole and make sure it fits. If not make necessary adjustments.
6. Now take the screws you unscrewed to take out the sub woofer and insert them in their holes. Press down on each of them so as to make a pre-determined mark of where you will drill.
7. Now remove the screws and remove the sub woofer from the hole. Now take your drill with the appropriate size drill bit and drill holes all the way through the pre-determined spots you marked with the screws.
8. Now place your sub woofer back in the hole and the screws back in the holes on the outer rim of the sub woofer. Make sure the screws line up with the holes that you drilled in the box.
9. Now screw the screws in the holes with a screwdriver.
10. Once you have screwed it down, take your level and make sure the sub woofer is level on the speaker box. If not then make the necessary adjustments.
How to Assemble a Cable to be Connected from a Computer to a Speaker
1. Get an audio cable
2. Cut each end of the cable (Unless it already has an end that can be attached to the audio port of the computer, then cut only one of the ends)
3. Separate the negative wire and group it together
4. Peal the positive wire and group it together
5. Get a PC audio connector plug from a pair of headphones, PC audio cable, etc. (Only if you had to cut both sides of the cable)
6. Peal the cable of the PC audio connector plug and separate the positive and negative wires (Only if you had to cut both sides of the cable)
7. Attach the positive end of the audio cable with the positive end of the PC audio connector plug by simply twisting the wires with each other, since this wires are good conductors they will not need a more sophisticated connection (Only if you had to cut both sides of the cable)
8. Repeat step 7 for the negative wires
9. Take the positive cable of the other end and connect it to the positive cable of the speaker
10. Repeat step 9 for the negative cables
11. Put tape around each of the connections to prevent the the contact of the pealed positive and negative wire with each other
NOTE: If the speakers used have a pre-arranged system of connection you can just simply cut it or use a connector cable to facilitate the access to the negative and positive cables
How to make oscillator
50Hz Oscillator Tutorial 1
-OR-
50Hz Oscillator Tutorial 2
Next Steps
[edit | edit source]1. Figure out if the problem with the cable was due to malfunction of the cable or miss connection of the amplifier
2. Test the oscillator with the oscilloscope
3. Find a way to connect the oscillator to the speaker board
4. Students can submit their engineering project proposal, for a "Walk Through Engineering Showcase", HERE