The purpose of this MakerBot Cupcake CNC procedure is to assist future HCC engineering students with the 3D-Scan project. By completing this procedure, a future team working with the MakerBot will not only understand how to operate it quickly, but also advance to the next step in the project.
7. Using the connect tool in the top Replicator G menu, connect ReplicatorG to the MakerBot. If the connection is not recognized in ReplicatorG you may need to select a different serial port or rescan for other serial ports. This can be done by going to the “Machine” drop down menu on the tool bar in ReplicatorG. Selecting the connect toolSelecting or scanning other serial ports
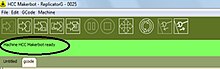
8. “Machine HCC Makerbot ready” should appear in green at the top of the ReplicatorG screen. And more of the tools at the top of the ReplicatorG screen are available to use. Confirming the Replicator G - MakerBot connection is complete
9. Place the black wire into the MakerBot Cupcake CNC motor. The motor is located in the center of the top side of the MakerBot. Placing the black wire
10. Tighten the screw. The screw is located on the right side of the motor. Locating and tightening the screw
11. The setup of the MakerBot Cupcake CNC is now complete.
3. Search something to print using the search bar in the upper right-hand corner. Searching an object on Thingiverse
4. In the search results list, click on the link that pertains to the object you wish to print. Do not click on a link that is the image of something.
5. On the object’s page, confirm this is what you want to print by referring to the images on the left.
6. Near the bottom of the page find an STL file to download. NOTE: There may not be any file to download if the STL file for that object has not yet been developed.
7. Click the red download arrow adjacent to the STL file you want to print. Downloading the STL file from Thingiverse
8. Refer back to the desktop to confirm the file was downloaded.
9. If the STL file is present, you have successfully downloaded the file, and are ready to print.
1. In ReplicatorG, go to the File drop down menu in the toolbar, select “Open.” Opening an STL file on Replicator G
2. In the “Open” window, go to “Desktop” and open the STL file you want to print.
3. The picture of the file should appear on ReplicatorG. To view the model of the object, use the “View”, “Move”, and “Rotate” commands located on the right side of the ReplicatorG window. Viewing the object in Replicator G
4. Scale the model to the size you desire, but make certain the size is consistent with the tolerances of the MakerBot Cupcake CNC. NOTE: MakerBot Cupcake CNC will print up to any size below 10mm x 10mm x 15mm. Scaling the object in Replicator G
5. Click “Generate GCode.” Generating GCode
6. If you made any changes to your model, a "Save model?" window will appear. Click yes if this is the appropriate scale of the model you want to print.
Saving the model
7. In the GCode Generator window, select SF35-cupcake-HBP as a Skeinforge profile. Selecting Skeinforge Profile
8. Select or unselect the “Use raft” check box if you want to create a raft. Checking the raft box
9. Click Generate GCode at the bottom of the GCode Generator window. Generating GCode for the modelGCode Loading Screen
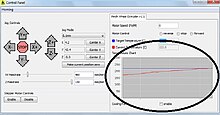
1. Click on the control panel tool in the ReplicatorG tool bar. Opening the Control Panel Window
2. In the “Control Panel” window, set the “Target Temperature (C)” to 220.0. This heats the wire to its appropriate melting temperature. This could take a few minutes. Setting the Target Temperature
3. Moving the X, Y, and Z jog controls of the Homing feature in the Control Panel Window, center the motor over the work table. Centering the work table For more assistance you can view a video using this link:Centering the Work Table under the MakerBot Motor
4. Now wait for the motor’s current temperature to reach the target temperature. Recognizing that the current temperature has reached the target temperature
5. Once the motor is centered and heated, click the “Build” tool in the ReplicatorG toolbar. Using the Build tool
6. A message will appear stating that the MakerBot will do a test extrusion and the material from the motor will be released. Remove the material from the work table and click the “Yes” option on the "Continue build?" window that appears.