
Filling Scuba Cylinders
| Completion status: this resource is ~75% complete. |
Contents based on SANS 10019:2011. Later versions are slightly different, but it is not worth revising until the current draft version is published |
Scuba cylinders must be filled with high pressure breathing quality air or gas mixtures before use in a diving operation. The skills can be described under two main aspects:
- Filling scuba cylinders with compressed air.
- Filling cylinders with compressed breathing gas mixtures other than air.
Filling scuba cylinders with compressed air
[edit | edit source]There are also two main techniques used to fill scuba cylinders with air. They are often but not necessarily used together.
- Filling scuba cylinders with compressed air using a High Pressure Breathing Air Compressor.
- Filling scuba cylinders by decanting from high pressure storage cylinders.
High Pressure Breathing Air Compressor Operator Training Manual
[edit | edit source]This manual is based on the legal requirements of the Republic of South Africa. Most of the principles will be applicable in other countries, but legal requirements will differ. It is the user’s responsibility to comply with local legislation.
Background and Introduction
[edit | edit source]Learning Outcomes
[edit | edit source]This learning is intended for those who fill portable containers for breathing air for use underwater by divers in self contained underwater breathing apparatus(SCUBA), for use in surface supplied diving equipment (SSDE) and for use out of the water in Self Contained Breathing Apparatus (SCBA). The outcomes and criteria may be defined in a range of documents including but not limited to South African National Standard 10019 (as may be amended from time to time).
This learning is intended to contribute towards the achievement of competence within the fields of Commercial and Recreational Diving.
This learning is intended to permit accreditation to operate a high pressure air filling station for SCUBA, SSDE and SCBA cylinders at the workplace.
This learning does not include all the responsibilities of the employer or owner of a filling station.
Specific Outcomes
[edit | edit source]
In particular, people credited with this competence must be able to:
- Perform pre-fill external inspections on portable containers for compressed breathing gas and set aside cylinders not conforming with requirements.
- Identify Oxygen Clean cylinders and cylinders labelled for breathing gases other than air.
- Safely operate high pressure breathing air compressors.
- Safely fill portable containers for compressed breathing gas with compressed air from high pressure breathing air compressors and high pressure storage systems.
- Safely fill Oxygen Clean cylinders with oxygen compatible air without contaminating them.
- Safely top up cylinders containing breathing gases other than air with compressed breathing air and label the cylinder appropriately
- Record the details as required by legislation
General Outcomes
[edit | edit source]In general, people credited with this competence are expected to:
- Identify and solve problems relating to the implementation of safe and efficient practices at the filling station.
- Work effectively with customers and colleagues when operating an air filling station.
- Collect, analyse, organise and critically evaluate information before assessing whether equipment is serviceable.
- Organise and manage themselves and their activities when operating equipment and providing a service.
- Communicate effectively with the customer regarding the status of the cylinder and the specifications for the fill, and effectively record required information.
- Use appropriate technology to provide a service/product.
The required skills are based on knowledge and procedures defined in the following reference documents and general principles.
- Relevant sections of SANS 10019:2011, including but not limited to:
- Section 8: Marking, labelling, colour coding and certificates
- Section 9: Filling of containers
- Section 10: Handling, storage, transportation and use
- Section 11: General safety precautions
- Table 4: Permanent gases: charging pressures and corresponding developed pressures
- Table 5: Permanent gases: developed pressures and corresponding charging pressures
- Table 11: Colour marking of gas cylinders
- Table 13: Pre-fill inspection rejection criteria for all cylinders other than welded LPG cylinders
- Table 15: Impurities in compressed air for breathing
- Annex A (normative) List of current approved manufacturing standards for the importation and manufacture of gas containers in South Africa
- Annex C (normative) Schedule of SCUBA and SCBA cylinder colour coding and labels
- Relevant sections of the General Safety Regulations and Driven Machinery Regulations of the Occupational Heath and Safety Act 1993
- Basic principles of operation of High Pressure Air Compressors.
- Standard nomenclature of major components of high pressure air filling systems
- Specific operating procedures of the filling installation/s used for instruction and assessment against this standard, including but not limited to the manufacturer’s operating instructions.
Introduction to filling cylinders
[edit | edit source]Who may fill cylinders: Legal position in South Africa
[edit | edit source]Health and safety in the workplace in South Africa is regulated by the Occupational Health and Safety Act, 1993 (Act No. 85 of 1993) and the various regulations in terms of section 44 of the act.
The scope of the OHS Act includes "To provide for the health and safety of persons at work and for the health and safety of persons in connection with the use of plant and machinery; the protection of persons other than persons at work against hazards to health and safety arising out of or in connection with the activities of persons at work"
SABS 019 - Transportable containers for compressed, dissolved and liquefied gases — Basic design, manufacture, use and maintenance, is incorporated into the Vessels under Pressure Regulations 1996, Regulation 3.1(a) and Regulation 10 by Government Notice R1625 of 4 October 1996
Pressure Equipment Regulations of 17 September 2004 supersedes and repeals (Regulation 21) the Vessels under Pressure Regulations 1996. Later version Pressure equipment regulations 2009.
South African National Standard SANS 10019:2008 Edition 6 was approved by National Committee StanSA SC 5120.05D, Vessels and systems under pressure – Cylinders, in accordance with procedures of Standards South Africa, in compliance with annex 3 of the WTO/TBT agreement.
SANS 10019:2008 Edition 6 was published in June 2008. This document supersedes SABS 019:2001 (edition 5).
SANS 10019:1011 Edition 7 supersedes SANS 10019:2008.
Relevant extracts from the OHS Act and Vessels under Pressure Regulations are quoted below to show the legal status and context of SABS 019 (now SANS 10019)
SABS 019 was superseded by SANS 10019 in 2008 and has the same legal status. References to sections of this document are formatted: SANS 10019: Section number and section header
Extracts quoted from SANS 10019 and other documents are printed in italics
For example, the persons regarded legally competent to fill SCUBA, SSDE and SCBA cylinders within the jurisdiction of the OHS Act are defined by SANS 10019 as follows:
- SANS 10019: 9. Filling of containers:
- 9.5 Persons competent to fill containers
- No person shall fill a portable container with gas unless he is competent to fill containers with the gases he handles, and unless
- a) he is fully conversant with the relevant requirements of this standard;
- b) he is satisfied that the container is suitable for the intended purpose;
- c) the container is not due for periodic inspection or testing; and
- d) permission to fill the container has been granted by the owner of the container, in writing, except where the container is owned by the end user. This requirement is for safety reasons, since the cylinder containment history is an essential reference for correct filling.
Occupational Health and Safety Act, 1993 (Act No. 85 of 1993) refers:
- (section) 44 Incorporation of health and safety standards in regulations
- (1) The Minister may by notice in the Gazette incorporate in the regulations any health and safety standard or part thereof, without stating the text thereof, by mere reference to the number, title and year of issue of that health and safety standard or to any other particulars by which that health and safety standard is sufficiently identified.
- (2) No health and safety standard shall be incorporated in the regulations except after consultation with the Council.
- (3) Any health and safety standard incorporated in the regulations under subsection (1) shall for the purposes of this Act, in so far as it is not repugnant to any regulation made under section 43, be deemed to be a regulation, but not before the expiry of two months from the date of incorporation thereof.
- (4) Whenever any health and safety standard is at any time after the incorporation thereof as aforesaid, amended or substituted by the competent authority, the notice incorporating that health and safety standard shall, unless otherwise stated therein, be deemed to refer to that health and safety standard as so amended or substituted, as the case may be.
- (5) The chief inspector shall keep a register of particulars of every publication in which a health and safety standard incorporated in the regulations under subsection (1), and every amendment or substitution of any such health and safety standard, was published, and also of the place in the Republic where such publication is obtainable or otherwise available for inspection, and he shall make that register or an extract therefrom available free of charge to persons having an interest, for inspection.
- (6) The provisions of section 31 of the Standards Act, 1993 (Act No. 29 of 1993), shall not apply to any incorporation of a health and safety standard or of any amendment or substitution of a health and safety standard under this section.
Pressure Equipment Regulations, 2009. refers:
- Regulation 18
- Transportable gas containers
- No user shall use or require or permit a portable gas container to be used, and no user shall fill, place in service, handle, modify, repair, inspect or test any portable gas container, other than in compliance with standards incorporated into these regulations in terms of section 44 of the Act.{In these regulations “the Act” means the Occupational Health and Safety Act, 1993 (Act No. 85 of 1993)}
The basic procedure
[edit | edit source]The filling of breathing air cylinders from a high pressure compressor and storage banks can be separated into 6 stages:
- Pre-filling inspection of cylinders to ensure that they are suitable for filling.
- Starting the compressor, and checking that it is working correctly
- Connecting the cylinders, opening the valves and starting the fill
- Filling the cylinders by keeping it vertically on the water cooling tank
- Filling the cylinders and ensuring that the compressor continues to work correctly
- Closing the valves and disconnecting the cylinders
- Storing the cylinders and recording the filling data
This process is described in detail in the following 5 Modules
The 6th Module explains the basic principles of operation of a typical compressor, and the 7th Module provides useful information beyond the training requirements, which may be useful to the operator in practice.
Module: Inspection of cylinders
[edit | edit source]The Compressor Operator must perform an external inspection of each SCUBA SSDE or SCBA cylinder presented for filling in order to assess whether it may be filled. This includes identification of Oxygen clean cylinders and cylinders labelled for breathing gases other than air.
What you must be able to do:
[edit | edit source]Decide whether the cylinder is acceptable to fill:
To do this the following steps are followed:
- Identify the following permanent markings:
- Working pressure
- Test pressure
- Serial number
- Manufacturer
- Manufacturing standard
- Water capacity
- Most recent hydrostatic test date
- Record the working pressure and serial number for future reference.
- Identify and record the following non-permanent markings and information:
- Owner’s name and address
- Most recent visual inspection date
- Type of breathing gas which may be filled
- Oxygen clean status
- Most recent eddy current test (if applicable)
- Inspect the external condition of cylinder:
- It must be clean and free from obvious contaminants
- It must be the correct colour scheme for service
- It must have a correct contents label
- External corrosion must be within limits
- Dents, gouges, and other mechanical damage must be within limits
- Burn marks must be within limits
- There may not be an external foot ring on cylinders for underwater service
- Inspect the condition of the cylinder valve and safety devices (if any)
- Check if permission is given by the cylinder owner to fill.
- Check the residual gas in cylinder
- Confirm that the type of breathing gas contained by the cylinder is a type of gas you are competent to fill.
- Measure the gas pressure remaining in the cylinder when inspected.
- Follow the appropriate procedure if the cylinder is empty or residual pressure is very low (less than about 10 bar or does not register on the test gauge)
- Analyse gas composition in the cylinder if applicable (This point only applies to operators who are competent to analyse and fill gases other than air).
- Make the decision
- Assess whether the cylinder complies with legal requirements for permanent and non-permanent markings
- Assess whether cylinder is in date (not yet due) for Hydrostatic test, Internal visual inspection and if applicable neck thread Eddy current test (Visual Plus).
- Assess whether cylinder, valve and any safety devices are in good serviceable condition
- Reject cylinders that are not acceptable and provide correct reasons why they must be rejected
Note 1: This training is to fill compressed breathing air and "Oxygen compatible" compressed breathing air only.
Note 2: You must also comply with standard operating procedures of the filling station. These will vary and therefore can not be covered by this manual. The owner of the facility should provide them as an operation manual.
Rules, regulations and procedures that specify how these things must be done:
[edit | edit source]Requirements of SANS 10019
[edit | edit source]The legal requirements specified in SANS10019 are detailed in the extracts below:
- 3.26 special gas
- gas or gas mixture that has specific properties and is prepared for special applications (e.g. instrument calibration gas mixtures or technical diving mixtures)
- Note that in terms of definition 3.26 technical diving mixtures are defined as Special gas, and the correct colour for cylinders containing these gases which will not be used underwater is "Protea".
- 7.1 General
- Only an approved test station shall carry out periodic inspection and testing (revalidation). The frequency of inspection and hydrostatic testing shall be in accordance with the requirements of SANS 1825. (Further text deleted as not applicable)
- 7.3 Safety precaution
- Cylinders that are overdue for inspection and testing shall not be refilled.
- 8.1 Permanent marking
- Each container shall be legibly and durably marked (hard-stamped, embossed or embedded in the resin of composite containers) with the information required as given in the applicable design standard or ISO 13769.
- Gas containers for compressed gases are not required to be marked with the Tare mass, as per the requirements of ISO 13769.(Further text deleted as not applicable)
- No permanent marking shall be removed from any container, however where change of ownership takes place, the previous owner’s marks can be cancelled by over stamping using a letter “X”.
- The serial number shall never be removed from any container.
- 8.3 Permanent marking following revalidation
- 8.3.1 Notwithstanding the exceptions in 8.3.2 and 8.3.3 the following additional permanent markings are to be hard-stamped on the shoulder of the container after revalidation:
- a) the approved test station identification mark;
- b) the year and month (for example 08/04) and the suffix "H” if a hydrostatic test has been done; (Further text deleted as not applicable)
- 8.3.1 Notwithstanding the exceptions in 8.3.2 and 8.3.3 the following additional permanent markings are to be hard-stamped on the shoulder of the container after revalidation:
- 8.4 Maintenance of permanent marking
- Permanent markings on a container shall be maintained in an acceptable manner and the container shall not be filled if the markings are illegible. Containers protected by an outer sleeve (e.g. plastic coating) can be filled if fitted with a test date ring and it is within the test date period.
- 8.5 Colour coding of containers
- 8.5.1 Colour identification
- The colours in table 11 are the allocated colours for the gases indicated in column 2. When changing the service of a container, the old paint is to be removed entirely before the application of the new identification colour. (Further text deleted as not applicable)
- 8.5.2 Containers for other commonly used gases (other than LPG)
- 8.5.2.1 Cylinders
- Cylinders for the gases listed in table 11 shall have the body colour as shown in the table. (Further text deleted as not applicable)
- 8.5.2.1 Cylinders
- 8.5.4 Containers for gases for which specific colour markings have not been allocated
- Colour marking of containers for special gases or containers for which specific colour markings have not been allocated, shall be coloured Protea (1020-Y80R) or as otherwise approved.
- 8.5.5 Cylinders for medical gas
- Cylinders for medical gases shall be colour-marked in accordance with SANS 10006.
- 8.5.6 Cylinders for SCUBA and SCBA use
- Cylinders for SCUBA and SCBA shall be colour-marked with the appropriate colour given in Annex C. Marking shall be in accordance with SANS 50250. The body of a container used for diving and surface rescue purposes shall be Canary yellow and the shoulder shall be French grey.(see table 11).
- 8.5.1 Colour identification
- 8.6 Labelling
- 8.6.1 Precautionary labels
- 8.6.1.1 General
- The labelling of cylinders (excluding LPG) shall comply with SABS ISO 7225.
- 8.6.1.2 Breathing gas
- Components of breathing gas mixtures other than air shall be listed on a 100 mm wide self-adhesive band fixed adjacent to the shoulder. (See annex C.)
- 8.6.1.1 General
- 8.6.1 Precautionary labels
- 8.6.4 Other labelling
- In addition to the marking required in terms of 8.1, 8.3 and when relevant, 8.4, each filled container shall be labelled in accordance with the regulations of the Trade Metrology Act, 1973 (Act 77 of 1973) and SANS 289.
- 9.1 General
- Prior to filling a cylinder an inspection to the guidelines given in 9.3 shall be performed. Should the rejection criteria be met for any of the given conditions, the cylinder shall be sent to an approved test station for further examination
- The rejection criteria are in accordance with SANS 1825, based on ISO standards.
- The gases or mixtures of gases given in tables 3, 4, 5, 6 and 7 may be transported in containers The purity and the moisture content of gases shall comply with the requirements given in an approved standard.
- When filling a container for sale, the requirements of the Trade Metrology Act, 1973 (Act No. 77 of 1973) and its regulations shall be observed
- 9.5 General
- No person shall fill a portable container with gas unless he is competent to fill containers with the gases he handles, and unless
- a) he is fully conversant with the relevant requirements of this standard;
- b) he is satisfied that the container is suitable for the intended purpose;
- c) the container is not due for periodic inspection or testing; and
- d) permission to fill the container has been granted by the owner of the container, in writing, except where the cylinder is owned by the end user. This requirement is for safety reasons, since the cylinder containment history is an essential reference for correct filling.
- 9.6 Filling with permanent gases
- 9.6.1 Inspection before filling
- The pre-fill inspection of the container by the filler shall be in accordance with the criteria as given in table 13 or table 14. Before filling any container, the filler shall ensure that:
- a) the container is clean and free from obvious contaminants;
- b) the container complies with the requirements of an approved standard and has the appropriate pressure rating;
- c) the container is not due for periodic inspection or testing; and
- d) the container, valve and safety devices, if any, are in good serviceable condition.
- 9.6.1 Inspection before filling
- 9.6.2 Inspection after filling
- After it has been filled, the container should be checked for leaks. If a leak is found and it cannot be stopped by the tightening of spindles or gland nuts, the container shall be emptied and shall not be refilled until the cause of the leak has been rectified.
- NOTE See also table 4 and 5 for the developed pressure for permanent gases
- 9.8 Filling of containers already in use
- A container already in use shall not be filled other than in accordance with the details stamped on it.
- 9.9 Compressed air for SCBA and SCUBA (excluding breathing gas mixtures)
- 9.9.1 Additional checks before filling
- In addition to carrying out an inspection in terms of 9.6.1, the filler shall ensure that no cylinder equipped with a foot ring is used for underwater service, and that the cylinder is not due for periodic inspection or testing (or both). Where the cylinder has a detachable boot, the filler shall remove the boot and inspect the bottom of the cylinder for signs of external corrosion.
- 9.9.1 Additional checks before filling
- 11.1 Containers exposed to fires
- Where it is evident from the condition of the paint that a container has been exposed to fire, it shall be immediately removed from service or its place of storage, and be presented for inspection and evaluation to an approved inspection station that will follow the requirements of SANS 1825 (see also annex A)
Colour coding of cylinders
[edit | edit source]| Name of gas | Chemical Symbol | Colour of cylinder bodyа | Colour of shoulder | |
|---|---|---|---|---|
| 2 | Air | — | French grey 4010-G50Y | |
| 5 | Argon | Ar | Peacock blue 5040-B20G | |
| 11 | Helium | He | Middle brown 7020-Y40R | |
| 15 | Nitrogen | N2 | French grey 4010-G50Y | Black S 9000-N |
| 16 | Oxygen | O2 | Black S-9000-N | |
| 17 | Special gas | — | Protea 1020-Y80R | |
|
NOTE The finish of the above paint colours is semi-gloss (sheen) | ||||
Note that Table 11 does not apply to SCUBA or SCBA cylinders. See also Annex C
Pre-fill inspection rejection criteria
[edit | edit source]| Condition | Reject criteria |
|---|---|
| Arc or torch burns | Localised heat affected zone plus addition of weld metal or removal of metal by grinding, filing etc. |
| Bulge | Visible swelling |
| Chain pitting, line or channel (or both) corrosion | When any one condition affects 50% or more of the diameter of the cylinder |
| Cracks | Split in material |
| Crevice corrosion | When this occurs close to an opening in a welded steel cylinder OR if the depth is greater than 20% of the original wall thickness in welded and seamless cylinders |
| Cuts or gouges | When metal has been removed and the depth of the cut or gouge is greater than 10% of the cylinder wall thickness |
| Dents | Dent is greater than 3% of cylinder diameter, or Diameter of the dent is greater than 15 times the depth of the dent |
| Depressed bung | When the profile of a welded cylinder has changed from the original shape |
| Fire damage | When there is excessive general or local heating, e.g:
|
| General corrosion | If the original surface of the metal cannot be seen |
| Isolated pits | Pits up to 5mm in diameter |
| Plug or neck Insert | Additional inserts to base or wall, which are not a part of the original design, e.g. pipes, nuts and bolts |
| Stamping | Any stamp markings on the parallel part of the cylinder wall. Any alterations, illegible, incorrect or inadequate markings |
| Suspicious marks | Marks introduced other than by the manufacturer or an Approved test station |
| Vertical stability | Any stacking of cylinders which creates an unstable condition such that cylinders may fall |
Scuba cylinder colour coding and labels
[edit | edit source]| Description | Gas type | |||
|---|---|---|---|---|
| Air | Pure oxygen | Nitrox | Trimix | |
| Body colour | Golden Yellow | Black | Golden Yellow | Golden Yellow |
| Shoulder colour | French Grey | White | French Grey | French Grey |
| Adhesive band colour | N/A | N/A | Cleara | Cleara |
| Adhesive band size | N/A | N/A | 300mm x 80mm | 300mm x 80mm |
| Lettering | N/A | N/A | NITROX | TRIMIX |
| Lettering colour | N/A | N/A | Green | Green |
| Contents label (as specified) | N/A | N/A | NEEDED | NEEDED |
| a The adhesive band is normally clear and the colour of the cylinder body should show through with the words of the type of gas in the correct letter colouring | ||||

NOTE: Nitrox includes all breathable mixtures of Nitrogen and Oxygen up to and including 99% Oxygen. Any Cylinder that has been used for a Nitrox mixture may be considered to contain Nitrox if it has been filled with any combination of Air, Nitrogen and/or Oxygen, but NOT other gases.
The Nitrox label indicates that analysis for composition only requires Oxygen fraction to be measured. The rest may be considered to be Nitrogen. The Nitrox label does NOT imply that the gas is safe to breathe at normal atmospheric pressure.
NOTE: Trimix includes all breathable mixtures of Nitrogen Helium and Oxygen up to and including 99% Oxygen. Any Cylinder that has been used for a Trimix mixture may be considered to contain Trimix if it has been filled with any combination of Air, Nitrogen, Helium and/or Oxygen, but NOT other gases.
The Trimix label indicates that analysis for composition requires both Oxygen fraction and Helium fraction to be measured. The rest may be considered to be Nitrogen. The Trimix label does NOT imply that the gas is safe to breathe at normal atmospheric pressure.
Periodic testing and inspection
[edit | edit source]Extract from SANS 1825:2005 Edition 2
- 4. Periodic inspection and testing standards
- 4.1 Except where provided for in 4.2 and 4.3, containers shall be periodically inspected and tested in accordance with the relevant standard as follows:
- a) Sans 6406 for refillable seamless steel gas containers of water capacity up to 150 L;
- b) (not applicable)
- c) (not applicable)
- d) SANS 10461 for seamless aluminium alloy containers;
- Table 1 stipulates the frequency of internal inspections and hydrostatic tests as applicable in South Africa and, as such, overrides the frequency and test stipulations specified in the above-mentioned standards
- 4.2 (not applicable)
- 4.3 (not applicable)
- 4.1 Except where provided for in 4.2 and 4.3, containers shall be periodically inspected and tested in accordance with the relevant standard as follows:
| Contents of container | Frequency | |
|---|---|---|
| Internal inspection | Hydrostatic test | |
Non-corrosive gas (other than acetylene)
|
|
If there is evidence of corrosion or damage, repair container and test hydrostatically. Every 10 years |
Respirable gas for breathing
|
|
|
Neck thread Eddy current test requirements are specified by the cylinder manufacturer.
How to do it
[edit | edit source]This section explains the practical techniques and gives useful hints.
Identification of permanent cylinder markings
[edit | edit source]The information that is required to be stamped on the cylinder is specified by the standard to which the cylinder has been manufactured, and will vary to some extent. However there are some items which will always be there, and some which are legally required for the compressor records.
The permanent markings may only be stamped on the shoulder, the base or on a brass neck sleeve (very old British cylinders), NO markings may be stamped on the side of the cylinder. Note that on Aluminium cylinders the manufacturer’s name (Luxfer, for example) is often stamped on the cylindrical surface around the outside of the base. This is in a region of extra thickness and for structural purposes counts as the base, not the side wall. However, hydrostatic test stamps should be on the shoulder as that is where people will look for them.
-
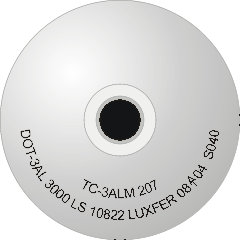 Stamp markings on an American manufacture aluminum 40 cu.ft. 3000 psi cylinder
 -
 Stamp markings on an American manufacture aluminum 80 cu.ft. 3000 psi cylinder
 -
 Stamp markings on a British manufacture aluminium 12.2 l 232 bar cylinder
 -
 Stamp markings on an Italian manufacture steel 6 l 300 bar cylinder


The permanent markings include:
The standard to which the cylinder was designed and manufactured. (Required).
[edit | edit source]This will usually imply the material, as the standard will include alloy and strength specifications.
| Code | Origin | Material |
|---|---|---|
| AS 1777 | Australian standard | Aluminium cylinders |
| AS 2875 | Australian standard | Alloy steel cylinders |
| CODAP 2000 | French standard | Steel cylinders |
| DGV | Druck Gas Verordnung (German) | Steel cylinders |
| EEC 84/525 | EEC Council directive | Steel cylinders |
| EEC 85/526 | EEC Council directive | Aluminium cylinders |
| EN 1964/1 | European standard | Steel cylinders |
| EN 1964/2 | European standard | Steel cylinders |
| EN 1975 | European standard | Aluminium cylinders |
| EN 12445 | European standard | Composite cylinders |
| EN 13445, Parts 1-6, 8 | European standard | Unfired pressure vessels |
| ISO 9809-1 | International Standards Organisation | Steel cylinders |
| ISO 9809-2 | International Standards Organisation | Steel cylinders |
| ISO 9809-3 | International Standards Organisation | Steel cylinders |
| ISO 11119-1 | International Standards Organisation | Composite cylinders |
| ISO 11119-2 | International Standards Organisation | Composite cylinders |
| ISO 11119-2 | International Standards Organisation | Composite cylinders |
| ISO 11120 | International Standards Organisation | Steel tubes |
| ISO 20703 | International Standards Organisation | Aluminium cylinders |
| VSR Rules | Raccolta VSR (Italian) | Pressure vessels |
| Italian Regulations (Series XIX of NI) | Italian standard | Gas cylinders |
| JIS B8241 | Japanese Industrial Standard | Steel cylinders |
| Luxint | Luxfer gas cylinder specification | Aluminium cylinders |
| BS5045-2 | British Standards Institute | Steel cylinders |
| BS5045-6 | British Standards Institute | Cylinders < 0.5 litres |
| BS5045-7 | British Standards Institute | Steel cylinders |
| BS5045-8 | British Standards Institute | Aluminium cylinders |
| DOT 3A | Department of Transport (US) | Steel cylinders |
| DOT 3AA | Department of Transport (US) | Steel cylinders |
| DOT 3AL | Department of Transport (US) | Aluminium cylinders |
| DOT 3AX | Department of Transport (US) | Stainless steel cylinders |
| DOT 3AAX | Department of Transport (US) | Stainless steel cylinders |
| SANS 7866 | South African National Standard | Aluminium cylinders |
The Inspection Authority which certifies the cylinder (Required).
[edit | edit source]| SABS | South African Bureau of Standards |
| TUV | Technischen Uberwachungs Vereinigung (Germany) |
| DOT | Department of Transport (USA) |
| AT | Authorised Testing (USA) |
| LL | Lloyds of London (UK) |
| BV | Bureau Veritas (France) |
| CL | Cochrane Laboratories (USA) |
The rated working pressure of the cylinder (Required).
[edit | edit source]Typical examples of WORKING PRESSURES
- 30MPa
- 232 bar
- 3000 psi
- 200 Bar
- 150kg/cm
- 300Atu
These are usually identified by such abbreviations as WP (Working Pressure), CP (Charging Pressure), or PS (Pression de Service).
American cylinders made to DOT 3A or DOT 3AA code may have a + sign after the Test stamp. This indicates that in the USA they may be filled to 10% above the nominal working pressure if they have passed a more stringent hydrostatic test then that normally required.
It is necessary to convert the working pressure to units compatible with the filling equipment. Most people can convert between the various metric units without resorting to a calculator, but psi should be converted either by calculator or a table of equivalent pressures kept at the filling station.
Date of manufacture (Required).
[edit | edit source]Month and year are usual. E.g. 11/94, 05.07 etc.
Serial Number (Required).
[edit | edit source]A serial number distinguishes the cylinder from any other similar cylinder. This is not always easy to recognise, but it is usually a series of digits and letters. Sometimes the first part is followed by a second group which looks slightly different.
The manufacturer’s name or trademark (Required).
[edit | edit source]A combination of this and the serial number will uniquely identify the cylinder. For example:
| Ali-Tek (Huletts)2 | South Africa | Aluminium |
| Apolda (Apoldaer Stahlflaschen, now Eurocylinder Systems) | Germany | Steel |
| Catalina Cylinders (division of Aluminium Precision Products) | USA | Aluminium |
| Dalmine1 (Tenaris Dalmine) | Italy | Steel |
| Eurocylinder Systems (was Apolda) | Germany | Steel |
| Faber (Faber Industrie S.p.A.) | Italy | Steel |
| S M Gerzat (now subsidiary of Luxfer Gas Cylinders) | France | Aluminium |
| Heiser (Jos Heiser), (subsidiary of Worthington since 1998) | Austria | Steel |
| IWKA2 (Industrie Werke Karlsruhe Augsberg Aktiengesellschaft), (also IWK before 1970) bought out in 1990 by Mannesmann Cylinder Systems. | Germany | Steel |
| Kaiser1,2 | USA | Steel |
| Luxfer | USA, UK and Australia | Aluminium |
| MES Aluminium | Turkey | Aluminium |
| Norris Industries1,2 | USA | Aluminium |
| Pst1 (PST Cylinders L.L.C division of Pressed Steel Tank Co. Inc) | USA | Steel |
| Walter Kidde1,2 | USA | Aluminium |
| WS (Wilhelm Siebel)1 | Germany | Steel |
| Worthington Cylinders1 | USA | Steel |
| 1 indicates cylinders seldom seen in South Africa 2 indicates manufacturer no longer producing cylinders for SCUBA | ||
Cylinder volume
[edit | edit source]Usually stated in terms of water capacity, usually in litres, l, or L, but sometimes in kg or lb, and in USA in cubic feet of free air. The volume of cubic feet of an American cylinder is a nominal value, and refers to the cylinder filled to charge pressure when new (includes the extra 10% of the + rating).
Distributor or owner’s name
[edit | edit source](Optional): For example: Afrox, Air Liquide, Bauer, Dacor, Dräger, ScubaPro, Underwater World, US Divers.
Mass
[edit | edit source]Mass of empty tank without valve: usually in kg. In older or American tanks in lbs
Hydrostatic test stamps
[edit | edit source]the month and year of testing separated by the test station’s identification mark.
(see above for meaning of + mark on American cylinders)
Country of origin
[edit | edit source]| Code | Country | Manufacturer |
|---|---|---|
| AU | Australia | Luxfer |
| AT | Austria | Heiser (Worthington/Heiser) |
| DE | Germany | Siebel, Mannesman, IWKA, Apolda, Eurocylinder |
| FR | France | Gerzat |
| GB | United Kingdom | Luxfer |
| IT | Italy | Dalmine, Faber |
| JP | Japan | |
| US | USA | Luxfer, Catalina, Walter Kidde, Pressed Steel, Worthington |
| ZA | South Africa | Huletts (Ali-Tek) |
Non-permanent markings: Colour code and labels.
[edit | edit source]Colour code
[edit | edit source]Cylinders for Oxygen are colour coded black with white shoulder. They may not be filled with air. Only breathing grade high purity oxygen (Medical or Aviation grade) may be filled into these cylinders. They must be oxygen clean, but no label is required as all cylinders with this colour code must always be oxygen clean.
Yellow cylinders for breathing gases other than air will only be used for diving gas. SCBA cylinders for surface breathing apparatus will only contain air. The correct colour coding for SCBA is Golden Yellow with French Grey shoulder
Green shoulders or yellow shoulders are not a legal option.
Large cylinders which will not be carried by divers (SSDE) containing breathing gases must be colour coded according to Table 12. If these cylinders may be carried under water on diving bells or stages they should be yellow with grey shoulder, and then the hydrostatic and visual inspections must comply with the requirements for SCUBA cylinders.
Non submersible cylinders for SSDE containing air will be French Grey. The common practice appears to be to use black and white quartered shoulder but this does not comply with SANS 10019.
Non submersible cylinders for SSDE containing Nitrox or Trimix should be coloured "Protea" and labelled to indicate the composition.
Cylinders containing breathing gases which will be carried by divers in the water (SCUBA) must be colour coded and labelled according to Annex C. This specifies Yellow cylinder with Grey shoulder. Scuba cylinders which contain breathing gases other than air must be labelled according to Annex C.
The legally required colour scheme for compressed gas cylinders in South Africa is specified in SANS 10019 Table 11 and Annex C. These are not suggestions or recommendations. They have force of law. It is illegal to fill cylinders that do not comply with the requirements of SANS 10019 unless they belong to a foreign vessel and will not be used in South Africa. If you or your customers don’t like this, write to Standards SA and complain, giving your reasons and suggested alternatives. If enough people request a change and it is logical, reasonable and will not compromise safety it might be considered.
A problem with table 11 is that it is not easy to verify the accuracy of a colour. The colours are specified with precision, but the standard used is not easily accessible. In practice, any colour that seems to meet the description is usually accepted, as in practice no-one seems to be able to prove what the correct colours look like, though the colour swatches are available from SABS.
Visual inspection sticker, disc or ring
[edit | edit source]The visual inspection sticker, disc or neck ring will identify the accredited inspection facility and specify the date of inspection, usually by punching the printed year and month identifiers appropriate to the date of inspection. Such labels may only be used once and if there is any punching of multiple dates the label is invalidated. There is no rule specifying where on the cylinder this label must be placed, but it is recommended that it should be easily visible and where it will not be damaged, as if it is defaced so that the date of inspection is not clear and unambiguous, the cylinder must be rejected for filling.
If the label is not clearly legible it is the responsibility of the owner to remove equipment that obscures it. It would be fair to charge for labour to remove such equipment, but only with permission of the owner and if the technician is both competent and has the correct tools to do this.
Visual plus – Neck thread eddy current test
[edit | edit source]The Visual plus, or Eddy current test is performed on aluminium cylinders with parallel neck threads. It is not a specific requirement of SANS 10019, but is indirectly required because of the manufacturer’s service requirement. The Eddy current test is primarily used to identify sustained load crack development in the neck threads of cylinders manufacture from 6351 alloy, but it will detect cracks, folds and some other defects as well.
This test can not be done on taper threads and it is not required on cylinders with taper threads. It is also not required on steel cylinders and the equipment sold for these tests is not ordinarily calibrated for steel.
Partial list of tanks made with 6351 alloy (subject to sustained load cracking):
- Any tank stamped with permit or exemption numbers 6498, 7042, 8107, 8364 or 8422 including:
- All Walter Kidde DOT-3AL Scuba tanks
- Luxfer 72 and 100 cu.ft. Scuba tanks (S72, S100) made before 8/87
- Luxfer 80 cu.ft. Scuba tanks (S80) made before 12/88
- Luxfer 50 and 92 cu.ft Scuba tanks (S50, S92) made before 4/88
- Luxfer 30 and 63 cu.ft Scuba tanks (S30, S63) made before 5/88
- Luxfer 40 cu.ft Scuba tanks (S40) made before 6/88
- Luxfer 80.8 cu.ft Scuba tanks (S80.8) made before 5/87
- Luxfer UK cylinders stamped with any of the following markings:
- HOAL1
- HOAL2
- HOAL3
- HOAL4
- BS5045/3/B
- BS5045/3/B/S
- AA6351
- HE30
- P****X (as part of serial number)
- P****P (as part of serial number)
- On some small cylinders manufactured at Luxfer UK’s Aldridge plant the above may not be present. In that case, the alloy can be determined from the three-digit number stamped around the base. If the three digit number is of the form 1** then the alloy of manufacture is AA6351
No Catalina tanks were made from 6351 alloy, and they do not require eddy current testing.
Ali-Tek cylinders are manufactured from 6061 Alloy by Hulett Cylinders. They claim that the 6061 alloy is not susceptible to Sustained Load Cracking, but also recommend eddy current testing of their product. This will make them relatively expensive to maintain.
Eddy current testing frequency varies with manufacturer’s recommendation. Some test stations insist on doing an eddy current test with every visual inspection, even if it is not required by the manufacturer. If the eddy current test label is less than 1 year old it is always in date, if less than 2 years it is usually in date.
Oxygen clean
[edit | edit source]What is the meaning of Oxygen Clean?
Oxygen clean is a term used to describe equipment that has been cleaned and decontaminated to remove materials which may start a fire or explosion when in contact with high concentrations of oxygen, such as occur during partial pressure blending of gas mixtures for diving. These contaminants include hydrocarbons such as lubricating oils, which are present in small quantities in standard grade compressed breathing air.
What is Oxygen compatible air?
Oxygen compatible air is air that has been filtered to a higher standard than is normally required for compressed breathing air. The reason for this is to reduce the hydrocarbon content (mostly due to compressor lubricating oils) to a level that firstly will reduce the risk of combustion when blended with gases with a high oxygen fraction, and secondly, that will not contaminate Oxygen cleaned equipment. Oxygen compatible air is just ordinary compressed air that has extremely low hydrocarbon content. This is usually achieved by passing the breathing quality air from the compressor through another filter, which gives rise to the alternative names of double filtered air or hyper-filtered air. In the diving industry these all have the same meaning, but oxygen compatible air is the more accurate term, as it describes what is actually required, You can run your air through as many filters as you like, but only if the air is cleaned of hydrocarbons will it be oxygen compatible and acceptably safe to blend with high partial pressures of oxygen. The allowable limit of hydrocarbons in compressed breathing air according to SANS 10019 table 13 is 0.5mg/m3. This is not a lot, but it is still too much for Oxygen compatible air.
It is entirely safe and acceptable to use Oxygen compatible air in a cylinder that has not been cleaned for oxygen service, but not the other way round. Filling an Oxygen clean cylinder with standard grade breathing air may contaminate it and this may cause a fire while filling or at some later date. Filling an oxygen clean cylinder with standard grade compressed breathing air may cause damage to property and injury or death to some person.
| Carbon Dioxide | 500 ppm |
| Carbon Monoxide | 2 ppm |
| Gaseous Hydrocarbons | 25 ppm |
| Condensed Hydrocarbons | 0.1 mg/m3 |
| Water Vapor / Moisture | −58°F Dew point |
| Solid Particulate Size | 2 microns |
Identifying an oxygen clean cylinder
A cylinder that has been cleaned for Oxygen service should be identified by a self adhesive label indicting that it has been found clean on inspection and giving the date of inspection. Oxygen clean status must be revalidated after hydrostatic testing and after any internal cleaning at any other time, but not necessarily after a visual inspection, which should not contaminate the interior. Cylinders that are labelled Oxygen Clean will also be labelled with a Nitrox, Heliox or Trimix label, but not all Nitrox, Heliox or Trimix cylinders will be labelled Oxygen Clean, as this is only necessary for cylinders that will be filled by partial pressure blending or with oxygen fraction greater than 23%. Partial pressure blending however, is a common method of blending Nitrox, Heliox and Trimix, so most cylinders with these labels will be Oxygen Clean.
SANS 10019 requires oxygen cleaning before first fill of any Nitrox or Trimix cylinder to contain Oxygen fraction greater than 23% (SANS 10019 Paragraph 9.9.2 e)
Cylinders with an Oxygen Clean label should NEVER be connected to a filling system that is not Oxygen compatible. If this is done by accident the Oxygen Clean label MUST be removed immediately and the owner notified. The cylinder is considered contaminated until a competent person has verified that it is still Oxygen Clean and has applied a new label with the date of re-verification. It should be assumed that the cylinder may have to be cleaned before re-verification is possible. This is cheaper than an investigation by an inspector and a possible charge of criminal negligence if you fail to report the contamination and someone is injured or killed in a consequent fire or explosion.
If the owner of a cylinder with an oxygen clean label requests a fill from a non oxygen compatible filling installation, make sure that he first removes the Oxygen Clean label, or remove it in his presence. Also check that the contents are not more than 40% oxygen, as this is above the limit for addition of air that is not oxygen compatible.
Gas type and composition (analysis)
[edit | edit source]This subject is beyond the scope of this manual. Any cylinder that is labelled for breathing gases other than air is the responsibility of the user to analyse before use. Air top (topping up with air) on a cylinder labelled for other mixtures is permissible and should be labelled as such. A strip of masking tape or other self-adhesive label must be applied to the shoulder where it can best be seen with the words “Air Top -Analyse before use” clearly and legibly inscribed in waterproof ink. This is in addition to any tape over the valve to indicate that the cylinder has been filled.
Take care that Oxygen Clean cylinders are not contaminated. See previous section.
Inspection of external condition of cylinder
[edit | edit source]The cylinder should be clean and free from obvious contaminants.
This refers to loose dirt and grease, not whether the paint is scuffed, stained or faded. The reason for this inspection is to ensure that there is no risk of getting the contamination into the cylinder or contaminating other equipment. The filler is not obliged to clean a cylinder brought for a fill, and it will depend on the organisation’s policy what should be done about it. Charging the customer for cleaning the cylinder should be negotiated first, or he may refuse to pay for it.
The condition of the paintwork has no minimum standard specified. The paint is there to identify the contents and service by the colour code. The colours are defined, but as long as they are substantially correct and can be clearly recognised, there is no reason to reject a cylinder if the paint is shabby.
On the other hand, no matter how pristine the paintwork, if the colours are not correct the cylinder must be rejected. SANS 10019 does not allow for optional colours. There is some room for interpretation of shades, as paint colour changes with time and until there is a specified tolerance for the colour variations, it is reasonable to allow any colour that is reasonably close to the specified colour. This means that slightly lighter or darker greys may be reasonably accepted for the shoulder colour, even if badly scuffed or stained, but green or yellow are not acceptable if the rule says grey.
The pre-fill inspection rejection criteria in Table 13 are fairly straightforward to apply. In borderline cases, refer the owner to an approved test station.
A few things can be kept in mind for these checks.
- An apparent bulge under the paint may be a lump of rust, so tap any bulges to see if they fall off. Then inspect the corrosion damage underneath.
- Any sign of body filler is a warning of hidden problems. Scrape it off if you can to check the condition of the underlying metal. If you cant get it off it is safer to reject the cylinder. Refer the owner to an approved test station.
Inspection of cylinder valve and safety devices
[edit | edit source]There is not much to do for this check. If there are no visible signs of structural damage, the sealing surfaces are in good condition and seal correctly to the filler connection and the valve opens and closes smoothly and easily and there are no leaks, then the valve is serviceable.
Look out for bent valve spindles, broken handwheels/knobs and damaged or distorted threads, though these will usually make themselves obvious when you try to connect up and check the pressure.
Look at taper thread valves to check that the threaded section is not bent from impact damage. Reject any valve with a bent threaded section.
Very few cylinder valves sold in South Africa have a bursting disc pressure relief fitting. They seldom give trouble, and when they fail it is not a hazard to the filler except for the noise and possibly water sprayed around the room. Don’t worry about them, there is nothing you can do to test them before filling. If they burst, it is the owner’s problem. It would be fair to charge for the fill even though the cylinder will be empty. All you can do is avoid overfilling the cylinders, which you should do anyway.
Bursting discs usually have a nominal bursting pressure of 1.5 times cylinder working pressure, so they should not easily blow if in good condition. It is better if they blow while filling than during a dive.
Reserve valves (J-valves) are still occasionally found. Check that the mechanism operates smoothly. Note that Dräger reserve valves will completely bypass the main cylinder valve.
It is not required by SANS 10019, but recommended by the authors that portable cylinders be turned over or rolled and listen for sounds of loose debris inside. If there is the sound of a single item rolling or sliding around it is probably the debris tube on the base of the valve which has come off. This is not a hazard in itself, but the owner should be notified, as the tube is a safety feature to prevent small loose particles from getting into the valve and possibly blocking or jamming it.
A rustling sound or the sound of several objects sliding inside a cylinder is warning of contamination by foreign matter or rust. Do not fill, and the cylinder must be visually inspected before filling. There is the possibility in a new cylinder that preservative material has been left inside, in which case removal may be sufficient action, otherwise the cylinder should be inspected by an approved test station.
Checking residual gas pressure
[edit | edit source]This can be done when connecting the cylinder to the filling point, though the valve should be cracked open to ensure there is no contamination in the orifice before connecting up. Any cylinder which does not produce a healthy hiss when the valve is cracked open should have an explanation why it is empty. If it is a reasonable explanation there is no reason to reject it for filling unless there is water or other contamination in the orifice, in which case the valve must be removed from the cylinder and cleaned and the cylinder interior checked by a competent person before it is filled.
Note that this learning module does not qualify an operator to service cylinders or valves. On the other hand a full visual inspection is not required when a valve is serviced, as long as the interior of the cylinder is not contaminated.
What to do if a cylinder is rejected for filling
[edit | edit source]In many cases a cylinder will be rejected because it does not comply with legal requirements, and is not necessarily unsafe or unserviceable. The owner should be notified of all the reasons why the cylinder was rejected for filling, and it is his responsibility to arrange for the required service or testing. Try to inform the owner of all the problems if there are more than one and it looks like they can be corrected. On the other hand, any defect which would cause the cylinder to be condemned should be mentioned first, to avoid wasting time. Do not allow yourself to be persuaded to fill an illegal cylinder. If there is an accident you will be held responsible, not necessarily the owner, though he may share the blame.
Module: Safe operation of a high pressure breathing air compressor
[edit | edit source]The Compressor operator must safely operate the High Pressure Breathing Air Compressor. This includes the following procedures:
- Perform Pre start checks and start-up of the compressor
- Perform Basic function tests on running compressor
- Conduct Routine checks and procedures while running
- Demonstrate Emergency shutdown of compressor
- Perform Normal Shut-down procedures
- Use appropriate personal safety equipment
- Maintain vicinity of compressor in safe condition
- Comply with health and safety regulations
What you must be able to do:
[edit | edit source]Perform Pre-start checks and start the compressor:
[edit | edit source]- If the compressor is driven by an internal combustion engine (portable)
- Check the compressor is level
- Check the base is stable
- Ensure that the exhaust fumes will be carried away and can not be taken into the compressor air inlet (do not set up in enclosed space)
- Ensure that compressor is in cool place (not in direct sun on hot day)
- Ensure unobstructed supply of cooling air
- Check that the compressor air intake is in an uncontaminated air supply
- Check intake filter condition is acceptable
- Check that discharge air filters are not due for change
- Check that the installation is not due for an air purity test
- Check that compressor and motor are not due for service
- Check that all of the compressor drain valves are open
- Check that filling valve/s are open
- Check that the discharge pressure gauge indicates low pressure
- Check that the condition of drive belts, safety covers, mountings etc is satisfactory and the installation is safe to operate.
- Check the compressor sump oil level is correct, and add correct oil if it is low
- Perform the Pre-start checks specific to the prime mover (motor). These will vary according to the installation, and can only be covered in general terms by the manual.
- Log compressor running hours at start
- Start the motor
Check correct function of compressor after starting and before filling cylinders:
[edit | edit source]- Check direction of rotation. Stop motor if wrong.
- Close all the drain valves
- Close the filling valves
- Check the function of the safety valve
- Check for leaks at the valves, pipe joints, filter casings and pressure relief valves
- Check for unusual sounds indicating malfunction
- Check the time taken to reach maximum pressure
- Check that the motor is running smoothly at an appropriate speed
- Check any exhaust fumes are venting clear of compressor intake and there is no recirculation.
Routine checks and procedures while running
[edit | edit source]- Conduct periodic checks on oil level
- Conduct periodic draining of filters
- Conduct periodic check for exhaust fumes not contaminating intake air
- Conduct periodic or continuous check for sounds indicating leaks or malfunctions
- Conduct periodic checks on motor
Emergency shutdown of compressor
[edit | edit source]- Point out emergency stop mechanism and explain how and under what circumstanced it should be operated.
- If permitted by the operating procedures, perform a simulated emergency stop of the equipment, and reset system ready for starting. Restart and perform any necessary checks.
Normal Shut-down procedures
[edit | edit source]- Close all filling valves (if connected to cylinders)
- Close all storage cylinders (banks)
- Open drain valves (unless you are planning to check for leaks)
- Allow compressor to run unloaded for a while if recommended by manufacturer.
- Shut down motor according to manufacturer’s instructions
- Bleed all filling lines (open bleed valves to depressurise)
- Check that gauges indicate system is depressurised
- Tidy up and store components as required by organisation’s operating procedures.
Comply with health and safety regulations
[edit | edit source]- Use appropriate personal safety equipment
- Maintain vicinity of compressor and filling area in safe condition
- Deny access to unauthorised personnel
Documents relating to standard of performance
[edit | edit source]General legal requirements for Health and Safety are regulated by :
Driven Machinery Regulations of the Occupational Health and Safety Act
[edit | edit source]The following extracts apply:
Revolving machinery
[edit | edit source]2. Unless moving or revolving components of machinery are in such a position or of such construction that they are as safe as they would be if they were securely fenced or guarded, the user shall cause -
- (a) every shaft, pulley, wheel, gear, sprocket, coupling, collar, clutch, friction drum or similar object to be securely fenced or guarded;
- (b) every set screw, key or bolt on revolving shafts, couplings, collars, friction drums, clutches, wheels, pulleys, gears and the like to be countersunk, enclosed or otherwise guarded;
- (c) every square projecting shaft or spindle end and every other shaft or spindle end which projects for more than a quarter of its diameter to be guarded by a cap or shroud;
- (d) every driving belt, rope or chain to be guarded; and
- (e) the underside of every overhead driving belt, rope or chain above passages or workplaces to be so guarded as to prevent a broken belt, rope or chain from falling and so injuring persons: Provided that the provisions of this paragraph shall not apply where in the opinion of an inspector no danger exists in the case of light belts due to the nature thereof and the speed of operation.
Air compressors
[edit | edit source]14. The user of a positive displacement type air compressor which is not provided with automatic means for limiting the operating temperature to a safe level shall provide a fusible plug fitted close to the outlet valves or discharge ports of every stage of compression: Provided that the provisions of this regulation shall not apply to air compressors with a free air delivery of less than 8.5 m3 per minute or in which compression does not take place in the presence of lubricating oil.
(This will not apply to most breathing air compressors as the FAD is usually less than 8.5 m3 per minute)
General Safety Regulations of the Occupational Health and Safety Act
[edit | edit source]Personal safety equipment and facilities
[edit | edit source]2.(1) Subject to the provisions of paragraphs (f), (g), (h) and (i) of regulation 5 of the General Administrative Regulations published under Government Notice R. 2206 of 5 October 1984, every employer and every user of machinery shall make an evaluation of the risk attached to any condition or situation which may arise from the activities of such employer or user, as the case may be, and to which persons at a workplace or in the course of their employment or in connection with the use of machinery are exposed, and he shall take such steps as may under the circumstances be necessary to make such condition or situation safe. (Replaced by GAR, 1994 by Government Notice R. 17403 of 6 September, 1996.)
(2) Where it is not practicable to safeguard the condition or situation contemplated in subregulation (1), the employer or user of machinery, as the case may be, shall take steps to reduce the risk as much as is practicable, and shall provide free of charge and maintain in a good and clean condition such safety equipment and facilities as may be necessary to ensure that any person exposed to any such condition or situation at a workplace or in the course of his employment or on premises where machinery is used is rendered safe.
(3) Taking into account the nature of the hazard that is to be countered, and without derogating from the general duties imposed on employers and users of machinery by subregulations (1) and (2), the safety equipment and facilities contemplated in subregulation (2) shall include, as may be necessary -
- (a) suitable goggles, spectacles, face shields, welding shields, visors, hard hats, protective helmets, caps, gloves, gauntlets, aprons, jackets, capes, sleeves, leggings, spats, gaiters, protective footwear, protective overalls, or any similar safety equipment or facility of a type that will effectively prevent bodily injury;
- (Text omitted - not applicable)
- (e) protective ointments, ear-muffs, ear-plugs, respirators, breathing apparatus, masks; air lines, hoods, helmets, or any similar safety equipment or facility of a type that will effectively protect against harm;
- (f) suitable insulating material underfoot where persons work on a floor made of metal stone, concrete or other similar material; and
- (g) generally, such safety equipment or facilities as may be necessary to render the persons concerned safe.
(4) An employer or a user of machinery, as the case may be, shall take steps to ensure that no safety equipment or facility provided as required by this or any other regulation is removed from a workplace or from premises where machinery is used, except for purposes of cleaning, repair, maintenance, modification, mending or replacement, and no person shall remove any such safety equipment or facility from a workplace or premises where machinery is used, except for the aforesaid purposes.
(5) An employer shall instruct his employees in the proper use, maintenance and limitations of the safety equipment and facilities provided.
(6) An employer shall not require or permit any employee to work unless such an employee uses the required safety equipment or facility provided in terms of this or any other regulation.
(7) The provisions of this regulation shall not be construed as derogating from the provisions of any specific regulation prescribing specific safety equipment or facilities.
Admittance of persons
[edit | edit source]2C. (1) Subject to section 8 of the Act, an employer or user, as the case may be, shall not permit a person to enter a workplace where the health or safety of such person is at risk or may be at risk, unless such person enters such workplace with the express or implied permission of and subject to the conditions laid down by such employer or user: Provided that such express or implied permission shall not apply in respect of a person entitled by law to enter such workplace or premises.
(2) An employer or a user, as the case may be, shall, if he deems it necessary in the interests of health and safety, post up a notice at every entrance to a workplace prohibiting the entry of unauthorised persons to such workplace and no person shall enter or remain at such workplace without the permission of the employer or user, as the case may be.
Specific procedures and checks
[edit | edit source]These will vary according to the installation, and will be detailed in:
- Compressor manufacturer’s operating instructions.
- Prime mover manufacturer’s operating instructions.
- Organisational operating procedures of the filling station.
How to do it:
[edit | edit source]Operation of the compressor and motor
[edit | edit source]Refer to the manufacturer’s operating instructions for the specific installation and components.
Checking direction of rotation:
[edit | edit source]Direction of rotation of a 3-phase electric motor is determined by the order of connection of the phase wires. It is possible for two plug sockets in the same room to be wired differently, so whenever a 3-phase motor is supplied by a different plug or if the wiring has been worked on, the direction of rotation of the motor must be checked on starting, as incorrect rotation will prevent the oil pump from lubricating the cylinders and the cooling fan will blow the wrong way, which is less efficient. Incorrect rotation will result in accelerated wear and overheating, and may cause serious damage or destruction of the compressor. Overheating may also cause breakdown of lubricant into toxic or harmful materials and contaminate the air supply.
This problem can not normally occur with Internal combustion engines or single phase motors, as long as they are correctly mounted in the first place. It is better to always check direction of rotation after a new motor has been fitted.
Flushing the filling lines
[edit | edit source]CO2 is present in the atmosphere with a natural amount of 250 - 800 ppmV. The molecular sieve used in the purifiers for drying the breathing air is able to adsorb CO2 which is accumulated in the cartridge. After shut-down of the compressor, adsorbed CO2 may be released again due to the partial pressure decrease. This free CO2 then gets washed out of the cartridge when the compressor is started again.
To avoid increased CO2 content in the compressed breathing air, Bauer compressors recommend flushing the filling lines before connecting and filling the air cylinders, i.e. let the compressed air escape into the open air by opening the filling valves for about a minute after starting the compressor and before filling cylinders
General safety rules and procedures for operating machinery
[edit | edit source]- a) Keep the instruction manual to hand near the equipment
- b) Read the instruction manual before beginning work, especially the safety notices chapter
- c) Do not wear long hair loose, loose clothing or jewellery, including rings. There is a danger of injury through, these getting caught on moving parts
- d) As far as necessary or according to regulations, use personal protective equipment.
- e) Observe all safety and danger notices on the equipment.
- f) Keep all safety and danger notices on the equipment complete and in readable condition.
- g) Intervals stipulated or given in the instruction manual for recurring checks / inspections must be adhered to.
- h) Make sure location and operation of fire extinguishers is known.
- i) Work on the equipment may only be carried out by competent personnel.
- j) People who are being trained or introduced to the job should only be allowed to work with the equipment under supervision of a competent person.
- k) Work on the electrical components of the equipment may only be carried out under supervision of a qualified electrician.
- l) If there are any malfunctions, shut the equipment down immediately and make it safe. Correct faults immediately or have them corrected before further use
- m) Conduct starting, monitoring and shut-down procedures according to the instruction manual.
- n) Before switching starting up the equipment, ensure that no one can be put at risk through running the machine
General safety rules and procedures for maintenance and repair work.
[edit | edit source]- a) Carry out the service, maintenance and inspection procedures at the intervals specified in the instruction manual.
- b) Always retighten any screw connections loosened for maintenance or repair work.
- c) If it is necessary to remove safety devices for maintenance and repair work, these must be replaced and checked immediately
- d) after completion of the maintenance or repair work.
- e) Ensure safe and environmentally friendly disposal of consumables and old parts.
Module: Filling the cylinders
[edit | edit source]The Compressor operator must safely fill cylinders from high pressure breathing air compressors and high pressure storage systems. This will include the following procedures:
- Connect cylinders to filling equipment
- Fill cylinders from storage cylinders (decant)
- Fill cylinders from compressor
- Disconnect cylinders from filling equipment
- Correctly store cylinders
- Report incidents
What you must be able to do:
[edit | edit source]Handling and connection of cylinders
[edit | edit source]- Use safe handling procedures
- Check connection equipment is serviceable
- Check connection is appropriate to the gas to be filled
- Make the connection using appropriate fittings and adaptors (to suit pressure rating and standard of connector)
- Check seal of connections is airtight under pressure
Filling from storage cylinders (Decanting and/or Cascade filling)
[edit | edit source]see also Cascade filling
- Explain cascade filling and demonstrate if facilities allow
- Ensure cylinder valve sufficiently opened
- Fill cylinders at appropriate rate to avoid excessive heating and to control pressure loss due to cooling after filling.
- Fill to pressure limited by developed pressure and temperature appropriate to the working pressure of the cylinder
- Monitor fill pressure, correctly read pressure from gauge
- Close valves when filled
Filling from a compressor
[edit | edit source]- Fill cylinders at appropriate rate
- Fill to pressure limited by developed pressure and temperature appropriate to the working pressure of the cylinder
- Monitor fill pressure
- Close valves when filled. Do not over-tighten as this will damage the valve seat.
Disconnection of cylinders from filling equipment
[edit | edit source]- Check filling and cylinder valves are closed
- Bleed filler connection/whip
- Disconnect filler connection and secure hose if appropriate
- Mark cylinder as filled and store safely
- Check cylinder and valve for leaks and correct if possible
Verification of fill pressure
[edit | edit source]
- Check charge pressure after cylinders have cooled to room temperature.
- Top up any cylinders which are under-pressure.
- Take temperature of cylinder into account – Pressure must be within 5% of but not exceed developed pressure for that temperature. That is about the accuracy you can expect from a hand-held cylinder pressure test gauge.
- Charging pressure is rated for 20°C. At 30°C it will be 3.4% higher.
Reporting incidents
[edit | edit source]- Report any uncontrolled failures of cylinders to appropriate approving authority
- Report any equipment failures or malfunctions to the management or designated responsible person.
Documents relating to standard of performance
[edit | edit source]The legal requirements for handling, connection, filling, disconnection and storage:
[edit | edit source]These requirements are specified in SANS10019 as detailed in the extracts below:
9.9.2 Filling
In addition to the requirements given in 9.6.2, the following provisions shall apply:
- a) If the air supplied is from a compressor, the air so supplied shall be guaranteed as suitable for respiration in accordance with the requirements of (b).
- b) Air filled into a cylinder shall have been filtered, shall be odourless (see NOTE 1) and any impurities present shall not exceed the relevant maximum given in table 15 (see NOTE 2).
- NOTE 1 The average limit of oil that can be smelled is approximately 0,3 mg/m3.
- NOTE 2 The methods given in table 15 are laboratory and reference methods.
- c) When other gas mixtures are required for special underwater conditions, the composition of the contents shall be given on the self adhesive band on the cylinder. (See also 8.6.1.2.)
- d) The frequency for specific qualities / impurities with regards to compressed air are given in table 15.
- e) A cylinder shall be oxygen cleaned before its first fill in NITROX or TRIMIX if the oxygen concentration is greater than 23%
10.1 Handling
Containers shall not be subjected to any undue shock. They shall be handled safely and carefully and sliding, rolling and skidding shall be avoided.
- 10.2.1 General
- The maximum height of any stack shall be governed by the stability of the stack and the ease with which containers can be safely placed on or removed from the stack. (Further text omitted as not applicable).
- 10.3.2 Containers shall be stored away from boilers, open flames, steam pipes and any other source of heat or potential source of heat.
- 10.3.3 Containers shall not be exposed to corrosive vapours.
- 10.3.4 Containers of compressed gas shall not be stored with flammables in other types of containers, for example, shipping containers.
- 10.3.5 Containers shall comply with the requirements of the referenced standards given in clause 2 (see also Annex A).
- 10.3.6 Cylinders for underwater use shall be stored dry in the valve-up position.
- 10.3.7 Leaking containers, where the leak cannot be stopped quickly and easily, shall be removed to an open space where they will be least dangerous to life and property, and both the supplier and the filler shall be notified.
- 10.4.1.3 Containers transported in a vehicle shall be so blocked or braced (or both) as to prevent movement, and shall not project beyond the sides or ends of the vehicle.
- 10.4.1.4 In no instance shall containers be so loaded into a vehicle that they can bounce or strike other objects. There shall be no sharp projections on the inside of the loading space, and adequate measures shall be taken to prevent containers from falling off the vehicle.
| Name of gas | Chemical symbol | Dangerous properties | Developed pressure group | Critical temperature |
|---|---|---|---|---|
| Air | — | — | 2 | −140,7ºC |
| Argon | Ar | — | 2 | −122,0ºC |
| Helium | He | — | 3 | −267,9ºC |
| Nitrogen | N2 | — | 2 | −147,0ºC |
| Oxygen | O2 | — | 2 | −118,4ºC |
| Charging pressure at 20ºC kPa |
Developed pressure at 65ºC kPa (gauge) | |||
|---|---|---|---|---|
| Group 1 | Group 2 | Group 3 | ||
| 14 000 | (Data omitted: Not applicable) |
17 200 | 16 200 | |
| 16 000 | 19 800 | 18 600 | ||
| 18 000 | 22 300 | 20 900 | ||
| 20 000 | 24 800 | 23 200 | ||
| 22 000 | 27 400 | 25 500 | ||
| 24 000 | 30 000 | 27 900 | ||
| 26 000 | 32 500 | 30 200 | ||
| 28 000 | 35 100 | 32 500 | ||
| 30 000 | 37 600 | 34 800 | ||
| Values for charging pressures other than those given in column 1 may be obtained by linear interpolation. | ||||
| Impurity | Chemical symbol | Limita, max. |
|---|---|---|
| Carbon monoxide | CO | 10 ppm |
| Carbon dioxide | CO2 | 500 ppm |
Water:
|
H2O | 25 mg/m3 |
| Lubricants (droplets or mist) | — | 0,5 mg/m3 |
| Odour and taste | — | None |
| Solid particles (dust, foreign matter, etc.)larger than 5,0 μm | — | 0,5 mg/m3 |
| Sampling and testing: Any appropriate method may be employed, provided it conforms with the following general requirements for measuring and assessing results:
Frequencies for monitoring impurities in compressed air for breathing:
Monitoring:
Results:
| ||
| a At or corrected to a temperature of 20ºC and a pressure of 101,3 kPa (1 bar) and, except in the case of water content, calculated on a moisture-free basis. | ||
The legal requirements for verification of fill pressure:
[edit | edit source]These are legislated by the Trade metrology Act No.77 of 1973: as detailed in the extract below:
Section 30(2): Any person who in retail trade sells any goods prepacked by him, shall, at the request of any purchaser of such goods who wishes to measure the quantity of the goods purchased from such person by such purchaser, make available to such a purchaser a certified measuring instrument suitable for measuring the quantity of such goods.
Section 37. Prohibition of false statement as to quantity.
- (1) Any person who directly or indirectly makes any false, incorrect or untrue declaration or statement or wilfully misleads any person as to the quantity, expressed by number or in terms of any measuring unit, of any goods or articles in connection with their purchase, sale, counting or measurement or in the computation of any charges for services rendered on the basis of number or measurement, shall be guilty of an offence: Provided that if there is any difference between the actual and any represented quantity, expressed by a number or in terms of a measuring unit, of the goods or articles in respect of which any declaration or statement is so made and such difference is permissible in terms of this Act, such declaration or statement shall not be regarded as false, incorrect or untrue merely because of the existence of such difference.
- (2) Any person who sells or causes to be sold anything, the quantity of which is expressed by number or in terms of a measuring unit, of which the actual quantity is short of that demanded of, or represented by, the seller, shall be guilty of an offence unless the shortage is permissible in terms of this Act.
The tolerance for error in actual content:
[edit | edit source]This is specified in SANS 458:2005 as detailed in the extract below:
| Item | Product | Tolerable error: percent of nominal quantity Qn | |
|---|---|---|---|
| Deficiency | Excess | ||
| 4 | Industrial and medical gases including dissolved gases but excluding liquid petroleum gases | 5% | Unrestricted |
Reporting of incidents:
[edit | edit source]The requirement to report incidents is specified in Occupational Health and Safety Act, 1993 as detailed in the extract below:
24 Report to inspector regarding certain incidents
- (1) Each incident occurring at work or arising out of or in connection with the activities of persons at work or in connection with the use of plant or machinery in which or in consequence of which –
- (a) any person dies, becomes unconscious, suffers the loss of a limb or part of a limb or is otherwise injured or becomes ill to such a degree that he is likely either to die or to suffer a permanent physical defect or likely to be unable for a period of at least 14 days either to work or continue with the activity for which he was employed or is usually employed.
- (b) a major incident occurred, or
- (c) the health or safety of any person was endangered and where
- (i) a dangerous substance was spilled;
- (ii) the uncontrolled release of any substance under pressure took place;
- (iii) machinery or any part thereof fractured or failed resulting in flying, falling or uncontrolled moving objects; or
- (iv) machinery ran out of control, shall within the prescribed period and in the prescribed manner, be reported by the employer or the user of the plant or machinery concerned, as the case may be
- (2) In the event of an incident in which a person died, or was injured to such an extent that he is likely to die, or suffered the loss of a limb or part of a limb, no person shall without the consent of an inspector disturb the site at which the incident occurred or remove any article or substance involved in the incident therefrom: Provided that such action may be taken as is necessary to prevent a further incident, to remove the injured and dead, or to rescue persons from danger.
- (3) The provisions of subsections (1) and (2) shall not apply in respect of –
- (a) a traffic accident on a public road;
- (b) An incident occurring in a private household, provided the householder forthwith reports the incident to the South African police; or
- (c) any accident which is to be investigated under section 12 of the Aviation Act, 1962
- (3) The provisions of subsections (1) and (2) shall not apply in respect of –
Further details on use of specific equipment
[edit | edit source]This information may be found in the equipment manufacturer’s Instruction Manuals and the organisation’s Operating Procedures.
How to do it
[edit | edit source]Follow the general sequence listed below, adapted where necessary to suit the installation.
- a) Check that the filler connection and cylinder valve are clean and dry
- b) Attach filler hose (see figure) using adaptor (see figure) if necessary.
- (Note that the maximum working pressure for Yoke type pillar valves, adaptors, and filling connectors is 240 bar, and may be less)
- c) Pressurise filling hose and check for leaks (see figure)
- d) Open cylinder valve
- e) If necessary control rate of filling using valve on filling panel or cylinder valve on bank cylinder.
- f) Monitor pressure until filled to required pressure. This will be greater than the nominal charging pressure to allow for pressure drop due to cooling. The amount of overpressure will depend on the temperature in the cylinder and must be determined by experience with the installation.
- g) Close the cylinder valve. Do this gently to avoid damaging the valve. If it does not leak it is tight enough. If it needs more than two-finger tightening the valve may need servicing. Any valve that is tight to turn when it is open is probably damaged. Inform the owner. (Industrial cylinder valves do not comply with this rule, and are often fairly tight to turn. That is why they have large handwheels)
- h) Close the supply valve and bleed the filler hose (see figure)
- i) Disconnect the filler hose and secure on storage holder or attach to the next cylinder
- j) Check the pressure on filled cylinders after they have cooled, and top up if necessary.
- k) Encourage your customers to check the pressure in their cylinders before taking them away. It is better for customer relations that they should know it is full before they leave, and the most convenient time to sort out any problem is before they leave. After the cylinder has been removed from the premises you have no control over handling. Have a cylinder pressure test gauge available at the storage area or the till. You can tether it on a length of string or flexible wire for security.
.jpg)
General safety rules and procedures for handling compressed air
[edit | edit source]- a) Never play games with compressed air, even at five bar. It can be lethal.
- b) Never point a jet of high pressure compressed air at any part of a body, yours or anyone else's.
- c) Never let a filling hose lie around loose. It must at all times be either:
- In your hand
- On a cylinder
- On a hose keeper
- d) An unsecured hose with an open end becomes a whip when pressurised
- e) Never twist a hose when installing it.
- f) Never kink a filling hose, even when un-pressurised.
- g) Never connect a filling hose with a sharp bend in it.
- h) Never try to patch a filling hose, it can't be done safely.
- i) Never try to use a hydraulic hose to make your own filling hoses. They are assembled with oil as a lubricant and they contain steel reinforcing which rusts. They are also usually too stiff and heavy.
- j) Never open a valve suddenly, this puts an unnecessary shock load on the downstream system.
- k) Do not look at a pressure gauge while pressurising it if you are not wearing eye protection - turn your head away.
- l) Do not ignore a leak, it wastes time, fuel, air and money. It may later develop into an explosive failure.
- m) Never try to tighten or loosen a connection under pressure. Conversely if a connection seems too tight, don't force it. Check first to see if it has really been depressurised. O-ring connections should be finger tight.
- n) Never re-tighten a connection until you have inspected it first to see why it is leaking. The cause of the leak may be obvious e.g. the O-ring has fallen out.
- o) Practice good housekeeping with multiple filling hoses. Avoid crossing them over to prevent confusion and operating the wrong valves
- p) Fill cylinders at a rate which allows them to remain reasonably cool. The temperature should never rise above 65C. This is too hot to hold for long for most people. As a general principle slower and cooler is better. A water bath can be effective, but can cause other problems
- q) Never allow any high pressure connection to be contaminated by oil or grease.
- r) Do not drop a filling hose into a water bath. When you do, blow it out thoroughly before using it to fill a cylinder. Make sure there is no water on the connector that can get into the cylinder
- s) Change the water in a water bath whenever necessary to keep it clean.
- t) Take care when lifting cylinders into and out of a water bath that you do not injure yourself or lose control and drop a cylinder and damage a valve or the filling equipment, particularly if it is pressurised.
- u) Before connecting to the filling line, ensure that there is no water in the cylinder valve by purging it, or water may be injected into the cylinder.
- v) Avoid filling unsupported cylinders in the upright position. They can be pulled over when the filling hose is pressurised or knocked over by passing people.
- w) Do not leave a compressor running unattended for more than a few seconds or minutes at most unless it has been set up for unattended operation.
- x) Always run a compressor up to maximum pressure to check that the safety valve works before starting filling.
Wet or Dry filling.
[edit | edit source]This is a controversial subject, and many of the arguments put forward by both sides are illogical.
The reference is to the use of water for cooling purposes while filling a cylinder.
The Wet-filling proponents claim that keeping the cylinder cool by immersing it in water reduces the overpressure required to achieve a complete fill when cooled to 20°C. This is partly true, There is heat loss to the water, and the pressure will be slightly less as a result, but the same effect can be achieved by filling more slowly.
The Dry filling proponents claim that the cooling will cause condensation on the walls of the cylinder, accelerating corrosion. What they don’t mention is that the cylinder walls during filling are considerably warmer than when you take it into the sea for a dive, and there is the same amount of water vapour in the cylinder then as when it was filled. Why should this water vapour condense on the sides at about 30°C during the fill, if it is below the required limit of 35mg/m3 and not condense a few hours later when the whole cylinder and its contents have cooled to room temperature? Unless the cooling water is colder than the dew point of the air in the cylinder or the storage temperature it will make no difference.
The table below gives dew point for a range of water contents at a few significant pressures.
From this table it is clear that a cylinder filled with air which is within the limits for water vapour, will condense out some liquid water at ordinary diving water temperatures. For example, a 200 bar fill at 50mg/m3 will start condensing on the cylinder walls at water temperatures below 11.4°C. On the other hand, it will not condense while being filled in a water bath at 15°C.
| Pressure (bar) | Water content (mg/m3 at 1.103 bar, 20°C) | ||||
|---|---|---|---|---|---|
| 15 | 20 | 25 | 35 | 50 | |
| Pressure dew/frost point °C | |||||
| 1 | −55.2 | −53.0 | −51.2 | −48.5 | −45.5 |
| 200 | −5.0 | −1.6 | 1.3 | 6.1 | 11.4 |
| 300 | −0.2 | 3.8 | 7.1 | 12.1 | 17.6 |
The physics suggests that it does not make a great deal of difference whether you use a water bath or not. Slow filling at lower temperatures is better, particularly when topping up oxygen rich blends, but for plain air fills it is not of great importance.
What is of importance is getting the final pressure of the cooled cylinder correct. Neither more nor significantly less than the rated charging pressure. This takes a bit of experience with the filling installation to get a feel for the correct pressure at the filling speed you can conveniently achieve that will cool to the correct pressure at 20°C. This is commonly somewhere around 20 bar above the rated pressure. A few hours of experimenting or talking to the more experienced operators will get this sorted out.
Requirements of the Trade Metrology Act, 1973
[edit | edit source]In simple terms, this act requires you to
- a) Describe what you sell in legally acceptable and understandable terms
- b) Supply what you claim to supply. Breathing air must be to the appropriate standard (Table 15 of SANS 10019). Mixed gases must be correctly labelled for composition.
- c) Deliver full value for money.
This means that if the charging pressure of a cylinder is 232 bar then it must be filled to 232 bar at 20°C with a tolerance of -5% unless you have specified a lower pressure beforehand. If your compressor only fills to 200 bar, there should be a notice clearly visible to any customer handing in a cylinder that the supplied pressure will be 200 bar, and it should then not be less than 190 bar at 20°C. Technically you should have a certified pressure gauge available to check the pressure, and a thermometer to check the temperature.
The charging pressure is measured at 20°C and if the temperature is different it must be corrected to 20°C. This means that you must fill to a pressure that will cool down to the working pressure, or check and top up when necessary. The tolerance for error in actual content is specified in SANS 458:2005 Table A1(b) for industrial and medical gases as 5% deficiency and unrestricted excess, however SANS 10019 does not allow excess above working pressure stamped on the cylinder, so in practice for a fill to nominal charging pressure, the tolerance is -5%. +0%.
| DP at 10°C | DP at 15°C | WP (CP) at 20°C | DP at 25°C | DP at 30°C | DP at 35°C |
|---|---|---|---|---|---|
| 193 | 197 | 200 | 203 | 207 | 210 |
| 200 | 204 | 207 | 211 | 214 | 218 |
| 224 | 228 | 232 | 236 | 240 | 244 |
| 232 | 236 | 240 | 244 | 248 | 252 |
| 290 | 295 | 300 | 305 | 310 | 315 |
| Values calculated by ideal gas law P1/T1=P2/T2 | |||||
Reporting of incidents.
[edit | edit source]If anyone is injured, there may be a requirement to report in terms of the Compensation for Occupational Injuries and Diseases Act, 1993. Information on how to do this is available on the Department of Labour website at http://www.labour.gov.za
Decanting and cascade filling from storage banks
[edit | edit source]Decanting from storage banks is a very simple and straightforward process. First check the pressure in the cylinder to be filled and the storage cylinder to make sure pressure in the storage cylinder is higher.
The cylinder to be filled is connected to the filling hose in the usual way, the filling line pressurised and checked for leaks, and the filling valve on the panel opened.
Depending on where your filling pressure gauge is situated in the system, you may control the flow by using the storage cylinder valve or an isolation valve between the banks and the filling panel. The cylinder should be filled at a rate which does not cause too much heating, particularly as excess heat will limit the final pressure after cooling. Air tops of oxygen rich blends MUST be decanted slowly, and must be made with oxygen compatible air. A rate of 25 bar per minute should not be exceeded (this is actually quite fast, but can easily be exceeded when decanting)
If decanting is simply to speed up the filling process and the cylinder will then be topped up by compressor, the order of filling is not particularly important, but if the compressor is not in service, or there is no compressor available, a stricter procedure known as cascade decanting can be used to maximise the amount of gas that can be transferred.
The principle of cascade decanting is to transfer between cylinders with the smallest pressure difference, and when there are two with the same pressure, to transfer to the smaller one first.
In practice this means you check the residual pressure in all the cylinders to be filled, and all the bank cylinders. Arrange your cylinders to be filled in order of lowest to highest residual pressure, and if two have the same pressure, put the smaller one towards the high pressure side.
Connect the highest pressure cylinder and decant from the lowest pressure storage cylinder that will provide flow in the right direction. When the pressures are balanced, decant from the next lowest pressure bank cylinder. Repeat until either the cylinder is filled or there are no more bank cylinders with high enough pressure. Disconnect and repeat the process with the next highest pressure cylinder from your queue.
Repeat the process until finished.
This procedure will get the most gas from the banks to the empties, but may not suit the requirements of the cylinder owners, so it may be necessary to modify it to suit special circumstances. The calculation of optimal decanting strategy will depend on the desired result, and is simply a matter of partial pressure calculations, though it tends to be tedious and is seldom used except by gas blenders mixing blends containing helium by partial pressure if they do not have a booster, as the cost of the gas may make the effort worthwhile.
Module: Recording filling data
[edit | edit source]What you must be able to do:
[edit | edit source]Record fill data in compressor log, listing the following data in the appropriate column
- Date
- Name and address of owner
- Cylinder manufacturer and country of origin
- Cylinder serial number
- Date of latest examination
- Type of gas filled (composition by % if other than air)
- Charging pressure (corrected to room temperature)
- Other data which may be required by the management of the filling station
Documents relating to standard of performance
[edit | edit source]The legal requirements are specified in SANS10019 as detailed in the extract below:
9.9.3 Details to be recorded when a cylinder is filled
- For each cylinder filled, the filler shall keep a record with the following information:
- a) the date of filling;
- b) the name and address of the owner;
- c) the manufacturer and country of origin of the cylinder and its serial number;
- d) the date of the latest examination;
- e) the type of gas filled into the cylinder; and
- f) the charging pressure.
The organisational operating procedures of the filling station may require further details to be recorded, for example the capacity of the cylinder, and/or the residual pressure.
How to do it
[edit | edit source]This is very much a matter of personal choice or organisational procedures, however a few suggestions may help.
- a) Use a clipboard with rough log sheets to record the cylinder data as you inspect the cylinder. Transfer this data to the compressor log if the cylinder is accepted for filling.
- b) Few cylinders are marked with their country of origin. This must usually be inferred from the manufacturer’s mark.
- c) Date of latest examination refers to latest visual inspection as SANS 10019 always refers to the hydrostatic TEST. It is not legally required to record the latest hydrostatic test date.
- d) Charging pressure recorded refers to pressure when the gas has cooled to 20°C. This is the pressure which the customer can expect to find when measuring before use. It is not correct to record the pressure measured when the cylinder is hot. Gas is sold at pressure corrected to 20°C
Module: Required practical training and experience
[edit | edit source]What you must do:
[edit | edit source]Provide the assessor with authenticated copies of air filling logbook sheets or other suitable worksheets indicating a minimum of:10 hours experience operating a filling station under supervision of a competent operator. This will include at least
- 10 occasions on at least 5 separate days of operating a compressor to the full range of Module: Safe opertion of a high pressure breathing air compressor above with the exception that there is no requirement to perform an unnecessary emergency shutdown on these occasions.
- Inspect and assess at least 2 cylinders on each of these occasions
- Connect and fill at least 1 cylinder on each occasion
- Connect and fill at least 20 cylinders in total
- Record filling details for all cylinders filled.
- Fill at least 5 cylinders by decanting. These cylinders may be topped up by compressor, and the decanting system may be integrated with a compressor in the filling system, with a filling panel suitably supplied with gauges and valves. This requirement may be done on a single occasion if the usual filling station has no storage banks. If more than 1 storage cylinder is available the cascade method should be used.
- All log book entries must be signed by the candidate and countersigned by a competent High pressure breathing air compressor operator with at least 10 hours experience on the filling installation used..
- All log book entries must comply with SANS 10019 Section 9.6.3
- Special log book sheets may be made if the organisation’s log book is not convenient for this purpose. (see Appendix D)
Note that more data is required for the training log sheets than is required by SANS 10019.
How to do it
[edit | edit source]- Make copies of the training and filling log sheets in appendices C and E
- Fill in data on 10 different cylinders on the training log sheets. Try to get a variety of different manufacturers, materials, sizes and pressure ratings of cylinders.
- Use 10 of the filling log sheets to record the 10 occasions of operating the compressor, including all relevant details of the cylinders. The filling must be done under direct supervision of a competent compressor operator. (The information must also be logged on the organisation’s filling log.)
- Alternatively the fills may be logged on the organisation’s logbooks and photocopied as evidence
- If you have significant previous experience and can produce valid and authentic evidence of this experience it will be considered by the assessor.
- Valid indicates that the experience is directly applicable to this qualification, and authentic means that it is your experience and can be proved to be so.
- This will require at the least a sworn statement by a suitable third party witness supporting your claim. Appropriate witnesses would be an employer or previous employer, or suitably qualified supervisor. In the case of diving club operators this would include the chairperson of the club committee.
- A suitable format for presenting this evidence would be photocopies of the compressor filling logbook showing your name as the operator.
If your previous experience and knowledge are sufficient, you may request Recognition of Prior Learning (RPL). Approach a registered assessor or training facilitator for more information on this subject, or visit the SAQA website at http://www.saqa.org.za
Module: Principles of operation of a typical High Pressure Breathing Air Compressor.
[edit | edit source]What you must know:
[edit | edit source]- General arrangement of a typical high pressure compressor.
- Operating cycle of the compressor and flow path of the air.
- Typical installation configuration of a portable compressor
- Typical installation configuration of a stationary compressor with filling panel and storage banks
- Standard nomenclature of external components
General arrangement of a typical high pressure compressor
[edit | edit source]The compressor unit comprises the following major assemblies:
- compressor block
- drive motor
- filter set
- base and frame assembly
- instrument/filling panel
Optional accessories include:
- electric control system
- electronic monitoring system
- automatic condensate drain
- fans and ducting for the cooling air
- compressed air storage banks
- casing with noise reduction facilities
- Nitrox blending tube
Operating cycle of the compressor and flow path of the air
[edit | edit source]This section is intended to give the reader a basic understanding of how a breathing air compressor works. Bauer compressor examples and illustrations have been used because they were available. Other manufacturers equipment will differ in detail, but the principles will mostly be the same.
Type of compressor
[edit | edit source]The usual compressor configuration for high pressure breathing air is the air cooled oil lubricated multi-stage reciprocating positive displacement compressor.
This is quite a mouthful, so we will look at the concepts one by one:
Positive displacement:
[edit | edit source]This means that the compression is done by enclosing air in a space and making that space smaller until the pressure rises to the planned level. At this stage it will flow out through a non-return valve.
A positive displacement compressor is not dependant on speed of operation to reach it’s working pressure. It will reach much the same output pressure at almost any reasonable speed.
Reciprocating
[edit | edit source]A reciprocating machine is one in which the components reverse direction on a cyclic basis. In this case, the pistons move up and down in the cylinder. The space used to compress the air is between the top of the cylinder and the cylinder head. This is simple technology and can be made with machinery that is common in industry. Sealing the gap between the cylinder and piston is on a cylindrical surface and the sealing components are circular, both easy shapes to build accurately, which keeps the cost down. The disadvantages are noise, vibration and limitations on speed. For a stationary installation these are not major problems.
Multi-stage
[edit | edit source]A multi-stage compressor does not attempt to compress to full output pressure in one go. It compresses in two or more stages, of approximately the same compression ratio in each stage, and allows the gas to cool between stages. High pressure compressors usually use three or four stages. All the air passes through each of the stages, one after the other, getting compressed by about the same ratio each time.
This has two major advantages:
- a) Lower compression ratios can be used. This makes dead space less problematic. Dead space is the residual volume when the cylinder reached the top of its stroke. Any gas that remains in this space will expand again when the piston moves down again, and only when this pressure drops below the inlet pressure will more gas enter the cylinder through the inlet valve. This represents wasted effort.
- b) The gas can be cooled between stages. This allows higher speeds and therefore greater output for any given size of machine. This also improves the efficiency of the compression which saves energy, so less power is required to drive the compressor
As the air is getting compressed in each stage, and is not allowed to expand between them, the swept volume of each stage must be smaller than the previous stage, so the first stage has a large volume, and the final stage is relatively tiny, but also much more ruggedly built, as the forces are much bigger because of the high pressure.
Oil lubricated:
[edit | edit source]The sliding surfaces of the components in the compressor generate heat due to friction, and the friction is reduced by lubrication. Oil is the usual lubricant as it is cheap and works well. The oil may be distributed by a splash system where the crankshaft throws oil around the crankcase as it rotates, or there may be an additional pressurised lubrication system which pumps oil to where it is needed. Oils drains back into the crankcase to be used again.
The disadvantages are that the oil film on the inside of the cylinders is in contact with the air in the compressor, and due to heat and movement, is partly vaporised and carried away in the air. If it is not condensed or filtered out, it will reach the cylinder and ultimately the diver's lungs.
Oil free compressors can eliminate this problem, but are very expensive.
The issue of oil in the air is an important one. The human body can tolerate very little oil in air, and some oils are worse than others.
Therefore as much oil as possible must be removed and the oil must be of a type which is tolerable in the quantities that will remain. Fortunately breathing air compressors are a relatively easy lubrication application as they do not get very hot and the speeds are relatively low, so simple oils do quite well and there is no need for toxic additives to improve lubrication.
We must also consider that air contains water vapour; and the capacity to hold this water is determined by the temperature and pressure. If we increase the pressure at constant temperature, the capacity to contain water vapour is reduced; therefore the balance of the water must condense as a liquid. To eliminate the maximum amount of moisture we must keep the temperature as low as possible and collect condensate at the highest pressure available.
Synthetic oils can break down into toxic products. Don't let the compressor overheat and be sure to change the oil on schedule.
Air Cooled
[edit | edit source]The heat that is generated by the compressor by friction and the compression of the air must be dissipated or it will continue to rise until something fails.
In the case of breathing air compressors this is usually done by air cooling, as air is freely available in large quantities. However this has some limitations, as air is not a very efficient coolant, so large amounts must be used, and the heat transfer surfaces must be large.
For these reasons the compressor will have a fan to blow air over the compressor and cooling coils for the compressed air, and the heat exchange surfaces will be increased in area by using fins. In this context fins are extensions to the surface which greatly increase the area in contact with the cooling air flow, so it is important that they are kept clean and the air flow is not obstructed. Fins are usually found on the cylinders, cylinder heads and cooling coils, and frequently on the crankcase.
The compressor room or place where the compressor is used must be well ventilated and must not get too hot. A limit of 45°C is specified for Bauer compressors. Others may require other temperature limits.
It is also important that the cooling air temperature is not too cold, as the lubricant will become too viscous. 5°C is the lower temperature suitable for Bauer compressors. If the air temperature is lower, the compressor should be operated in a room where the air will warm up as the compressor runs.Refer to installation instructions for the specific compressor for details.
Air flow through the compressor
[edit | edit source]A typical 3 stage compressor
[edit | edit source]We will now consider how this is done in a typical three stage compressor and in what sequence. The item numbers refer to Figure ????
As this is a three stage compressor the average compression ratio of each stage may be about 6.5 to 1, to give an overall compression ratio of 6.5 x 6.5 x 6.5 = 275. which is close to what you would need for 230 bar fills.
- a) The Intake filter (Item 1) is of the disposable, dry paper cartridge type and will stop all solid particles larger than 5 micron. This filter, however, has no effect on any of the gaseous impurities. The position of the intake filter must therefore be such as to exclude any contaminants such as carbon monoxide from compressor motor or other sources from the intake air. This can be done on internal combustion engine powered compressors by means of a flexible intake snorkel 3 - 5 metres long. Electrically driven compressors may not need this if they are in a well ventilated place with good quality air.
- b) From the intake filter, the air then enters the first stage cylinder (item 2) and is compressed to approximately 6.5 bar and then passes through an inter-stage cooler (item 5) which cools the air back to nearly ambient temperate The air then goes to the second stage (item 3) which compresses it to approximately 42 bar. Each stage is protected by a safety valve (item 8) which is normally fitted between stages in the main flow path – as can be seen on the diagram.
- c) After compression in the second stage, the air passes through another inter-stage cooler (item 6) and on to the first intermediate separator (Item 11) which separates condensate droplets by means of a sintered metal filter. The air then enters the third stage (item 4) and once again it is compressed, this time to a pressure of approximately 260 bar. The now very warm air then goes through the final cooling coil (Item 7) or After-cooler, which reduces the temperature to within about 10°C of the ambient inlet temperature.
- d) The cooled high pressure air then passes through a water separator (item 12, left side) and past the final pressure safety valve (item 10). The air is by this stage free of liquid water, and passes through a filter cartridge (item 13) which is filled with activated charcoal to remove oil vapour, and molecular sieve to dry the air.
- Each of the filters and separators is fitted with a drain cock (item 14) which enables the condensed mixture of oil and water to be drained, either manually or automatically.
- e) The clean, dry air then passes through a back pressure and non-return valve (item 15). The back pressure valve or pressure maintaining valve is to ensure that the filter system is always filled to at least 70 bar before any air is released into the cylinders to be filled. This ensures that more moisture is condensed and separated mechanically which prolongs the life of the drier cartridges and protects the storage cylinders. When the back pressure valve opens the clean, dry air is released into the distribution system.
- Note: It is important for the final safety valve (item 10) to be upstream of both the filter system and the final pressure gauge (item 18) so that in the event of the filters becoming blocked due to overload or lack of maintenance, the safety valve will always protect the system.
- f) At minimum, the distribution system consists of a filling valve (item 17) and a final pressure gauge (item 18). Commonly an air bank and filling panels containing multiple filling cocks and valves are incorporated.
- g) If there is an option of high and low pressure filling connections there will be a pressure selection or change-over valve (item 19) and another safety valve (item 20) on the low pressure line to ensure that lower pressure cylinders can not be overfilled.
Air flow through a 4-stage compressor
[edit | edit source]The air path in a 4-stage compressor is much the same. See figure.
- 1 Intake filter
- 2 Inter-cooler 1st/2nd stage
- 3 Inter-cooler 2nd/3rd stage
- 4 Inter-cooler 3rd/4th stage
- 5 After-cooler
- 6 Intermediate separator 2nd/3rd stage
- 7 Intermediate separator 3rd/4th stage
- 8 Oil and water separator
- 9 Filter
- 10 Pressure maintaining valve
- 11 Non-return valve
- 12 Filling valve
- 13 Condensate drain valve
- 14 Safety valve – 1st/2nd stage
- 15 Safety valve – 2nd/3rd stage
- 16 Safety valve – 3rd/4th stage
- 17 Safety valve – final pressure
- 18 Pressure gauge, Filling pressure
- 19 Pressure gauge, Delivery pressure
Filtration
[edit | edit source]In order to reduce impurities to the permitted levels a the air is processed at several stages.
Solid contaminants are prevented from entering the compressor by filtration at the intake.
First there may be a suction strainer, which, on a portable compressor, is mounted on the end of a long hose at least 2m off the ground. It is an extremely coarse filter but the ambient air well above the ground is less dusty and less likely to draw in exhaust gases from vehicles or the compressor's own engine exhaust. To further minimise this source of impurity it is desirable to lead the inlet pipe upwind of the compressor and aim the exhaust downwind.
Second is a pleated paper dust filter similar to those used on car engines, and filtering down to the same level of efficiency, about 5 micron. Unlike the car engine, the intake side of the filter is O-ring sealed to the intake hose to ensure that exhaust gases cannot be sucked in at this point.
Third. Water is separated after compression by condensation and
Fourth are water traps which coalesce and remove condensed droplets
Fifth is a particle filter to remove solid particles
Sixth. Oil contaminants generated inside the compressor are filtered out of the compressed air by adsorption on filter material
Seventh. Water vapour is reduced to acceptable levels by filter material
- 1 Filter inlet
- 2 Jet pipe
- 3 Filter head
- 4 Final pressure safety valve
- 5 Housing
- 6 Chamber separator
- 7 Cartridge
- 8 Filter outlet
- 9 Pressure maintaining valve
- 10 Condensate drain tap
- 11 Condensate outlet
Condensate drain
[edit | edit source]The condensate produced by cooling after the compression process has to be drained regularly by means of the condensate drain valve
- before start-up of the compressor unit
- during operation every 15 minutes, at high humidity every 10 minutes.
Typical configuration of a portable compressor
[edit | edit source]Typical installation of a stationary compressor with filling panel and storage banks
[edit | edit source]-
 A small stationary installation with Bauer Mariner II, filling panel, water bath and storage bank. (the storage cylinders were spares intended for a diving bell and would not normally be yellow and grey)
 -
 A Bauer Mariner II high pressure breathing air compressor stationary installation at a private filling and gas blending facility
 -
 Small Bristol compressor stationary installation


Module: Practical operational hints
[edit | edit source]This section is not required knowledge and will not be assessed, but is included as the operator may find it useful in practice. Suggestions provided here are superseded by the manufacturers operating manual which should be considered the authoritative work on the subject.
The authors accept no responsibility for inappropriate use of the information in this module.
Assessing the performance of the compressor.
[edit | edit source]Most things that go wrong with a compressor reduce the air output. If left uncorrected they will get worse. A performance test will check almost everything at the same time. If a problem is detected refer to the section on troubleshooting or call your maintenance technician.
- Calculate your optimum time in advance as follows :
- Check the volume (water capacity) of the cylinder, this is V
- Measure the residual pressure, this is P1
- The compressor nameplate will give the Free Air Delivery (FAD), this is Q
- Do not use the "suction capacity” or “piston displacement" figures if given. These will always give an incorrect result, as they do not take dead volume into account.
- Do not fill the cylinder at a rate of more than about 5 bar per minute. If the FAD will fill faster than this fit cylinders to multiple filling hoses and equalise the pressures. This will prevent excessive heating and give a more accurate result. Use the sum of the cylinder volumes for V
- Choose a fill pressure that is compatible with all the cylinders used in the test, and close to the rated pressure of the compressor, this is P2
- Calculate the time to fill to the chosen pressure.
- T = V x (P2 - P1)/Q where T is the time in minutes that it should take to fill, and should be somewhere between 30 and 40 minutes. (longer is not a problem, but could be tedious)
- If you are not within 10% of this figure you have a problem developing.
- At altitude use a correction factor for barometric pressure, Multiply your time by the ratio of sea level pressure to actual barometric pressure. This value should be greater than 1 for altitudes above sea level. i.e. the time will be longer.
- Note also that this will be affected by air temperature, and the test should be done when the air temperature is not too far from 20°
- Always take the time from when the safety valve blows and you open the filling valves until the time it blows again. This eliminates the effect of filling the filters of the compressor which will give you too low a reading and cause needless panic. A typical worksheet for the performance test is given in the back of this book. (See appendix D). If there is an electrical shutdown, open the filling valves just below shutdown pressure.
Troubleshooting problems with the installation
[edit | edit source]When a compressor is faulty the operator usually only has one diagnostic instrument to diagnose the fault, namely the final pressure gauge. If there are intermediate pressure gauges for the interstage pressures, they can be used to identify some problems more precisely.
If the motor is started and a graph is drawn of pressure against time, a wealth of information can be gained from this single instrument.
A cylinder should not be connected for this diagnostic test. The pressure must be allowed to build up until the safety valve blows and/or the pressure stabilises.
The electrical shutdown should be disabled for this test, as it is necessary to allow the overpressure valve to blow off.
- Start by releasing all pressure in the delivery line, this can be done by fully opening the filling valve so the air escapes to the atmosphere. When the gauge has dropped and stabilised, close the valve and read off the pressure at roughly 5 second intervals (the exact interval is not important, you want about 20 readings in the time it takes to blow off the safety valve, and the intervals should preferably be reasonably regular. If your first graph is too rough, do it again)
- A simple graph is drawn with pressure on the vertical axis and time on the horizontal axis. Plot your readings and draw a curve through your points. Draw a horizontal line at the working pressure of the compressor according to the manufacturer’s specification or theoretical safety valve setting.
- Compare your graph against the examples given on the following pages.
- The graphs are for a safety valve setting of 250bar, which is reasonable for a charging pressure of 232 bar, as is commonly required. This will differ according to the compressor and installation requirements.
-
 Graph 1. Normal operation. The rate of pressure rise (time scale) will depend on the compressor and details of the installation, such as filter volumes and pipe lengths. It will also be affected by air temperature and altitude (barometric pressure). The time to blow-off should be measured occasionally and logged for comparison.
 -
 Graph 2. Pressure hardly rises at all: Major leak: Check drain cocks, check if there is a filter cartridge in the housing, check for broken or disconnected intercooler pipes.
 -
 Graph 3: Backpressure valve leaking or valve absent. Pressure buildup on delivery side of filter is immediate. Water extraction is inefficient and there is a significant risk of condensation in the cylinders. Filter life will be reduced. Repair or install backpressure valve.
 -
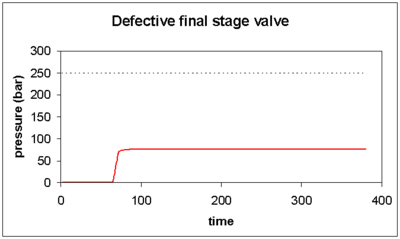 Graph 4: The final stage valves are malfunctioning and the pressure does not rise above about 60 to 80 bar, though there may be no external leaks. This is a serious malfunction and the valves must be repaired.
 -
 Graph 5: A leak on the high pressure side prevents full pressure being reached. The leak is more severe at high pressures, but may close at lower pressures. Check filling valves, pipe joints and filter seals.
 -
 Graph 6: Pressure rises steadily but slowly. Compressor is running at reduced efficiency. There are many possible reasons, including restricted intake air flow, low compressor speed, high altitude, high intake air temperature, faulty 1st stage valves and leaky piston rings. Some of these problems are not serious, but others could be indication of major problems developing.
 -
 Graph 7: Safety valve set too high. The compressor is functioning correctly, but the safety valve must be reset for safety reasons. If there is an automatic electrical shutdown, the overpressure valve should be set to a slightly higher pressure than the mechanical safety valve, or the pressure may be released before shutoff pressure and the compressor will continue to run indefinitely.
 -
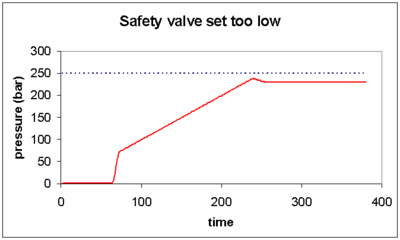 Graph 8: Safety valve set too low. The compressor is functioning correctly, but the safety valve is releasing the pressure below the required value, and it will not be possible to fill to the required pressure until the valve has been recalibrated.
 -
 Graph 9: Sticking pressure gauge: The compressor is performing correctly, but the needle of the pressure gauge rises in steps. This is a fault of the gauge and is not serious as long as it does still move. The readings will be inaccurate, and if the jumps are too big the gauge should not be used for filling lower pressure cylinders.


Diagnostics from intermediate pressure gauges
[edit | edit source]Each intermediate pressure gauge should rapidly build up to working pressure and then remain at that pressure, possibly vibrating slightly as the interstage pressure fluctuates at the frequency of the compressor rotation.
If an intermediate pressure gauge does not build up pressure, there is a leaking exhaust valve on the previous stage, or an external leak.
If the intermediate pressure gauge does build up pressure, but not the full working pressure and the interstage overpressure valve blows off, it could mean that the overpressure valve is faulty.
If the intermediate pressure gauge does build up full working pressure and the interstage overpressure valve blows off, it could mean that the next stage inlet valve is leaking back higher pressure air, and the overpressure valve is protecting the compessor as intended.
Any defect in a lower pressure stage will affect the delivery of all higher pressure stages. Dont assume a problem in a higher pressure stage until the lower pressure stages have been eliminated as the possible cause.
Setting up a compressor in the field
[edit | edit source]General principles:
[edit | edit source]- Keep compressor cool.
- Ensure that intake air is not contaminated.
Site preparation
[edit | edit source]- a) Unload the compressor. Keep it as level as possible. The oil should stay in the sump.
- b) Check for any transport damage. Fan guards can get bent, and loose spanners and things can fall into the moving parts.
- c) Find a piece of firm, well ventilated, ground which is reasonably level and in the shade.
- d) Start looking downwind of the camp so that the exhaust fumes and noise are earned away from the camp on the wind. To avoid annoying anyone else you may have to take a campsite downwind of everybody else, but take care not to go downwind of any source of contamination.
- e) Rotate the compressor until free access to the controls is obtained. It must also be at least half a metre clear of any large obstruction to allow cooling air to flow freely.
- f) The engine exhaust must be downwind and the intake snorkel led upwind.
- g) Support the primary intake filter on the end of the hose so that it is at least 2m off the ground, facing upwind, and bent over or sheltered so that rain cannot fall into it.
- h) Organise your site: Prepare your equipment:
- i) Test pressure gauge.
- ii) Filling adaptors from A clamp to DIN thread or vice versa if applicable.
- iii) Compressor filling log book and pen
- iv) Operator’s manuals for motor and compressor should be on site
- v) Tool kit
- vi) Spares box
- vii) Gas test kit with range of tubes
- viii) Fire extinguisher
- ix) Masking tape and marking pen
- x) Arrange your "traffic pattern" by marking areas for storing full and empty cylinders
- xi) Have tarpaulin available to provide shelter in case of rain.
- xii) Clear the area of fire hazards, and place the spare fuel, funnel, engine and compressor oil in the shade.
- xiii) Now start logging the cylinders to be filled. You must get the information required in SANS 10019 but may also want additional information such as:
- i) size of cylinder (water capacity)
- ii) running hours of compressor
- iii) Charges for filling
- iv) Whether filling fees have been paid
Pre-start checks
[edit | edit source]- a) Fill the fuel tank. If you do this first and spill a bit, then it will evaporate while you are busy with the rest of the checklist. For safety reasons the fuel tank should be empty during transport. Make sure you pick up the right can and don't fill a pertol engine with diesel or paraffin!
- b) Check the compressor oil level. Dipstick must be pushed/screwed all the way in and the level should be between the marks. Do not overfill. If it needs topping up make sure you use compressor oil not engine oil. If very low, suspect loss during transport (check the air filter).
- c) Check engine oil level - top up if necessary with engine oil, usually till it nearly overflows when level - and refit cap.
- d) Pull starter cord slowly to make sure everything is rotating freely. Check drive belt condition and tension.
- e) Record running hours or start time and cross check with time for next service.
- f) Open all filter drains.
- g) Turn ignition switch or cut-out to "on" position
- h) Open fuel tap .
- i) Pull choke out if engine is cool. If in doubt leave it in and try without it first.
- j) If throttle is adjustable set to "start" position.
Start up
[edit | edit source]- a) Brace yourself against the compressor frame and pull starter cord firmly and vigorously.
- The engine should fire immediately and within seconds a loud knocking sound should be heard on Bauer compressors. Ignore it. If however the engine does not start, try not more than twice more before moving on to "Trouble Shooting".
- Mindless repetitive pulling of the cord creates more problems than it solves.
- b) Within 30 seconds of start-up the engine will develop an uneven rhythmic beat, indicating that the choke is no longer required. Push it in slowly.
- c) Close the drain cocks and on Bauer compressors listen for rattling noise to stop. This should be within 30 seconds.
- d) Allow motor to warm up for another 30 - 60 seconds depending on ambient conditions.
- e) Check oil flow in bypass tube or oil pressure on gauge (if fitted).
- f) Close filling cocks
- g) Watch for "jump" on final pressure gauge as back pressure valve opens.
- h) Watch final pressure rise smoothly until safety valve blows at about 10% above working pressure. Pressure will then drop slightly and remain steady. Leave machine running against safety valve.
Starting to fill
[edit | edit source]- a) Check residual pressure in cylinder first with test gauge.
- b) Fit filling adaptor if needed.
- c) Connect filling hose.
- d) Check that cylinder valve reserve lever(if fitted) has been pulled all the way down.
- e) If compressor is fitted with multiple filling pressure capabilities, check correct filling pressure has been selected on control valve.
- f) Open filling valve, but keep cylinder valve closed so the hose is pressurised and all seals in the system are subject to full working pressure.
- g) Listen carefully for leaks.
- h) Open cylinder valve slowly. Listen to air decanting. It is not necessary to open valve fully.
- i) Watch pressure gauge needle drop smoothly to pressure measured in step (a)
While filling
[edit | edit source]- a) Drain condensate every 10 - 15 minutes, 15 in dry winters,10 in hot summers. Try to do this just after you have changed cylinders, so you are wasting air at a lower pressure.
- b) Keep an eye on pressure gauge to ensure that the air pressure is rising steadily, and listen for leaks: the sound is distinctive and can usually be heard above the noise of the compressor and motor. Leaks may be more easily heard a few metres away.
- c) Monitor wind direction to ensure exhaust is still blowing downwind of the intake and that there is no contamination from upwind (dust or exhaust fumes or even odours from garbage or toilets).
- d) Ensure equipment remains in shade.
- e) Monitor running hours to ensure you do not exceed filter cartridge life.
- f) Log cylinders to be filled as they arrive on site and place them in the queue.
Changing cylinders when full
[edit | edit source]- a) Close the cylinder valve. Do NOT over-tighten, as this will damage the valve seat
- b) Pull reserve lever up (if fitted)
- c) Close the filling valve and open the bleed valve.
- d) Leave compressor pumping against the safety valve, it does no harm for a few minutes.
- e) Remove filling connection and adaptor if used, and transfer to next empty cylinder.
- f) Ensure reserve rod, if fitted, is pulled down.
- g) Close bleed valve and open the filling valve
- h) Check for leaks
- i) Open the cylinder valve slowly. If using multiple filling hoses open the cylinder at lowest pressure first and only open other cylinders when pressures are equal. This prevents transfer of air between cylinders and possible contamination.
- j) Remove full cylinders to "full" storage area and enter charging pressure in logbook.
- k) Take next cylinder from "empty" area and start logging its particulars if you have not already done so
Note 1: SANS-10019 states that "if a cylinder is leaking and the leak cannot be stopped by tightening gland nuts, etc., then the cylinder shall be emptied and not refilled until the leak is rectified.
Warning: Most diving cylinder valves do not have gland nuts that can be tightened. The spindles seal internally on "O" rings or other seals which are not adjustable. The valve seals are usually plastic on metal, and can easily be damaged by over-tightening. About all you can do is "crack" the valve to blow out any dirt on the seat and then close again a little, and only a little, tighter than before. Similarly, moving the reserve valve pull rod up and down a few times may affect a seal for a leaking Dräger reserve valve.
A leak at the neck threads can not be serviced on a pressurised cylinder. Attempts to tighten using a wrench or lever while the cylinder is pressurised run a high risk of damaging the thread, either of the cylinder or the valve or both and they may have to be scrapped. This could also lead to catastrophic thread failure, or a claim from the owner for negligent damage to property.
Note 2: Any valve which requires excessive force (more than 3 Fingers on valve!) to open or close it needs a service. Suggest to the owner that he has the valve serviced first and you will fill it later.
Shutting down
[edit | edit source]Before closing down, check the pressure of the first cylinder you filled. As it cooled down it may have dropped unacceptably far below working pressure or be over-pressured. Top up cooled cylinders to appropriate developed pressure to suit the charging pressure and temperature if necessary.
- a) Close valve on final cylinder when full
- b) Close fuel cock
- c) Disconnect and remove cylinder in normal way
- d) Wait for engine to stop
- e) Listen for leaks and track them down with soapy water before continuing
- f) Open condensate drains from lowest pressure to highest, thus preventing carry over of condensate by reversing flow in the pipes.
- g) Allow to cool down completely. Engine exhaust must be cool to touch.
- h) Repair any leaks
- i) Store filling hoses on keepers
- j) Take down snorkel and roll up.
- k) Pack away tools and other loose articles.
- l) Cover installation with tarpaulin against rain wind and dust.
Compressor room requirements.
[edit | edit source]
- The compressor room must be clean, dust-free, dry and as cool as possible.
- Avoid direct exposure to sunlight; if possible, choose south side of building.
- Additional heat producing units or line systems should not be installed in the same room or should be well isolated.
- The floor must be capable of taking the load of the system weight.
- Locate the unit level; refer to technical data for maximum allowable inclination.
- Ensure adequate ventilation. Remember: room temperature = cooling air temperature, min. = +5°C, max. = +45°C.
- If possible install unit in such a manner that the compressor fan can draw fresh air from outside, for instance through an opening in the wall as low as possible.
- Ensure that an adequate exhaust air opening is provided, as high as possible.
- Locate compressor as close to the air intake opening as possible. (Minimum distance approx. 50 cm)
- Locate unit so as to absolutely avoid intake of warm or hot cooling air.
Servicing: Oil and filter changes
[edit | edit source]Oil and oil filter changes.
[edit | edit source]These instructions DO NOT supersede the instruction manual supplied by your compressor’s manufacturer. If there is any contradiction, refer to the official manual.
Oil changes should be done at the running hours specified by the manufacturer. Typically this is around 1000 to 2000 hours depending on the oil and compressor.
First run the compressor to heat up the oil so it flows more easily, then stop the compressor and remove the drain plug and allow the oil to fully drain. Tilt if convenient to accelerate drainage.
If you are going to fill with a different oil it is important to drain very thoroughly as some oils are not compatible. Remove the old oil filter at this time and replace with a new one. Replace the drain plug and fill with the specified amount of fresh oil. Check the level by sight glass or dipstick to be sure that it is correct. If it is a bit high at this stage run the compressor for a short time to prime the filter and oil pump, then re-check the level.
If your compressor has a gear type oil pump it may be necessary to bleed the pump of trapped air, or at least run the compressor for several minutes without load (drains open) to ensure that the new oil is being circulated.
Air filter changes and media repacking:
[edit | edit source]Some filters are only suitable for cartridges supplied by the manufacturer. These should simply be changed according to the manufacturer’s instruction at the correct interval, or when they reach the specified saturated mass.
Other filters may be repacked using bulk filter media by the user.
If the media are identical to those previously used, the useful life will be the same, but if for some reason a change is made, and different media are used, for example grain size is different, or the brand is changed, then tests of air quality should be done at more frequent intervals than normal to calibrate the new media.
When packing filters it is important to avoid channelling, where the media may form a channel of least resistance and the gas passes through this without being properly filtered. To avoid channelling many filters have a spring loaded pressure pad, so that as vibration consolidates the media, the spring takes up the gap and keeps the media compressed. If there is no spring, then the media should be consolidated by tapping the container during the filling process, to ensure that it packs closely and leaves no gaps. Channelling is also less likely if the filter is mounted vertically, as is usually the case.
Be sure to pack the filter with all the required pads, perforated plates, springs and clips that are required, and put the media in to the correct depths or masses and in the order specified by your manual.
Before re-assembly check all O-rings and threads are clean and in good condition.
Log the filter change and the running hours at which it was done so that it is clear to all operators when it was done, and note the expected running hours for the next change.
After repacking and/or installing the new cartridge, reassemble the housing, start the compressor and check for leaks.
Filter Maintenance (Bauer Triplex).
[edit | edit source]- a) Depressurize system before starting any maintenance work. Wait until the pressure on the gauge has dropped to zero before opening the filter housing.
- b) Dry inside of filter housing with a clean cloth and check for corrosion before installing new cartridge. Replace any defective parts.
- c) Lubricate threads and O-rings as well as threaded part of cartridge with white petrolatum (DAB 9) or Never-Seez White. Apply sparingly.
- d) Observe number of operating hours/no. of bottle fillings to ensure paying exact attention to the maintenance intervals.
- e) Leave a cartridge in the filter when the unit is out of service, so that humidity entering the system is absorbed.
- f) Change the cartridge before reactivating a compressor unit which has been out of service for more than 6 months.
- g) Keep all condensate drain valves and shut-off valves closed. Keep a minimum pressure of approx. 50 to 80 bar (700 to 1,100 psig) within the system to prevent moisture entering the compressor piping and filter system.
Oil and water separator maintenance (Bauer)
[edit | edit source]The sintered filter micro--cartridge requires periodic cleaning. See maintenance intervals.
Removal of the sintered filter element (see illustration):
- a) Remove tube connected to the non-return valve (2).
- b) Unscrew the filter head (3) and remove.
- c) Unscrew micro-cartridge (1) from filter head (3).
- d) Remove centre-screw (4) to remove filter elements.
- e) Clean sintered filter elements using hot soapy water and blow dry with clean compressed air.
- f) Re-assemble in reverse order.
Conducting air quality tests
[edit | edit source]Any appropriate method may be employed, provided it conforms with the general requirements:
- 1) for measuring and assessing results. The accuracy of the method shall be taken into consideration; and
- 2) the detection limit of the method employed shall be below the required limit value. (this means the method used must be able to detect the impurity reliably at the limit value)
Frequencies for monitoring impurities in compressed air for breathing as required by SANS 10019:
[edit | edit source]- 1) Monthly measurements of lubricants, CO2 and CO from the compressor should be made with indicator tubes or other analysis equipment. Where equipment is used infrequently, such as only for one or two days a week, the period may be extended but should not exceed three months. This will include mobile compressors.
- 2) If synthetic lubricants are used additional tests should be carried out at initial commissioning, after major overhaul, and at six monthly intervals, with equipment that can detect hazardous constituents of the lubricant and its breakdown products.
Monitoring:
[edit | edit source]An employer or user shall ensure that the measurement programme for the impurities in compressed air for breathing, received from a compressor and to which a person can be exposed, is carried out by an approved inspection authority or by a person whose ability to do the measurement is verified by an approved inspection authority.
However, there is nothing to stop you from conducting your own tests at other times, even if you are not approved, if you want to be sure of air quality for any reason.
Results:
[edit | edit source]The results of the official measurements must be made available for perusal to an inspector of the Department of Labour or a user on request. Any additional tests beyond those required by SANS 10019 are your own.
Methodology:
[edit | edit source]


The procedure described here applies to the popular Dräger detector tubes used with the Dräger Simultan test equipment. This equipment is not difficult to use, but in order to ensure reliable results, it must be used exactly as specified.
Principle of operation
[edit | edit source]The principle of the Dräger detector tube is that a specified volume of gas at atmospheric pressure is passed at a specified rate through a tube which contains a chemical reagent which changes colour when exposed to the specific impurity it is intended to test. The colour change and length of tube contents affected are proportional to the amount of impurity that has been exposed to the reagent.
By comparing the exposed tube with a standard scale the concentration of the contaminant can be determined. Accuracy is claimed by the manufacturer to be within 15% of nominal.
Description of Apparatus
[edit | edit source]The equipment comprises a regulator which is set to a specified discharge pressure, which supplies gas to a manifold with a series of precisely calibrated orifices.
These orifices are sonic, or choked orifices, and they deliver a flow rate which is dependant on only the upstream pressure, so it does not matter whether there are tubes attached downstream of the orifices, the flow through each orifice will be correct as long as they are not blocked by contaminants.
Procedure
[edit | edit source]The regulator should preferably be attached to the filling system directly, and the air to be tested should come from the compressor only (not banks). If there is more than one compressor in the system each one should be tested separately.
If it is not possible to test air directly from the compressor, it is possible to get a reasonable result from a cylinder filled from that compressor, but the cylinder must be clean or it may contaminate the air to be tested, which might then show more contaminants than the compressor actually delivers.
It is suggested that the detector tubes be digitally photographed along with the calibration cards after the test, so that the raw results can be kept for future reference, as well as the interpretation of the results. Log this information in your compressor log. It may be worth having the report countersigned by a witness who was present and observed the test.
A series of such tests can help you calibrate filter life after changing to a different brand or type of filter medium. This should be done for at least two filter changes on the new medium to ensure that the results are reliable.
Note that this does not replace the tests that must be done by an approved agency or verified person, unless you are verified for this purpose by such an agency.
Sources
[edit | edit source]- Anthony, T G & Clarke, P R. 2006. HSE Research Report 427: Moisture levels in compressed breathing air. 2006, Sudbury, Suffolk; Health and Safety Executive
- Catalina Cylinders. Technical Support document: Crown Markings of a Standard SCUBA Cylinder. October 4, 2001
- Catalina Cylinders. Technical Support document: Cylinder Cleaning. August 20, 2001
- Catalina Cylinders. Technical Support document: Serial Number Prefixes of SCUBA Cylinders. February 20, 1998
- Catalina Cylinders. Technical Support document: Thread and neck inspection Criteria for SCUBA Cylinders. April 10, 2006
- Catalina Cylinders. Technical Support document: Valving of SCUBA (Air) Cylinders. November 11, 2005
- Federal Register, Volume 71, No. 167, Tuesday August 29, 2006 pp51122-51129 Department of Transportation Pipeline and Hazardous Materials Safety Administration, 49 CFR Parts 173 and 180, RIN 2137-AD78 Hazardous Materials: Aluminum Cylinders Manufactured of Aluminum Alloy 6351-T^ Used in SCUBA, SCBA and Oxygen Services – Revised Requalification and Use Criteria
- HSE Diving Information Sheet no. 9. Divers’ breathing air standard and the frequency of tests. June 2006, Sudbury, Suffolk; Health and Safety Executive
- Harlow, V. Vance Harlow’s Oxygen Hacker’s Companion, 4th edition. 2001, Warner, New Hampshire; Airspeed Press
- Harlow, V. Vance Harlow’s SCUBA Regulator Maintenance and Repair, 1999, Warner, New Hampshire; Airspeed Press
- International Organisation for Standardization, 1997. ISO 13341 First Edition 1997-10-15, Transportable gas cylinders- Fitting of valves to gas cylinders
- SANS 10019:2011 Transportable containers for compressed, dissolved and liquefied gases — Basic design, manufacture, use and maintenance. 2011 Pretoria; Standards South Africa.
- SANS 289:2006 Labelling requirements for prepackaged products (prepackages) and general requirements for the sale of goods subject to legal metrology control. April 2006, Pretoria; Standards South Africa.
- SANS 458:2005 Tolerances permitted for the accuracy of measurements of products (including prepackaged products) in terms of legal metrology legislation. 2005, Pretoria; Standards South Africa.
- SANS 1825:2005 Gas container test stations – General requirements for periodic testing of portable and transportable refillable gas containers. 2005, Pretoria; Standards South Africa.
- South Africa. 1973. Trade Metrology Act, No. 77 of 1973. Pretoria, Government Printer.
- South Africa. 2004. Department of Labour. Pressure Equipment Regulations 2004. Regulation 1088 of 2004. Regulation Gazette No. 8057, Vol. 471 Pretoria 17 September 2004 No. 26794; Government Printer.
- South Africa. 1987. Department of Labour. Environmental Regulations for the Workplace 1987. Regulation 2281 of 1987. 16 October 1997 Pretoria; Government Printer.
- South Africa 1988. Department of Labour. Driven Machinery Regulations, 1988. Regulation 1031 of 1988. 26 February 1988. Pretoria; Government Printer.
- South Africa. 1993. Occupational Health and safety Act, No. 85 of 1993. Pretoria, Government Printer.
- South Africa. 1993. Compensation for Occupational Injuries and Diseases Act, 1993. Pretoria, Government Printer.
- South Africa. 1996. Department of Labour. General Safety Regulations 1996. Regulation 1591 of 1996. 30 May 1986 Pretoria; Government Printer.