Visual Basic/Introduction
Getting to know the VB6 IDE[edit | edit source]
The VB6 IDE (Integrated Development Environment) is among the easiest and most fully featured IDEs available for any programming language. One major thing which is far easier in VB6 than most other programming IDEs is GUI design.
Feel free to explore and experiment with the IDE. Its not easy to "break" anything in it, so have at it!
Overview of the IDE[edit | edit source]
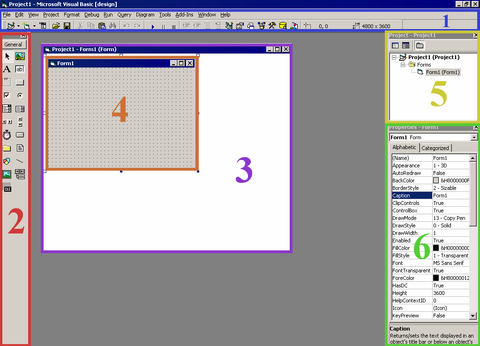
- Menu bar: This section contains a wide variety of options for customizing the IDE and modifying your program.
- Toolbox: This window contains objects you may place on a Form or UserControl.
- Object Window: This window may contain a graphical object such as a Form or UserControl.
- Graphical object: This is the object which represents what your program will look like. In this screenshot it is a Form called by the default name "Form1".
- Project toolbar: This is the place from where you navigate to different files in the project.
- Properties window: Here, you change the different properties of objects and controls.
Setting up the IDE[edit | edit source]
Don't allow sloppy coding[edit | edit source]
- Click on Tools->Options
- Check "Require Variable Declaration"
- Click on the "Environment" tab
- Select the option button which says "Prompt to save changes"
- Press "OK"
Get rid of silliness[edit | edit source]
On the bottom-right of the IDE, close the "Form Layout" pane because it is pretty much useless.
Access to handy functions[edit | edit source]
- Right-click somewhere on the toolbar and click on "Customize..."
- Click on the "Commands" tab
- Under "Categories", select "Edit"
- Scroll down to about the middle of the "Commands" box until you can see "Indent", "Outdent", "Comment Block", and "Uncomment Block". Drag all of those items to your toolbar, putting them in order, right next to the "Start", "Pause", and "Stop" buttons.
- Press "Close"
You can now use these commands by selecting a block of text in your source code then hitting one of these commands to do the specified function on the whole block of code. Handy.
Changing Properties of Objects[edit | edit source]
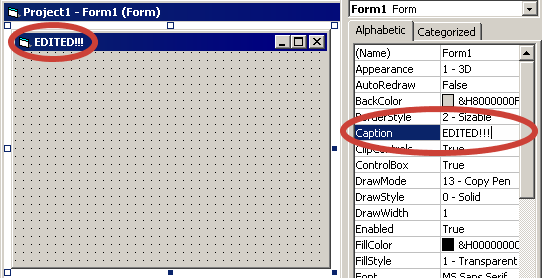
If you click on an object on your form, or even the form itself, you gain access to the properties of that item and change them in the properties pane on the right side of the screen.
Underlined letters[edit | edit source]
When you press the [Alt] button in many programs you're shown little lines underneath certain letters of menu items. If you then press on your keyboard a letter which corresponds to one of the underlined letters then that menu item is selected.
In VB6, to get that functionality all you have to do is place an ampersand (&) before the letter you want to be underlined and functional in this way.
This functionality exists in:
- Primary Menu items
- Secondary menu items
- Command buttons
Deleting a picture or icon property[edit | edit source]
If the Picture or Icon property of an object has been set, it may be un-set by going to the corresponding property and pressing the [Delete] key..
Controls & UserControls[edit | edit source]
All of the small icons on the left-hand of the screen, in the toolbox pane, represent Controls or UserControls which you can place in a program. Controls are compiled objects which reside in external OCX or DLL files. UserControls are objects inside of your project which reside in CTL files.
These objects may be a wide variety of different things, but they're usually graphical elements like TextBoxes, ListBoxes, CheckBoxes, and everything else you interact with in a graphical program. These objects may also be invisible items which provide functionality on a purely functional level like Winsock (Network connectivity), Timer (Code execution timing), MSInet (Web and FTP connectivity).
Placing controls on a form[edit | edit source]
- Left-click on the box representing the control you want in your program (Example: TextBox)
- Left-click and drag from one spot to another on "Form1", then release.
- Most controls will appear on "Form1" as the same size as the box you laid out with your click-and-drag.
- Some controls will remain a fixed size no matter what.
- Some controls will snap to different intervals of length/width.
Importing extra controls[edit | edit source]
If you want to use a control which is not included in VB6's "Standard EXE" toolbox of 21 controls, you'll need to import them like this:
- Right-click somewhere in the toolbox, and select "Components"
- In that window you can select an OCX file which contains controls you can add to your form
- If the control you're looking for isn't on the list then you can try to find it by clicking "Browse..." and finding the OCX file manually
- Sometimes OCX files are given the extension DLL when the file is a DLL which includes OCX data inside it
Running A Program[edit | edit source]
Take a look in the menu item "Run".
You will find that:
- Pressing "Start" in that menu, pressing the "Play" button, or pressing F5 on your keyboard will run your program
- Pressing "Break" in that menu, pressing the "Pause" button, or pressing Ctrl+Break on your keyboard will pause your program
- Allows you to edit your program while you're running it (AWESOME! Spoilage factor here versus every other programming IDE)
- Pressing "End" in that menu, or pressing the "Stop" button will stop your program
Stopping A Program[edit | edit source]
When you are done testing your application, you will want to close it. There are several ways to accomplish this.
- If at all possible you should close your application by pressing the "X" button on the top-right of the window of an application, or using the keystroke Alt+F4. This is a "clean" termination of the program.
The following options should be used only in the case that your program has stalled and you cannot close it by pressing Alt+F4 or the "X" button on the program's window. In all of these options there is a chance of causing a memory leak, which renders some space in your computer's memory unusable until the next time you reboot the computer.
- If the VB6 IDE is still responsive: Press the "Stop" button located beside the "Play" and "Pause" buttons in the VB6 IDE.
- If the VB6 IDE is no longer responsive: Press Ctrl+Break to Pause the program's execution.
- If Ctrl+Break doesn't work: Try to end VB6.exe via the windows task manager.
- If none of that works: Time to restart the computer and go fix that horrible bug in your program!
Compiling A Program[edit | edit source]
You must be using a full, retail copy of Visual BASIC. The Learning Edition will not compile to EXE
- In the VB6 IDE, press File->Make ProjectName.exe, select a location and filename you would like your program to have and VB6 will create that EXE for you simply and very easily.
The process in which source code is converted into EXE is called "compiling", and is far more simplified in VB6 than a language like C++.
In order for your program to run on any given computer, that computer must have all of your program's "dependencies". All programs written in VB6 will require the Visual Basic 6 Runtime Library (msvbvm6.dll). Happily: Windows XP had the VB6 runtime library ever since first release, so if you make a VB6 program with no extra dependencies, it will work on Windows XP.
Prior versions of windows, however, did not come with the VB6 runtime preloaded, and will require it to be installed if it hasn't yet been installed.
If your program requires any extra DLL or OCX files in order to work, those are now dependencies of your program which you will need to supply to anyone you want to send your program to. For maximum portability it is a good idea to rely on functionality you implement in your own program. If you're lucky, you can opt for implementing the CTL source code file from an OCX into your program if the OCX is open-source and was written in VB6.
Getting into the source code[edit | edit source]
You may access source code related to any visible object in the object window, including Forms, Controls, UserControls, CommandButtons, TextBoxes, etc.
There are multiple ways to do this:
- Right-click anywhere on a graphical object and select "View code"
- Double-left-click on the object
- Right-click on the object you would like to see the source code to in the Project Explorer window and select "View code"
After you do one of those you should see something like the following:
Option Explicit

Private Sub Form_Load()

End Sub
This is the current source code behind the object you selected. In this example, your cursor is currently between "Private Sub Form_Load()" and "End Sub" because the object you double-clicked on was a "Form" and the default subroutine for the IDE to bring you to if there is nothing yet coded for that object is "Load()".
You can change which subroutine associated with "Form" you want to look at by clicking somewhere inside the "Form_Load" routine, then selecting one of the options inside the combo-box on the top right of the window you're in.
Setting project properties[edit | edit source]
- In the top menu click on Project » Project1 Properties
Search through this dialog. Learn its options. Set the values inside.
Your first VB6 program[edit | edit source]
A traditional first application in any programming language will be something which somehow displays "Hello world!". So, that's what we're going to do, but I'm gonna make it complicated for you. Start a new project, get into the source code, select all of it, and replace it with this:
Private Sub Form_Load()
    MsgBox "Hello World"
End Sub
Now press the "Run" button or [F5] to run the program. It will show you a message box which says something like:
Hello World
| Learning Visual Basic |
| Previous: (none) — Next: Visual Basic/Variables and Types |

